
Looking for easy card sketches to jumpstart your creativity? At The Stamp Camp, you’ll find printable card sketches for crafting designed to inspire your own unique card layouts. These creative card sketches don’t include measurements, giving you the freedom to experiment with different sizes, layers, and designs. Each sketch is a starting point to spark new ideas and help you craft beautiful handmade cards with confidence. Download and print your favorite easy card sketches from The Stamp Camp and let your creativity take the lead!
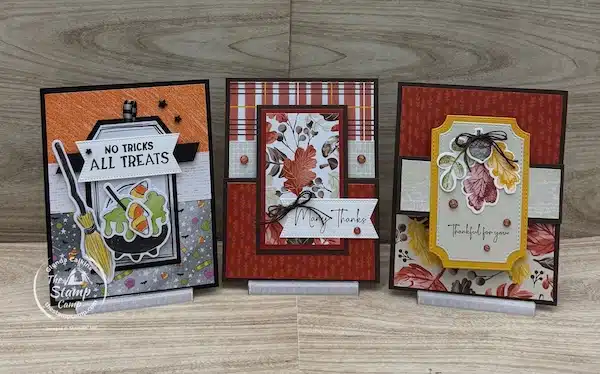
Today’s easy card sketch has endless creative possibilities! The three cards I’m sharing are just the beginning — truly the tip of the iceberg. At first glance, each card might look similar, but take a closer look and you’ll see how small changes — like the width of the Designer Series Paper or the focal elements — make each one unique. That’s the beauty of creative card sketches like this! Ready to explore all the possibilities? Let’s get started with Card Sketch #26 from The Stamp Camp.
Keep Your Sketches Organized
If you haven’t already, make sure to download and print the sketch so you can use it as a handy tool in your craft room. I recommend keeping a 3-ring binder and some clear page protectors nearby — print each of your favorite sketches and slide them inside the protectors. This way, you’ll have an organized reference book ready whenever inspiration strikes.
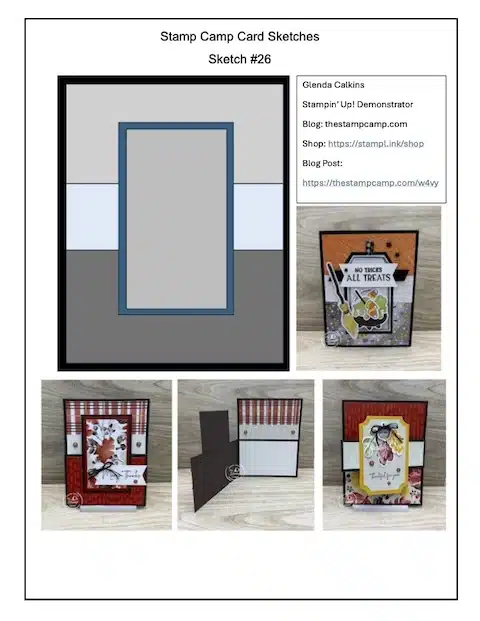
To download and print Sketch #26 Click HERE
To download and print Sketch #25 Click HERE
To download and print Sketch #24 Click HERE
To download and print Sketch #23 Click HERE
To download and print Sketch #22 Click HERE
To download and print Sketch #21 Click HERE
To download and print Sketch #20 Click HERE
To download and print Sketches #11 – #20 Click HERE
To download and print Sketches #1 – #10 Click HERE.
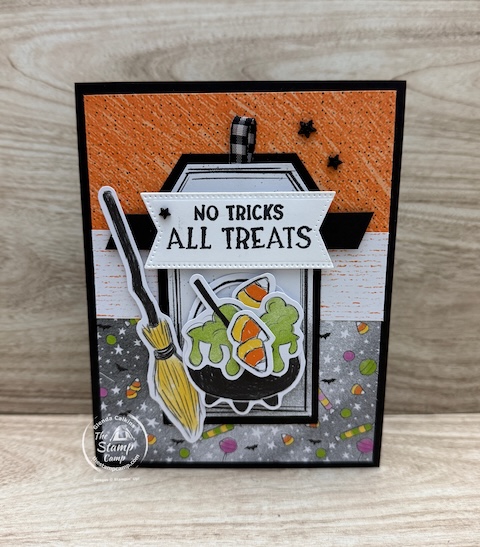
Card #1 features the Spooky Sweet Designer Series Paper and makes the perfect Halloween card! This simple layout from today’s easy card sketch comes together in minutes — quick, fun, and stress-free. With the two sheets of die cuts included in the paper pack, creating the focal point for your card front couldn’t be easier. It’s a great example of how The Stamp Camp’s card sketches can help you make eye-catching designs without extra effort.
Let’s take a look at the measurements for Card #1 from today’s easy card sketch.
-
Card Base: Basic Black – 5-1/2″ x 8-1/2″, scored at 4-1/4″.
-
Designer Series Paper (Spooky Sweet):
-
Top strip – 2″ x 4″
-
Center strip – 1-1/4″ x 4″
-
Bottom strip – 2-1/4″ x 4″
-
Tip: Attach the top and bottom strips first, then add the center strip to neatly cover the edges.
The tag on the card front is one of the die cuts from the Spooky Sweet Designer Series Paper pack. I matted it with Basic Black cardstock (2-1/4″ x 3-7/8″) and trimmed the top edges on an angle to match the tag shape.
The sentiment was stamped on Basic White cardstock and die cut with the Stylish Shapes Dies. Behind the sentiment, I added a 1/2″ x 4″ strip of Basic Black, trimming both ends on an angle for extra detail.
For the focal elements, I used die cuts from the paper pack — the witch’s broom, bubbling pot, and candy pieces. To finish it off, I added a few black shimmer foam stars for a touch of sparkle.
This easy Halloween card design is quick to assemble and shows just how versatile The Stamp Camp’s card sketches can be — simple, stylish, and full of possibilities!

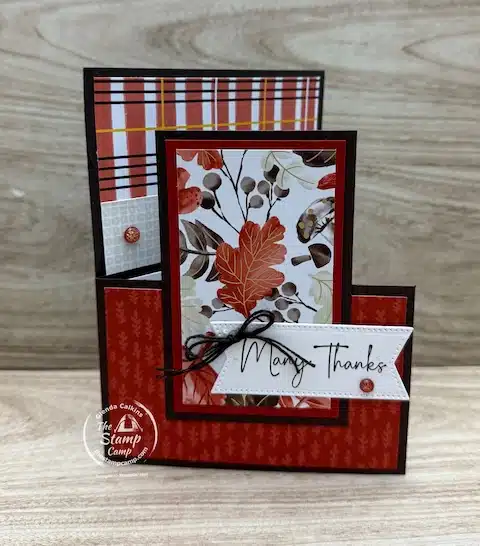
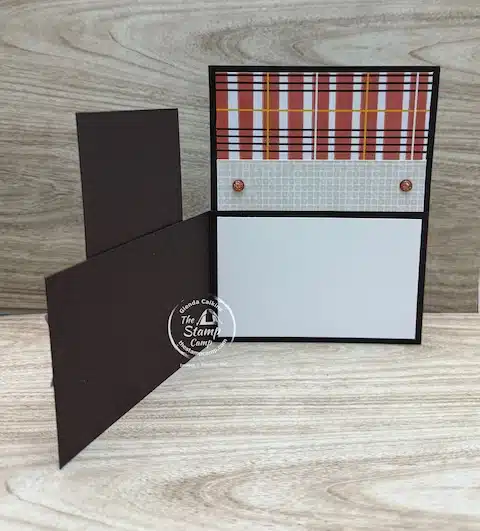
Card #2 is one of my illusion-style cards — it may look like a solid front at first glance, but there’s a clever twist! The bottom portion flips open like a regular card, while the top portion is hidden inside, creating a fun surprise when the card is opened.
This design is a simple yet striking way to add an interactive element to your card without making it complicated. It’s a perfect example of how an easy card sketch can be adapted into something unique and eye-catching.
In this photo, you can see how the card opens. The focal point on the card front is attached to the bottom portion, which flips open like a standard card. What initially looks like the top section of the card is actually hidden on the inside panel, creating a fun illusion when the card is opened.
This clever design shows how a simple layout from an easy card sketch can be transformed into something interactive and unique.
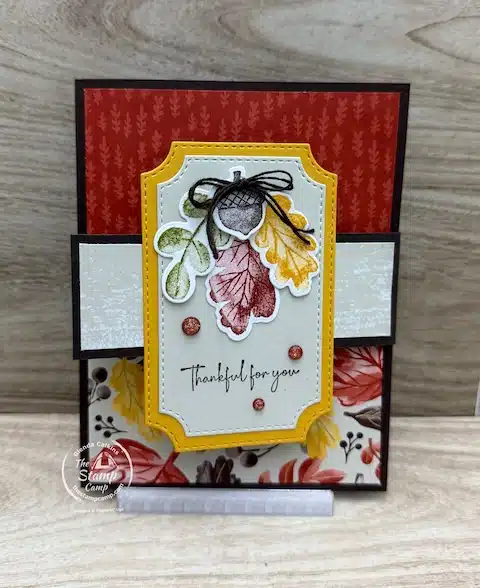
For Card #2, I used the Gathering Together Specialty Designer Series Paper along with the coordinating Gathering Moments sentiment for the card front, die cut using the Stylish Shapes Dies. I added a double bow with Early Espresso Thread and finished the card with a few Cajun Craze and Gold Dots for extra detail.
Here are the measurements for this easy card sketch:
-
Card Base: Early Espresso – 4-1/4″ x 5-1/4″
-
Opening “Card” Feature: 2-3/4″ x 8-1/2″, scored at 4-1/4″
-
Designer Series Paper on Card Front: 2-1/2″ x 4″
-
Matted DSP for Focal Point: 2″ x 3-1/2″
-
Cajun Craze Mat under Focal Point: 2-1/4″ x 3-3/4″
-
Final Mat (Early Espresso) under Focal Point: 2-1/2″ x 4″
-
DSP Strips Inside (Top to Bottom): 1-3/4″ x 4″ and 1″ x 4″
-
Basic White Panel for Sentiment or Writing: 2-1/2″ x 4″
This layout shows how versatile a simple easy card sketch can be — with layered mats, coordinating DSP, and a fun interactive fold, you can create a card that’s both elegant and engaging.
Card #3 may look very similar to Card #1 at first glance, but it’s another example of how appearances can be deceiving! This is a fun illusion-style card with two interactive openings. The first is a flip-out arm on the front, and the second opens like a regular card, revealing the inside panel.
This clever design is a great demonstration of how a simple easy card sketch can be transformed into something surprising and engaging. With The Stamp Camp’s creative card sketches, you can experiment with multiple folds and interactive elements while keeping your cards clean and easy to assemble.
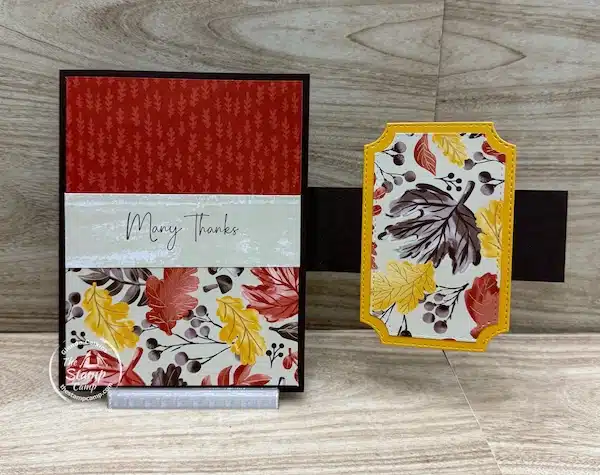
For Card #3, I used the Gathering Together Specialty Designer Series Paper and incorporated the Gathering Moments Bundle for the leaves, die-cut with the coordinating dies. The sentiment is also from the bundle. To add extra detail to the focal point, I brought in the new Branching Out Dies — because who doesn’t love a good framelit? These dies are a must-have for any crafter’s toolkit.
The flip-out arm on the card front holds the focal point with the sentiment and leaves. When you open this arm, you’ll find an additional message inside. To give the inside a polished look, I matted the back of the focal point with more of the gorgeous Gathering Moments Specialty DSP, so the inside flap mirrors the outside design beautifully.
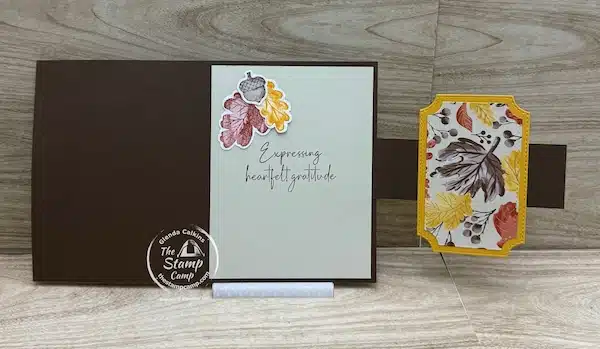
When you open Card #3 all the way, you’ll see the inside stamped sentiment along with a few more of those gorgeous die-cut leaves — the perfect finishing touch!
Here are the measurements for this easy card sketch:
-
Card Base: Early Espresso – 5-1/2″ x 8-1/2″, scored at 4-1/4″
-
Flip-Out Arm: 1-1/2″ x 4-3/4″, scored at 1/2″ and adhered to the inside edge
-
Inside Panel: Basic Beige – 4″ x 5-1/4″; this piece covers the attached arm section so it appears seamless
-
Designer Series Paper (Front, Top to Bottom): 2-1/4″ x 4″, 1-1/4″ x 4″, 3″ x 4″ (attach the center strip last so it fits under the arm mechanism)
-
DSP on Arm Front: 1-1/4″ x 4″
-
Focal Point: Crushed Curry cardstock and Basic White cardstock die-cut using the Branching Out Dies
-
Inside Focal Panel: Designer Series Paper die-cut with the Branching Out Dies, layered onto another Crushed Curry die-cut piece
The arm mechanism is sandwiched between the front and back Branching Out die-cut pieces, creating a sturdy hinge and a clean, professional finish.
This creative card sketch is a great reminder that even small changes—like adding an interactive arm or layering coordinating papers—can completely transform a design.
Ready to Create? Grab Your Supplies for These Easy Card Sketches!


Click on any of the products below to grab the supplies you’ll need to create these fun easy card sketch designs. I truly appreciate any and all orders — your support means so much!
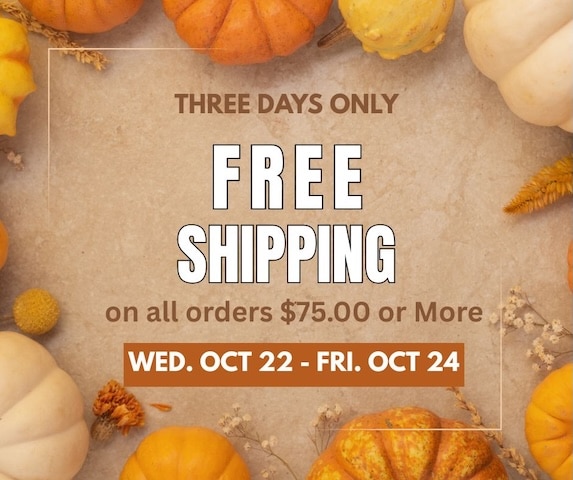
FREE Shipping begins today, October 22 through Friday, October 24 on all orders of $75.00 or more (before shipping and tax). It’s the perfect time to stock up and save on your favorite crafting essentials!
October Customer Appreciation – Huge PDF file Featuring the Neutrals Color Family
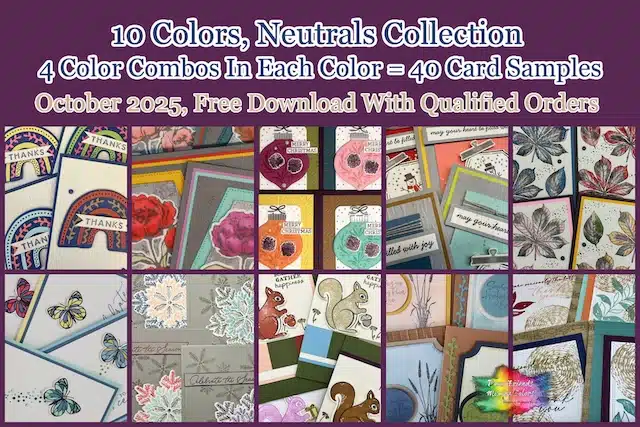 Orders of $50 or more (before tax and shipping) placed in my online store this month will qualify for an exclusive PDF download.
This month’s download includes:
-
Neutrals Color Combination Guide – Forty unique color combinations featuring the Neutrals Collection
-
Forty coordinating card ideas to inspire your crafting
-
Bonus PDF featuring creative ideas with the color Night of Navy
Please note: this Customer Appreciation PDF Download is not available for purchase—it’s my special gift of thanks to everyone who places a qualifying order with me.
This Month’s FREE PDF file featuring the Night of Navy Color Combinations:
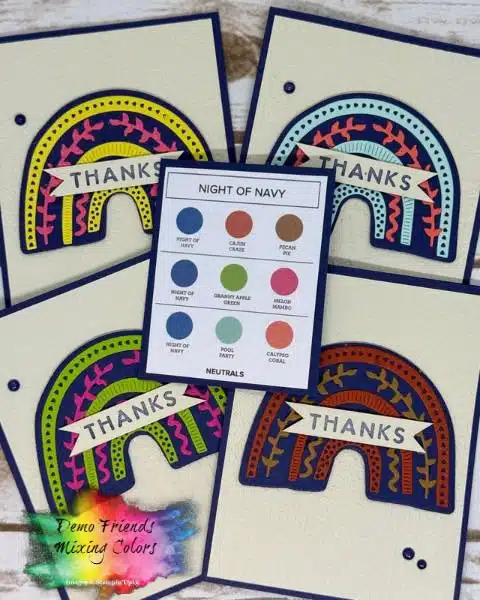
Click HERE to download the FREE Night of Navy PDF file.
Join me every Wednesday for more Easy Card Sketches!
Place your orders Here: https://stampl.ink/shop