
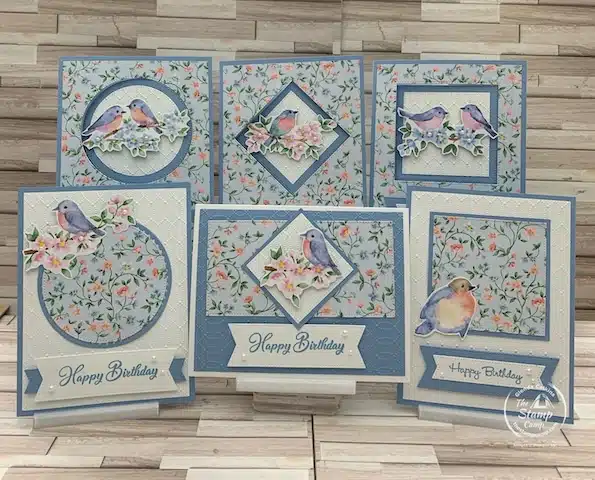
Let me start out by saying that last night’s one sheet wonder cards are so pretty and easy to create. You are going to be so happy you chose the Flight & Airy designer series paper for your free sale-a-bration item. If you didn’t get this paper pack, you missed out because it is beautiful. I’ve created a few different cards with this paper pack and I haven’t been disappointed with any of them. Last night I created these 11 cards from just one sheet of the Flight & Airy Designer Series Paper. There are 6 fun fold cards and 5 regular cards using the left-over die cut pieces from the 6 fun fold cards. In the photo I’m only showing 6 of the 11 cards I created as the group is just too big to get a good shot of all of them together.
I showed you a card Wednesday, February 28, on my blog using the Sale-a-bration Softly Sophisticated bundle and told you I would be doing that fun fold in my class last night. If you missed that blog post, you can view it HERE.
Let’s Take a Closer Look at These Eleven One Sheet Wonder Cards:

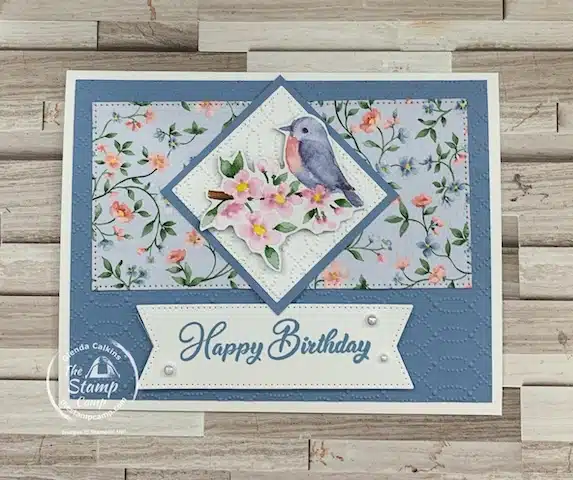
To create the peek-a-boo windows, I used the Stylish Shapes dies as I wanted to show you all the different windows you could create with the dies. First up are the circle dies. I created 2 of the same shaped windows as I have 2 sets of the Stylish Shapes dies, so demonstrating these went much faster. These cards are quick and easy to put together and with the Sale-a-bration Flight & Airy designer series paper you can create a bunch of cards in no time. With the Go To Greetings stamp set you can create these cards for so many different occasions and if you choose a different sentiment for each card you would have a very nice assortment of cards when you need a card for a specific occasion.
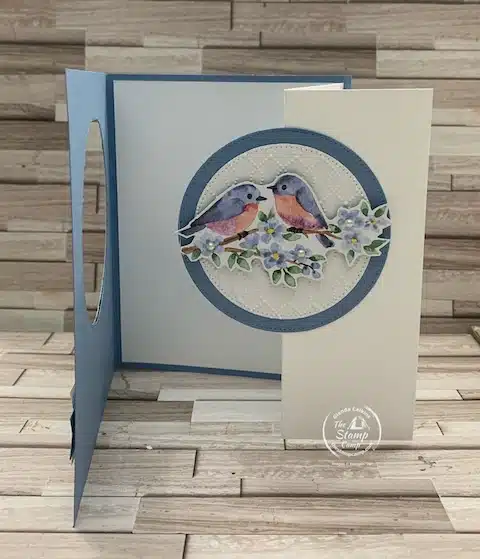
You can see the Z-fold portion of the card when it is open, and you can also see how we achieved the peek-a-boo portion. The card base is the Boho Blue and is 5 1/2″ X 8 1/2″ scored at 4 1/4″ and the Basic White cardstock is 5 1/4″ X 8″ scored at 2″ and at 4″. All these One Sheet Wonder fun fold cards were created the same way with the same size card bases and inside cards.
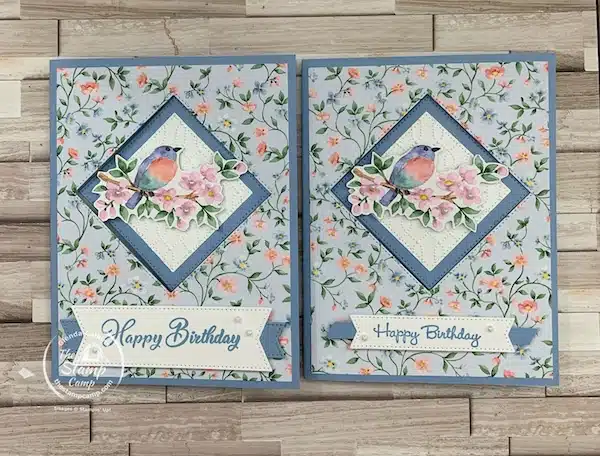
Next up is the Squares and you can see how I used the Softly Sophisticated Embossing Folder on the square piece that is matted onto the square we die cut out for the Peek-a-boo window. On the sentiment pieces for these cards, I die cut the larger banner die out of the Boho Blue cardstock and the smaller banner die was used on the Basic White cardstock.
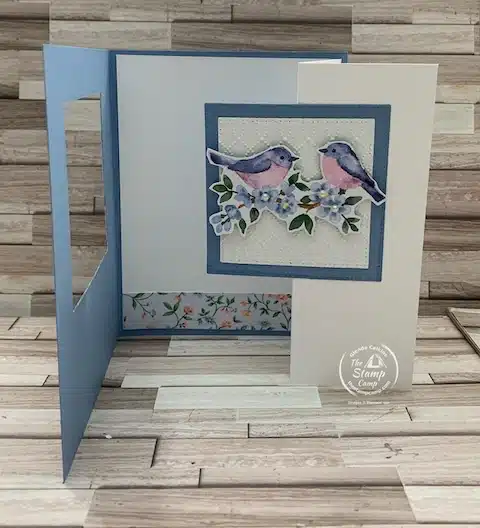
Again, here is the view of the inside with the squares. You can determine which shape you prefer your windows to be. You might want to consider the element that you use on your shape; either hand cut from designer paper or a stamped and die cut image. It should fit within the perimeter of the die cut out piece; if it overlaps or is larger the peek-a-boo portion will not work and your card will not open.
Of all the shapes the diamond shape is the smallest, you need to use a smaller square on its side to fit into the perimeter of the card. The larger square on its side was too close to the edge of your card and not recommended.
For the sentiments on these cards, I showed different ways to use the Stylish Shapes Banners. The one on the left uses the larger banner die cut for the sentiment and the smaller banner die cut in half, giving the visual of it spanning across the large sentiment banner. For the sentiment on the right, I just added a 1/4″ strip of the Boho Blue cardstock and trimmed the ends.
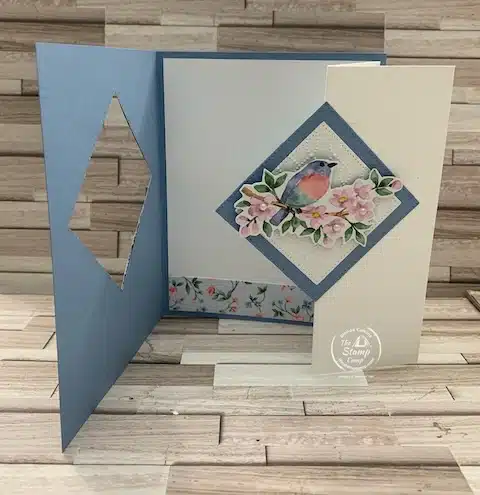
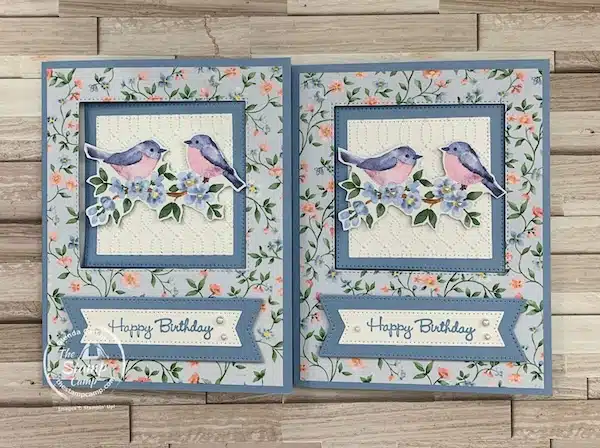
Here is the look you get on the inside with the diamond shape. Each has a full-size Basic White on the inside, so you have plenty of room to stamp or hand write a sentiment or note inside. I used the leftover pieces from the Flight & Airy designer series paper across the bottom edge to tie the front and inside together.
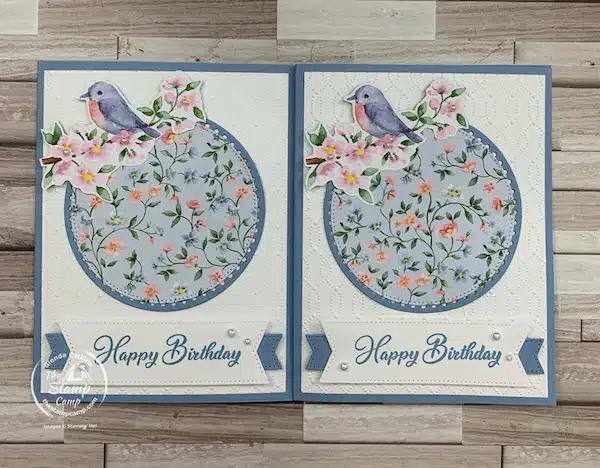
Now you were probably thinking what are you going to do with all the left-over shapes you die cut out from the fronts? I’ll show you how I used each shape creating 2 cards of each shape. Each card has the Basic White piece on the front embossed with the Softly Sophisticated embossing folder. I didn’t want to cover up the pretty designer paper, so I just added a swap of the bird and flowers that I hand cut from the printed papers.
It might be a little hard to see but I used the Everyday Details dies for the larger circle die cut that is under my printed die cut circles. This die has little dots all the way around, which is slightly visible.
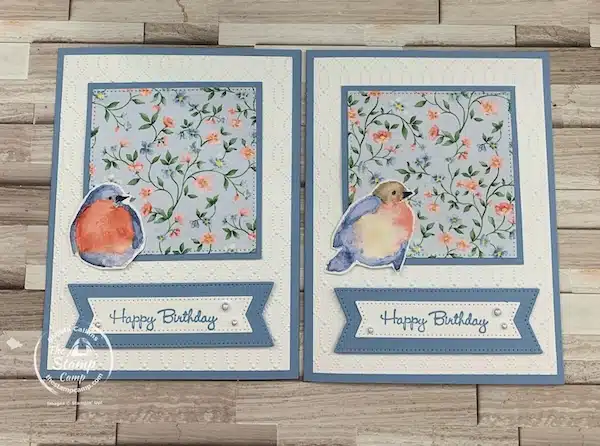
For the square cards I used the larger birds from the print and just hand-cut them out and popped them up in the corner of the square. I did create all my cards as birthday cards because I do send out a lot of birthday cards each month to team members.
For the smaller squares which were the diamond shapes on my peek-a-boo cards, I attached then to a Boho Blue cardstock piece that was embossed with the Softly Sophisticated embossing folder. I then added another smaller square die cut on its side to give that diamond shape over the top of where the 2 squares meet. This gives the illusion that the printed paper was a rectangle that went across the card front.
I used the Iridescent Pearls on all the cards to accent them. These go perfectly with this paper and the embossing folder.
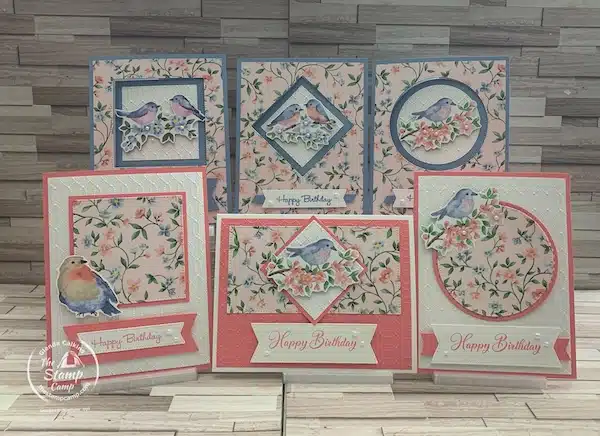
These were the ones I created before the class; so, these you could say were my prototype cards. This is a similar print to the one I used during the YouTube live class only the background is pink. I created half the cards with Boho Blue cardstock and half the cards with Flirty Flamingo cardstock. I did create 11 cards but with that many cards it is hard to get them all in the photos, so I just show 6 of the 11 cards. These were done exactly as the ones above and in the video.
Sale-a-bration is now over and done until next year; but you can use any designer series paper you have on hand to create these cards.
Here is your shopping list for this week’s One Sheet Wonder Cards:


Remember you MUST use the Host Code unless your order is over $150.00, then do NOT use the host code and you will receive the host benefits, plus my rewards.
Here is the Video for these Beautiful Flight & Airy Cards:
My Customer Appreciation for March:
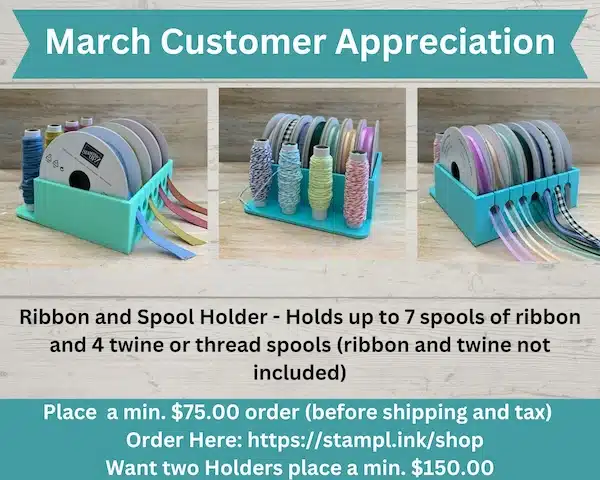
My 3D printer has been buzzing getting ready for this month’s customer appreciation special. Do you have a spot or a way of storing your ribbon and twine spools? If not check out this combo ribbon/twine storage system. My combo ribbon and twine holder will hold up to 7 spools of ribbon depending on the size of the spool and 4 spools of twine or thread. This is perfect to sit on your desk and keep your spools in order and upright or place on a shelf.
Do you have the White Open Storage Cube from Stampin’ Up! with the Topper Storage? If not, you can check it out on page 124 of the annual catalog. This is a cube that you can store ink pads, ribbon, adhesives, small embellishments and more. I’ve taken my ribbon storage system and made them to fit inside the cube and with the topper storage you have the space on top to hold my ribbon storage system as well. (Check out what I’m talking about in the photo below.). Yes, the bottom ribbon storage system has the twine/thread spool holder inside; you will just need to slide it out of the cube to get at the spools when needed.
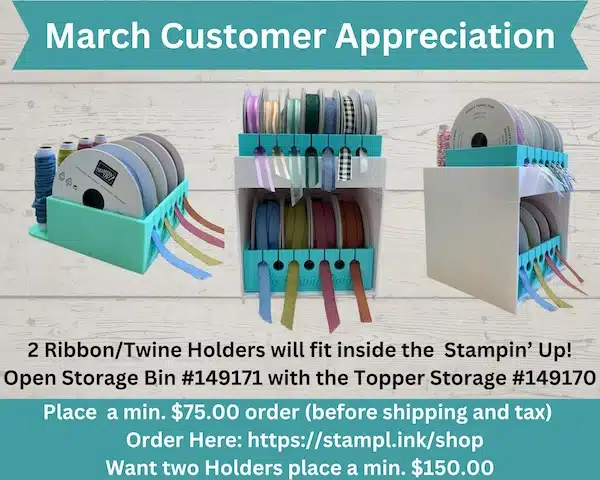
To get one of my Ribbon holders you will need to place a min. $75.00 online order with me and use the host code. If you would like two holders you will need to submit a min. $150.00 order and no need to use the host code. I will send you the ribbon holder(s) free of charge. I will however need you to email me with your color choice, baby blue, mint green, or purple. If I don’t hear from you or if you do not respond to my email regarding your ribbon holder, I will assume you do not want the holder.
Place your orders Here: https://stampl.ink/shop
Click HERE to view How To Use A Host Code
6 thoughts on “Eleven Gorgeous One Sheet Wonder Cards With Flight & Airy Paper”
Hi Glenda, I just recently saw your one sheet wonder cards and am loving them, do you email us out when you are doing a live. I live in Australia, not sure how to follow you, would love to watch your lives
thanks Joan
If you subscribe to my YouTube channel you will be notified when I go live. Here is the link: https://stampl.ink/YouTube
Happy Stamping!
Hi Glenda,
Do you do templates? love what you did on these cards.
Thank you
Caroline C King
Hi Caroline, If the cards are part of my card club than I do have the one sheet wonder pattern and download project sheet. However, this was not part of my club, so all the information I have is in the blog post. Glad you liked them and thanks for checking out my blog. Happy Stamping!
I love these cards. I have watched the video 3 times now.
That’s how much I love them.
Hi Vicki, Thanks so much for watching and leaving me a comment. I do have a brand new 12 x 12 package of that bird paper if you would like to purchase any. Let me know. You can email me at: [email protected]