
Welcome to Week #30 of my Stamp Camp Card Sketches Series!
This week’s sketch is all about fun and easy card design techniques that work for any occasion you have coming up. If you love working with simple card sketch templates or you’re always on the lookout for quick and easy card sketch ideas, you’re going to love today’s inspiration.
For this week’s layout, I switched things up by using a different Designer Series Paper pack, bundle, and sentiment on each of the three samples. It’s a great reminder of how adaptable card sketches can be—one sketch, endless possibilities!
Be sure to grab today’s sketch below. Print it off and tuck it into a 3-ring binder inside a page protector so you’ll have a handy resource right in your stamp room. Whether you’re ready to try something new or you’re feeling stuck in a creative slump, this collection of sketches will spark fresh ideas every time.
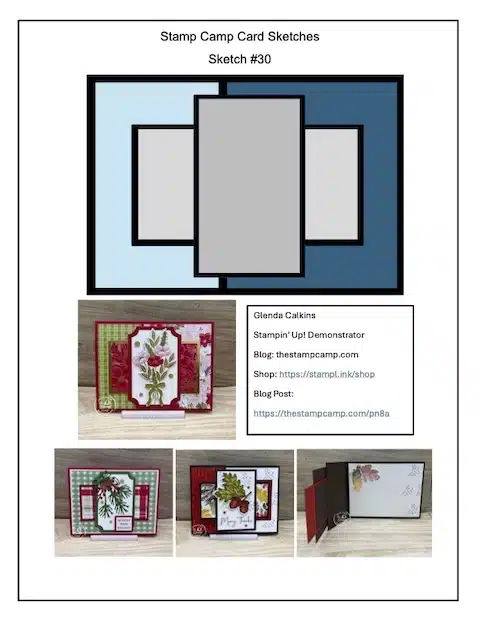 To download and print Sketch #30 Click HERE
To download and print Sketches #21 – #30 Click HERE
To download and print Sketches #11 – #20 Click HERE
To download and print Sketches #1 – #10 Click HERE.
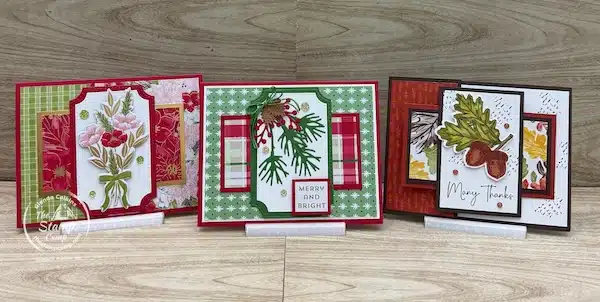
Let’s Take a Look at Each Version of Today’s Sketch
Each of today’s cards follows the same basic layout, but you’ll notice how uniquely they turn out with different papers, bundles, and sentiments. That’s the beauty of working with simple card sketch templates—you can create multiple versions that look similar in structure yet feel completely different in style.
Using the Week #30 sketch as the foundation, I designed three cards that showcase how versatile fun and easy card design techniques can be. Whether you prefer bold colors, traditional holiday patterns, or soft florals, this sketch adapts beautifully and gives you quick and easy card sketch ideas you can use again and again.
Let’s dive into each sample so you can see how changing up your stamp set, dies, or Designer Series Paper transforms the look while still staying true to the original card sketch.
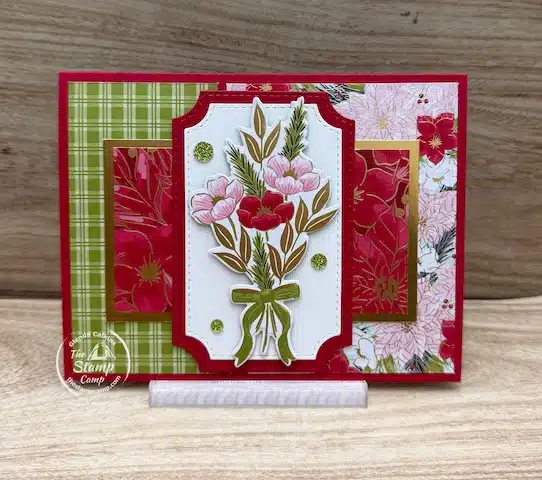
Card #1 – Traditions of Christmas Specialty Designer Series Paper
For Card #1, I stayed true to the classic beauty of the Traditions of Christmas Specialty Designer Series Paper—right down to the die-cut floral bouquet that comes directly from the paper pack. This version of the sketch is a perfect example of how fun and easy card design techniques can shine simply by letting your DSP do the work.
The card base is 5 1/2″ x 8 1/2″, scored at 4 1/4″.
-
The DSP on the left side of the card front measures 2″ x 4″.
-
The DSP on the right side measures 3 1/8″ x 4″.
-
The Gold Foil mat in the center is 2 1/2″ x 4 1/4″, layered with another coordinating DSP piece cut to 2 1/4″ x 4″.
For the focal point, I created a stacked look using a pair of detailed mats from the Branching Out Dies and placed the coordinating floral bouquet die cut in the center. A few green Traditional Sparkling Sequins add just the right pop of shimmer and finish off the design beautifully.
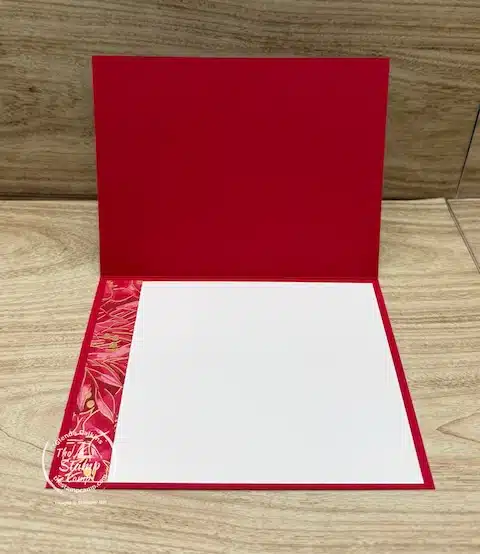
On the inside of the card, I added a piece of Basic White cardstock measuring 4″ x 5 1/4″, along with a 3/4″ x 5 1/4″ coordinating strip of the Traditions of Christmas DSP across the bottom edge. It’s a simple finishing touch, but it ties the whole design together beautifully and gives you that polished look inside and out.
This elegant card works for so many occasions—think weddings, anniversaries, or even a winter birthday. With this sketch and the right paper, you can easily transform the design to suit any celebration.
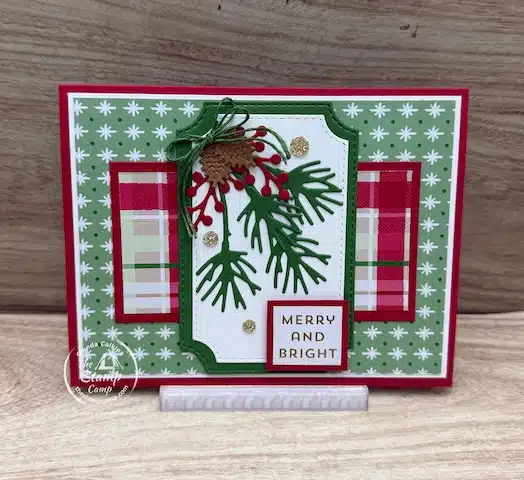
Card #2 – Christmas Tags & More Designer Series Paper
Card #2 stays close to the original sketch but with a slight twist. Instead of using two separate pieces of DSP on the card front, I chose one solid piece from the Christmas Tags & More Designer Series Paper measuring 3 7/8″ x 5 1/8″. This creates a bold backdrop and gives the card a clean, cohesive look. I matted this piece onto Basic White cardstock cut to 4″ x 5 1/4″, then adhered it to a Real Red card base measuring 5 1/2″ x 8 1/2″, scored at 4 1/4″.
For the center horizontal strip, I used Real Red cardstock cut to 2 1/4″ x 4 1/4″, topped with a 2″ x 4″ piece of the coordinating DSP—the backside of the larger green print. This brings the whole design together while still giving the layered look from the sketch.
I used the Branching Out Dies once again for the focal point. The greenery, branches, and decorative elements come directly from the die set. To finish it off, I added a sweet Old Olive double bow and a sprinkling of Gold Traditional Sparkling Sequins for a festive touch. The Merry & Bright sentiment is from the Greetings for You Mix & Match Ephemera Pack, making it quick and easy to complete the card.
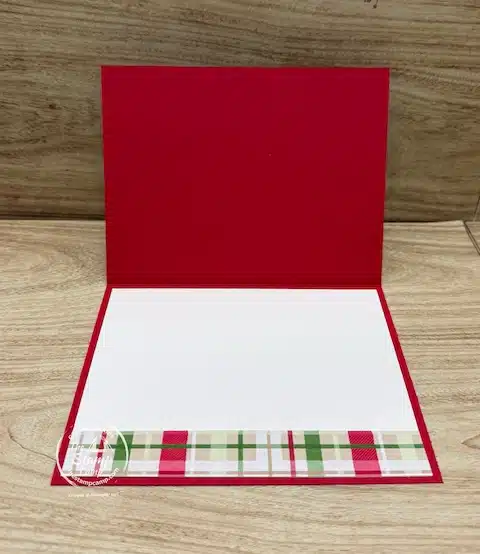
For the inside, I once again added a piece of Basic White cardstock measuring 4″ x 5 1/4″, along with a coordinating 3/4″ x 5 1/4″ strip of the Christmas Tags & More Designer Series Paper across the bottom edge. This simple detail brings the design from the front of the card into the inside, giving it a finished, coordinated look.
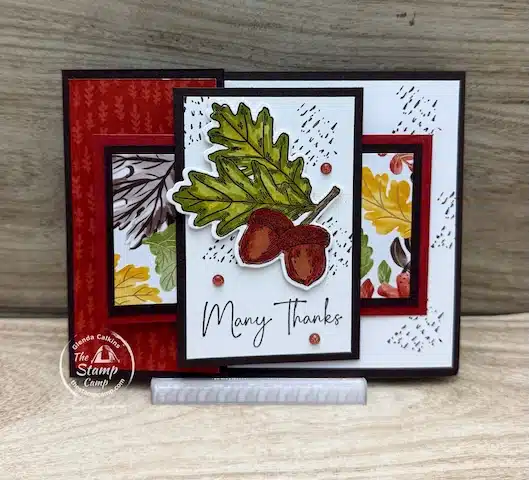
Card #3 – A Fun Fold Twist on the Sketch
Card #3 is a fun fold version of this week’s sketch. At first glance, it looks just like the original layout, but the card base is cut in a way that allows the focal image on the front to swivel outward—such a simple but impressive twist! For this design, I used the Gathering Together Specialty Designer Series Paper along with the Amber Autumn Bundle for the focal point. The sentiment, along with the leaves and acorn on the inside, comes from the Gathering Moments Bundle.
The Early Espresso card base is cut to 4 1/4″ x 9 1/2″, scored at 5 1/2″ and 7 3/4″.
To create the fun fold opening:
-
On the 7 3/4″ score line, cut down 1″ from the top and 1″ up from the bottom.
-
Remove those two 1″ rectangular sections from the top and bottom.
This creates the opening where the center horizontal panel will attach.
Next, fold the card base in half on the 5 1/2″ score line, then fold again on the 7 3/4″ score line. The cut-out section is where the layered horizontal panel will go:
-
Cajun Craze: 2 1/2″ x 4 1/2″
-
Early Espresso Mat: 2 1/4″ x 4 1/4″
-
Gathering Together DSP: 2″ x 4″
On the left side of the card front, add a 2″ x 4″ piece of the Gathering Together DSP. The Basic White panel you see peeking through is actually the inside layer, measuring 4″ x 5 1/4″, and it forms part of the front design once the card is closed.
For the focal point, I used:
-
Early Espresso: 2 1/2″ x 3 3/4″
-
Basic White: 2 1/4″ x 3 1/2″
The acorn and leaf cluster is from the Amber Autumn Bundle. I stamped it on Basic White cardstock using Memento Black, then colored it with Old Olive, Daffodil Delight, and Pecan Pie Stampin’ Blends. The small splatter image is stamped in Early Espresso, as is the sentiment, pulling the whole design together beautifully.
In this photo, you can see how the front section pivots outward, creating a fun and unique interactive element to this simple card sketch. It’s an unexpected twist that adds movement and makes the card feel extra special.

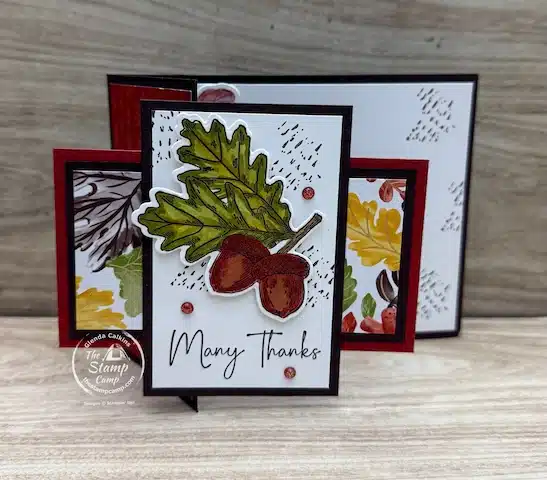
In this photo, you can see the inside of the card with the leaf and acorn die cuts, along with plenty of room to stamp or write your message. You can also clearly see the rectangular section removed from the card front—this is what creates the pivot mechanism that makes this fun fold design work so beautifully.
Here is your Shopping List Guide to Fun and Easy Card Design Techniques Supplies:


Price: $12.50

Price: $16.50

Price: $16.50


Click on any of the supplies you wish to purchase and add them to your shopping cart, Thank You! Thank You! For Your order!
Thank you so much for stopping by The Stamp Camp today! I hope these card sketches inspire you to create beautiful handmade cards for every occasion. Don’t forget to download your Card Sketch #30 PDF and add it to your Card Sketch Notebook for future inspiration.
November Customer Appreciation Gift!
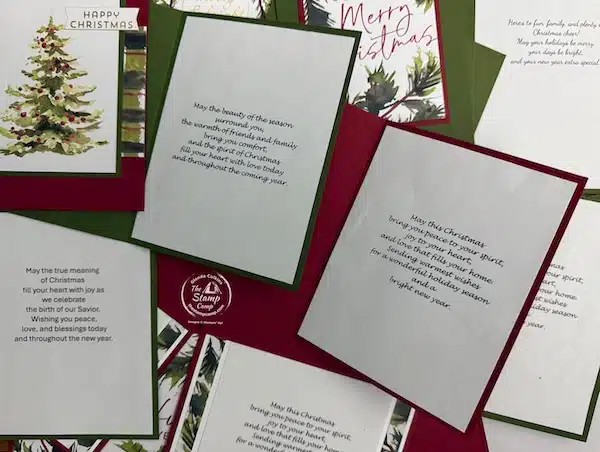
Do you ever struggle with what to write inside your Christmas cards—or maybe you don’t have the perfect inside sentiment stamp? Well, I’ve got you covered!
When you place a minimum $30 (before shipping and tax) online Stampin’ Up! order with me this month, you’ll receive an exclusive PDF file featuring 6 different Christmas card sentiment inserts.
Each sentiment is provided in both horizontal and vertical formats, with 4 of the same sentiment per sheet—ready to print, cut, and use!
How to Use:
-
Print the sentiment of your choice.
-
Cut the sheet in half in both directions.
-
Adhere the insert to the inside of your card.
I typically cut my inserts to 4″ x 5-1/4″, but if you’d like to mat your sentiment on another color of cardstock, trim your sentiment insert to 3-3/4″ x 5″ instead.
Make your Christmas cards extra special this year with beautiful, heartfelt sentiments—ready to go and easy to use!
Place your orders Here: https://stampl.ink/shop
2 thoughts on “Fun and Easy Card Design Techniques for Stunning Handmade Cards”
those are very pretty
Thanks and thanks for checking out the blog post. Happy Stamping!