
Welcome back to Sketch #31 in my series of quick and easy card sketch ideas! Today’s sketch is perfect for those moments when you want to sit down and create a beautiful handmade card without overthinking the design. With clean lines, simple layers, and endless creative potential, this card sketch will quickly become one of your favorite go-to layouts.
One of the best things about using creative card sketches is how much time they save. Instead of wondering where to start, you simply follow the layout, choose your papers, stamps, or dies, and start crafting. Whether you’re creating a birthday card, thank-you card, or thinking-of-you card, this sketch works for any theme or style.
Don’t Forget Your Printable Card Sketch!
I’ve included a printable card sketch for crafting that coordinates with today’s design. Print it out, slip it inside a page protector, and add it to your 3-ring binder so you always have a handy cardmaking resource right in your craft room. Over time, you’ll build a whole library of sketches you can flip through anytime you need inspiration.
Why This Sketch Works
-
It keeps your layout simple enough for quick crafting.
-
It gives you room to feature designer paper, stamped images, or die cuts.
-
It works beautifully with any cardstock colors or patterns you already have on hand.
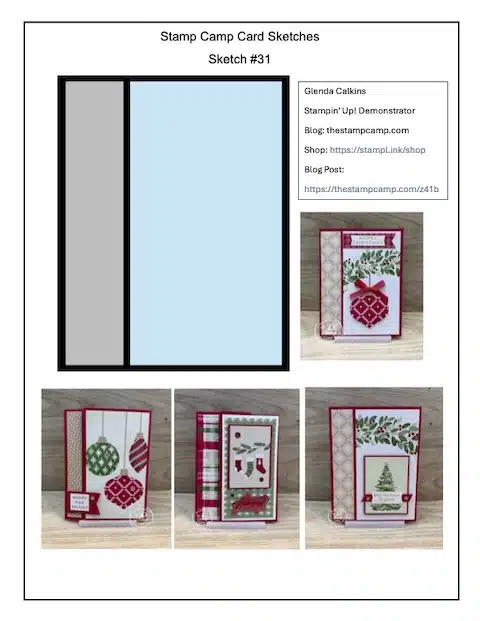
To download and print Sketch #31 Click HERE
To download and print Sketch #30 Click HERE
To download and print Sketches #21 – #30 Click HERE
To download and print Sketches #11 – #20 Click HERE
To download and print Sketches #1 – #10 Click HERE
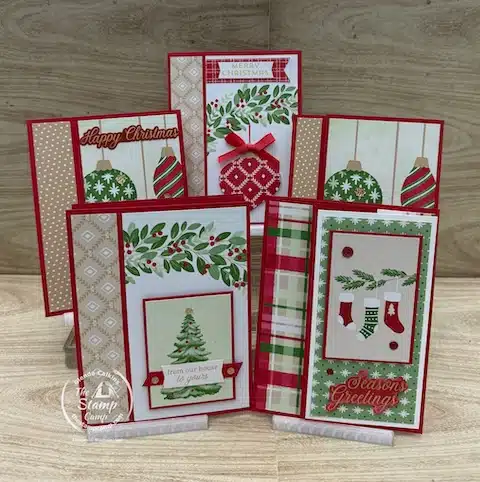
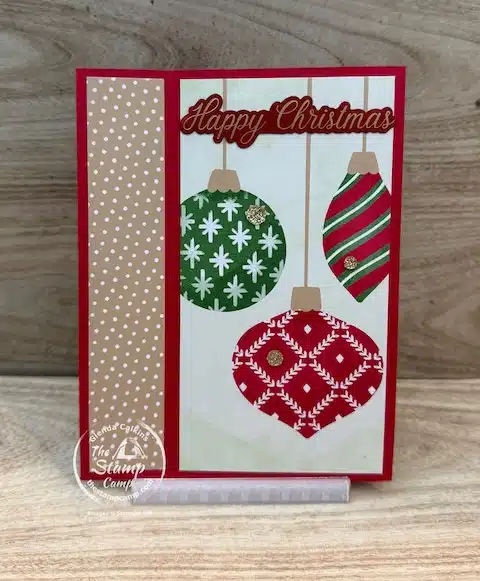
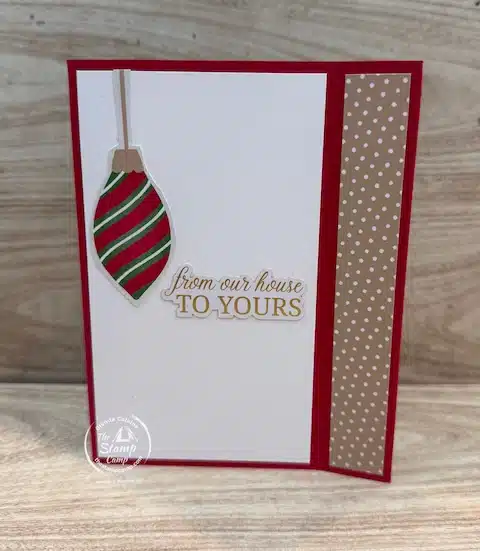
Card #1 – Quick, Simple, and Perfectly Aligned with Sketch #31
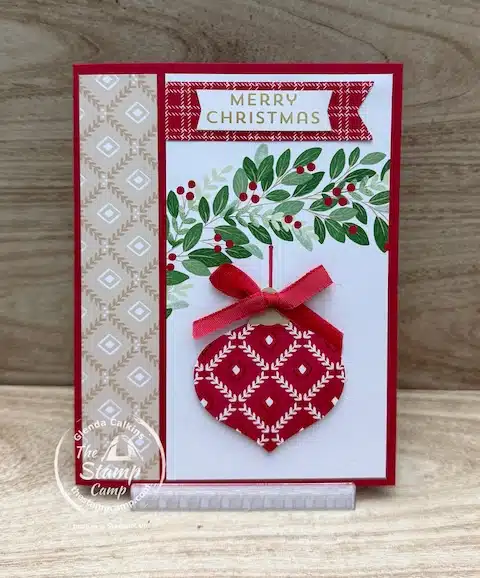
Let’s begin by taking a look at Card #1. This basic design is truly quick and easy to create and follows today’s card sketch perfectly. If you’re looking for quick and easy card sketch ideas that come together effortlessly, this one is a great place to start.
For all four of today’s cards, I’m featuring the Christmas Tags & More Specialty Designer Series Paper along with the Greetings for You Mix & Match Ephemera Pack. These two products pair beautifully and make the creative process even simpler—just layer, adhere, and embellish!
The card base for Card #1 is Real Red, cut to 5 1/2″ x 8 1/2″ and scored at 4 1/4″. This classic red is perfect for holiday crafting and gives your card a bright, cheerful foundation.
To follow the sketch, here are the Designer Series Paper pieces you’ll need:
-
1″ x 5 1/4″ (left strip)
-
2 7/8″ x 5 1/4″ (right panel)
These clean, simple layers make it easy to recreate this layout again and again—especially when using my creative card sketches and printable card sketches for crafting as a guide.
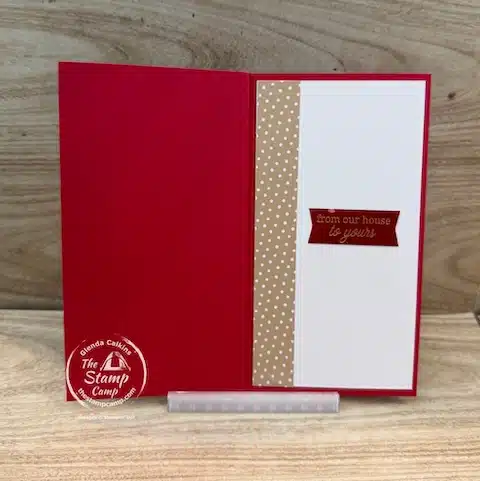
You can make quick and easy cards even faster by using the Christmas Tags & More Specialty Designer Series Paper Pack. This pack includes two sheets of die-cut pieces—just punch them out and adhere them to your card fronts or use them on the inside of your card, like I did for Card #1. These ready-to-use elements coordinate perfectly with your layers and make designing handmade cards effortless.
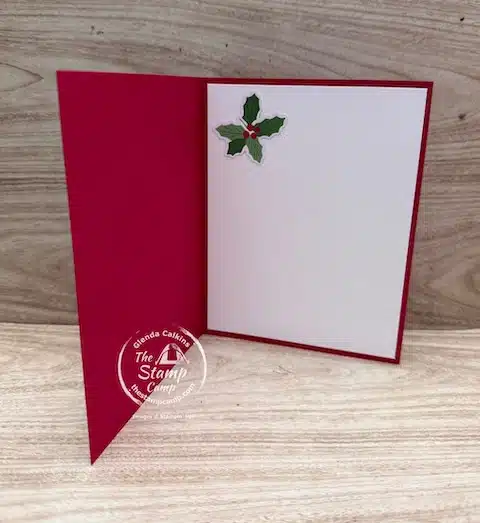
For the inside of the card, I added a piece of Basic White cardstock cut to 4″ x 5 1/4″. To tie the design together, I simply placed one of the Holly Leaves die cuts in the upper left-hand corner. It adds just the right touch of festive detail without any extra work—exactly what we love when crafting with quick and easy card sketch ideas.
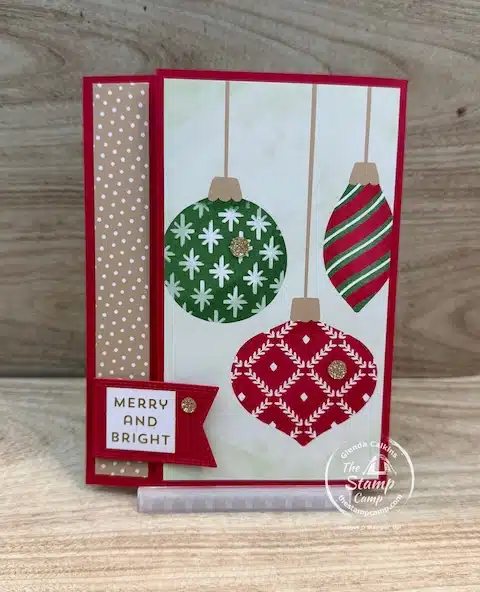
Card #2 – A Quick and Easy Fun Fold Using Sketch #31
Card #2 looks very similar to Card #1, except this time we’re turning the design into a fun fold card. This version uses a vertical book binding fold, and with just a couple of extra score lines you can transform your regular card base into something a little more special—while still keeping things quick and easy.
The card base is Real Red, cut to 5 1/2″ x 8 1/2″. Score it at 3″ and again at 4 1/4″. When you adhere the 1 1/4″ side flap closed, you create the charming book binding effect that opens on the right just like a hardcover book.
Following Sketch #31, the Designer Series Paper pieces from the Christmas Tags & More Specialty DSP remain the same:
-
1″ x 5 1/4″
-
2 7/8″ x 5 1/4″
To finish the card front, I used one of the sentiments from the Greetings for You Mix & Match Ephemera Pack. To color the sentiment layer, I simply smooshed the die-cut piece directly onto my Real Red ink pad, then took a tissue and gently wiped away the excess ink. Because these pieces are gold foiled and adhesive-backed, the ink beautifully tints the cardstock while resisting the gold foiled lettering. Once it’s colored, just peel and stick it right onto your card front—so easy and so pretty!
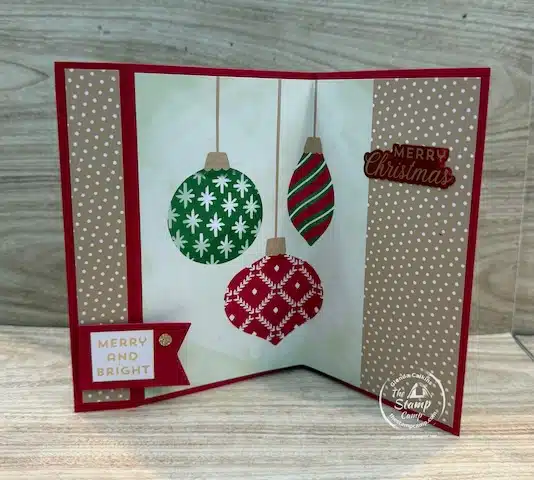
Finishing the Inside of Card #2
For the inside of Card #2, I kept things simple but coordinated. I started with a piece of Basic White cardstock cut to 2 3/4″ x 5 1/4″. Along the left side, I added a narrow strip of the Christmas Tags & More Designer Series Paper, measuring 3/4″ x 5 1/4″. This small touch brings the front design into the inside of the card and ties everything together beautifully.
To finish it off, I added another sentiment from the Greetings for You Mix & Match Ephemera Pack. Just like on the front, I smooshed the die-cut piece directly onto my Real Red ink pad, wiped away the excess ink with a tissue, and adhered it to the inside. These gold-foiled, adhesive-backed pieces make adding a polished sentiment incredibly quick and easy—perfect for keeping your fun fold cards both creative and efficient.
Card #3 – Another Fun Fold Twist Using Sketch #31
Card #3 may look similar to Card #2 at first glance, but it’s actually a completely different fun fold card—and such a fun one to create! This fold gives your card an interactive, dimensional look while still staying true to today’s card sketch.
The card base is Real Red, cut to 5 1/2″ x 8 1/2″.
Score your card at 1″, 2″, and 5 1/4″.
Fold along all score lines, keeping the 1″ and 2″ sections on the left side. Secure the 1″ flap down on top of the 2″ section—this creates a sturdy folded edge on the left that adds structure and style to the card.
Once your base is folded and ready, follow these steps:
-
Attach the 3/4″ x 5 1/4″ Christmas Tags & More DSP strip to the left front flap.
-
Add the larger 3″ x 5 1/4″ ChristmasTags & More DSP panel to the main card front.
For the focal point, I used a banner die cut from the Stylish Shapes Dies and added a small sentiment from the Greetings for You Mix & Match Ephemera Pack. The side panel folds back, which creates the fun fold mechanism and reveals the inside when opened.
This card is quick, creative, and a great example of how you can take a single sketch—like Sketch #31—and transform it into many different quick and easy card sketch ideas.
Inside of Card #3 – A Full Reveal of Beautiful Designer Paper
When you open up Card #3, you’ll get a beautiful surprise—the inside reveals almost the entire 6″ x 6″ sheet of the Christmas Tags & More Specialty Designer Series Paper. This fun fold is such a great way to showcase those gorgeous patterns you don’t want to cut apart!
Here’s how to assemble the inside:
-
Lightly fold the Christmas Tags & More DSP (6″ x 5 1/4″) at the 3″ mark to create a gentle center crease.
-
Secure the right-hand side of the DSP to the right inside edge of your card.
-
Secure the left-hand side of the DSP to the left inside edge, placing it about ?” from the score line so the card opens smoothly.
To finish the inside, I added another sentiment from the Greetings for You Mix & Match Ephemera Pack. Just like before, I smooshed the die-cut onto my Real Red ink pad, wiped away the excess ink, and applied it to the upper right-hand corner of the DSP. It’s a simple detail but adds a polished, coordinated touch.
Where Do You Write Your Message? The Backside Has You Covered
You may be wondering—with all that beautiful Designer Series Paper inside, where do you sign or stamp your card? The answer is simple: the backside of the card! This fun fold design leaves the entire back panel open, giving you plenty of room to write a personal message, add a stamped greeting, or attach another decorative element.
To create a clean writing space, I added a piece of Basic White cardstock measuring 3″ x 5 1/4″. Along the left edge, I adhered a coordinating strip of the Christmas Tags & More DSP, cut to 3/4″ x 5 1/4″. This ties the back of the card into the rest of the design beautifully.
For a little extra decoration, I used one of the Greetings for You Mix & Match Ephemera sentiments—this time left just as it comes—and added an ornament image that I hand-cut from the Designer Series Paper. You could easily swap this for any of the die cuts included in the pack if you prefer a quicker option.
This gives your card a polished finish all the way around while keeping everything cohesive and festive.
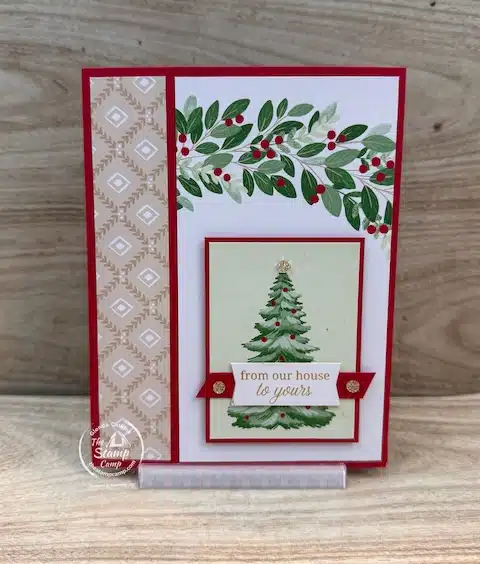
Card #4 – A Fun Fold Gift Card Holder Using Sketch #31
Card #4 is another fun fold card, but this time it doubles as a gift card holder—a creative way to give both a handmade card and a little gift all in one. These are perfect for friends, family, or coworkers during the holidays.
The card base is actually two separate pieces, each cut to 4 1/4″ x 5 1/2″. The front panel is decorated using the Christmas Tags & More DSP, cut to:
-
1″ x 5 1/4″
-
2 7/8″ x 5 1/4″
To highlight the Christmas Tree pattern from the DSP, I carefully cut it from one of the sheets and layered it onto a Real Red mat for a polished, framed look.
For the sentiment, I chose one from the Greetings for You Mix & Match Ephemera Pack. To make it pop, I added a strip of Real Red cardstock behind it and adhered it across the Christmas Tree image. This adds dimension and draws attention to the greeting, making it the perfect focal point for your gift card holder.

Inside of Card #4 – Creating the Gift Card Pocket
When you open Card #4, the inside is a little different from the previous cards—it’s designed to hold a gift card! Here’s how I created the pocket and added coordinating layers for a polished finish.
Start with a piece of Basic White cardstock measuring 4 3/4″ x 11″, and score it at:
-
2 3/4″
-
5 1/2″
-
8 1/4″
Next, measure 1 3/4″ from the bottom right-hand side and make a small mark. Cut diagonally from this mark to the score line at 8 1/4″—this will form the pocket for your gift card.
Fold the Basic White strip along the score lines back and forth to create the accordion fold.
-
Adhere the top of your accordion fold to the backside of the card front, lining up the bottom edge and leaving about 1/2″ from the side.
-
Then, adhere the backside of the accordion fold to the back of the second 4 1/4″ x 5 1/2″ piece of Real Red cardstock.
Important: This is your pocket, so add adhesive only along the bottom edge and side edges—this keeps the pocket open so the gift card can slide in easily.
To decorate the inside, cut two pieces of Christmas Tags & More DSP, 2 1/2″ x 4 1/2″, and adhere them to the center panels of the accordion fold portion. Finally, I added a couple of Greetings for You Mix & Match Ephemera sentiments, matted onto Real Red cardstock, and adhered them to the inside as shown. This gives your gift card holder a cohesive, festive look while keeping it functional and fun!
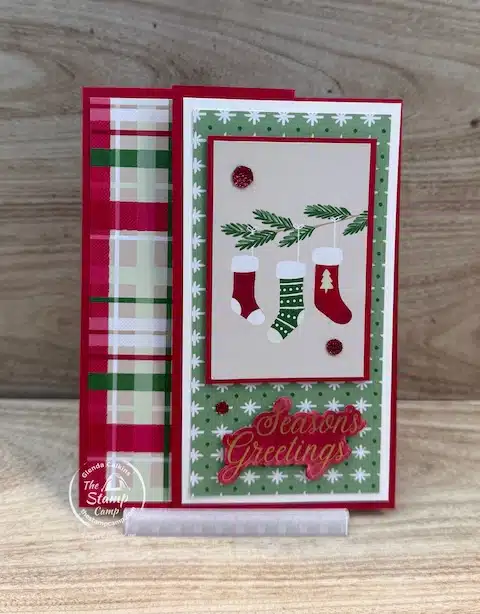
Card #5 – Another Fun Fold with Sketch #31
Card #5 is yet another fun fold card, perfect for showing how versatile Sketch #31 can be. This design adds a layered, dimensional look while still being quick and easy to create.
The card base is Real Red, cut to 5 1/2″ x 8 1/2″, and scored at 1 1/2″ and 4 1/4″. Fold the 1 1/2″ score line back toward the 4 1/4″ score line to create the flap.
For the card front:
-
Attach a piece of Christmas Tags & More DSP (2 1/2″ x 5 1/4″) to the left-hand panel.
-
Cut Basic White cardstock (2 3/4″ x 5 1/4″) and adhere it to the 1 1/2″ front flap, leaving about 1/8″ of Real Red showing along the edge.
-
Add another piece of Christmas Tags & More DSP (2 1/2″ x 5″) on top of the white panel for a layered effect.
For the sentiment, I used one from the Greetings for You Mix & Match Ephemera Pack. This time, I added color using blending brushes to gently tint the gold-foiled piece, then popped it up onto the card front for dimension.
To finish the design, I added another piece of Christmas Tags & More DSP matted onto Real Red cardstock, and scattered a few Traditional Sparkling Sequins for a festive, sparkling touch.
This card, like the others, shows how creative card sketches and quick and easy card sketch ideas can be used to make multiple, unique designs from the same layout.
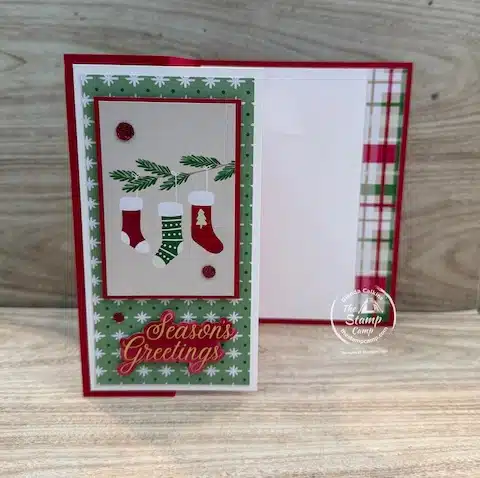
Inside of Card #5 – Coordinating Layers for a Polished Finish
For the inside of this fun fold card, I kept the design simple and coordinated with the front. I added a piece of Basic White cardstock measuring 4″ x 5 1/4″ to create a clean writing space.
To tie in the front design, I added a coordinating strip of Christmas Tags & More DSP (3/4″ x 5 1/4″) along one edge. This simple detail brings the inside and outside together beautifully while still leaving plenty of space for your personal message.
Wrapping It Up – Five Unique Cards from One Sketch
There you have it—five different cards all created using the same sketch, the Christmas Tags & More Specialty Designer Series Paper, the Greetings for You Mix & Match Ephemera Pack, and finished off with Traditional Sparkling Sequins. These examples show just how versatile Sketch #31 can be, and how you can create quick and easy cards while still keeping them creative and fun.
Whether you make them for holidays, birthdays, or just because, these creative card sketches and printable card sketches for crafting are a great way to simplify your cardmaking while still producing beautiful, handmade results.
Shopping List for These Quick and Easy Card Sketch Ideas:

Price: $12.50


Click on any of the supplies you wish to purchase and add them to your shopping cart, Thank You! Thank You! For Your order!
Thank you so much for stopping by The Stamp Camp today! I hope these card sketches inspire you to create beautiful handmade cards for every occasion. Don’t forget to download your Card Sketch #31 PDF and add it to your Card Sketch Notebook for future inspiration.
November Customer Appreciation Gift!
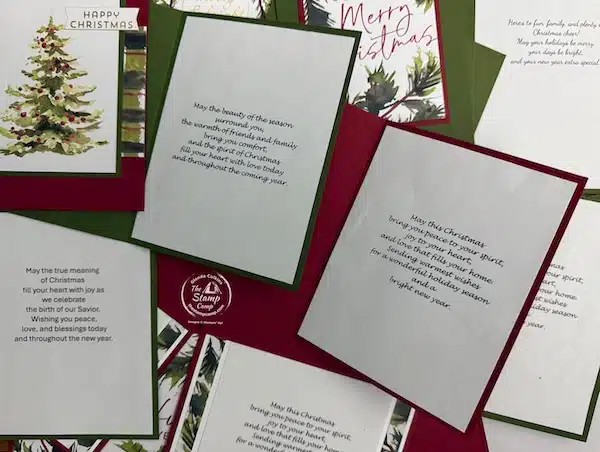
Do you ever struggle with what to write inside your Christmas cards—or maybe you don’t have the perfect inside sentiment stamp? Well, I’ve got you covered!
When you place a minimum $30 (before shipping and tax) online Stampin’ Up! order with me this month, you’ll receive an exclusive PDF file featuring 6 different Christmas card sentiment inserts.
Each sentiment is provided in both horizontal and vertical formats, with 4 of the same sentiment per sheet—ready to print, cut, and use!
How to Use:
-
Print the sentiment of your choice.
-
Cut the sheet in half in both directions.
-
Adhere the insert to the inside of your card.
I typically cut my inserts to 4″ x 5-1/4″, but if you’d like to mat your sentiment on another color of cardstock, trim your sentiment insert to 3-3/4″ x 5″ instead.
Make your Christmas cards extra special this year with beautiful, heartfelt sentiments—ready to go and easy to use!
Place your orders Here: https://stampl.ink/shop