
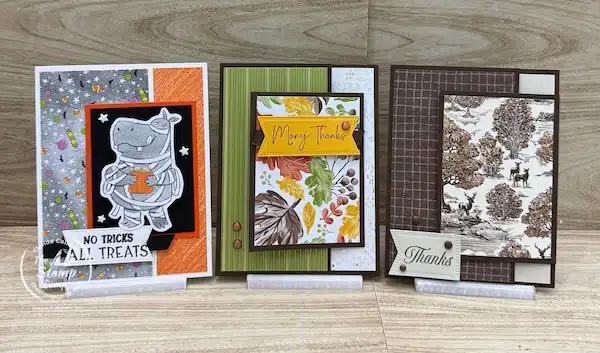
This week’s simple card sketch templates are perfect for all occasions and work beautifully with any Designer Series Paper you have on hand. Whether you’re creating birthday, thank you, or seasonal cards, these clean and simple card sketch layouts will help you design something unique every time.
For this week’s feature, Card Sketch #25, I decided to mix things up a bit! All of my cards are fall-themed, showcasing the warm, rich tones of autumn. I used a variety of different Designer Series Paper packs to show how easily you can adapt one sketch to fit any color palette or season.
Keep Your Sketches Organized
If you haven’t already, make sure to download and print the sketch so you can use it as a handy tool in your craft room. I recommend keeping a 3-ring binder and some clear page protectors nearby — print each of your favorite sketches and slide them inside the protectors. This way, you’ll have an organized reference book ready whenever inspiration strikes.
New to My Blog?
If this is your first time visiting, welcome! I’ve listed all my previous simple card sketches for beginners below so you can easily download and print them. These sketches are designed to help you make beautiful handmade cards with minimal effort — even if you’re just starting out.

To download and print Sketch #25 Click HERE
To download and print Sketch #24 Click HERE
To download and print Sketch #23 Click HERE
To download and print Sketch #22 Click HERE
To download and print Sketch #21 Click HERE
To download and print Sketch #20 Click HERE
To download and print Sketches #11 – #20 Click HERE
To download and print Sketches #1 – #10 Click HERE.
Don’t forget to subscribe to my blog and join me every Wednesday for a brand-new card sketch. Each week brings you fresh inspiration, new layout ideas, and creative ways to use your Designer Series Paper stash!
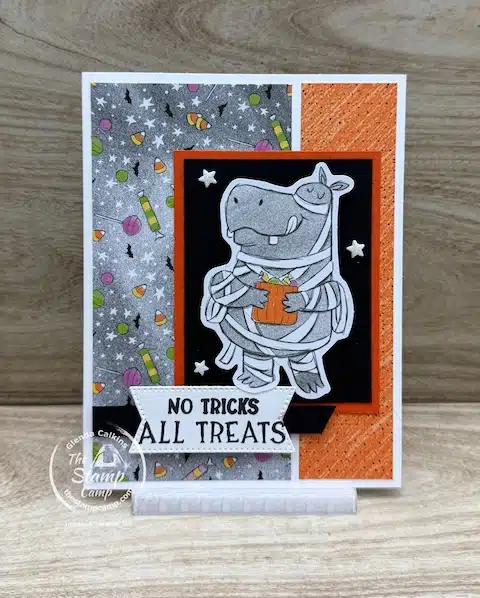
Card #1 – Spooky Sweet Halloween Card
Featuring: Spooky Sweet Halloween Specialty Designer Series Paper and the Spooky Halloween Bundle
Card #1 from this week’s Simple Card Sketch Templates is all about fun Halloween vibes! I used the Spooky Sweet Halloween Specialty Designer Series Paper along with the coordinating Spooky Halloween Bundle to create this adorable card.
What I love most about this paper pack is that it includes two sheets of die-cut images — no stamping or fussy cutting needed! Just punch them out and attach them to your card front or use them to decorate the inside of your cards for a quick and coordinated look.
The sentiment is stamped in Black Memento Ink and die cut using the Stylish Shapes Dies. To finish off the card and give it that festive Halloween sparkle, I added a few Foam Stars — they’re the perfect final touch!
Measurements:
-
Card Base: Thick Basic White – 5 1/2″ x 8 1/2″, scored at 4 1/4″
-
Designer Series Paper:
-
2 5/8″ x 5 1/4″
-
1 1/4″ x 5 1/4″
-
-
Layered Focal Point:
-
Pumpkin Pie – 2 3/4″ x 3 1/2″
-
Basic Black – 2 1/2″ x 3 1/4″
-
-
Sentiment Strip: A narrow strip of Basic Black cardstock layered beneath the sentiment banner
This clean and simple card design shows just how easy it is to create a festive handmade card using one of my clean and simple card sketch layouts. Perfect for beginners or anyone short on crafting time but still wanting that wow factor!
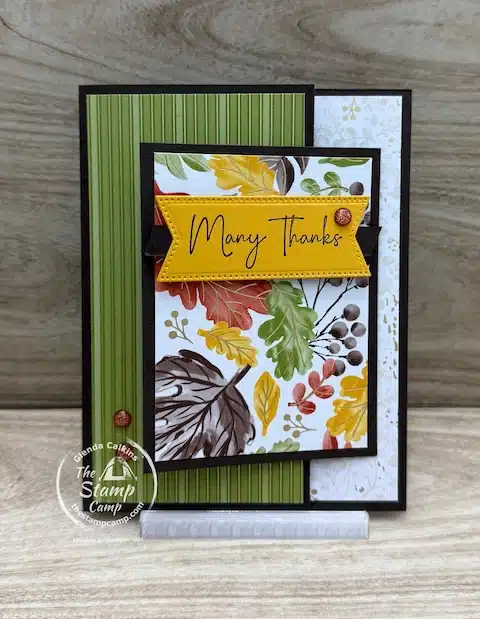
Card #2 – Gathering Together Fun Fold Card
Featuring: Gathering Together Specialty Designer Series Paper and Gathering Moments Stamp Set
Card #2 may look similar to the first card at first glance, but it’s actually a fun fold card — one of my favorite ways to add a little surprise to a clean and simple layout! For this version, I used the Gathering Together Specialty Designer Series Paper paired with the Gathering Moments Stamp Set to create a beautiful fall-themed card.
These rich, elegant paper prints are part of my Stamp Camp at Home Card Club Kit this month. I love how the deep autumn colors and metallic accents work perfectly with this week’s simple card sketch templates. Whether you use this layout for fall, birthdays, or even holiday cards, it’s an easy way to make your handmade designs stand out.
If you’d like to learn more about my Card Club, you can find all the details in this blog post here.

Measurements:
-
Card Base: Early Espresso – 5 1/2″ x 8 1/2″, scored at 4 1/4″ and 7 1/4″
-
Cut out the top right and bottom right corners (each a 1 1/4″ square). This creates a 1 1/4″ x 3″ section where you’ll attach your flip-out panel.
-
-
Flip-Out Panel: Early Espresso – 3″ x 4″
-
Layer with Gathering Moments DSP – 2 3/4″ x 3 3/4″
-
-
Inside of Card: Basic White – 4″ x 5 1/4″
-
Add a strip of Gathering Moments DSP – 1 1/2″ x 5 1/4″
-
-
Left Side of Card Front: Gathering Moments DSP – 2 3/4″ x 5 1/4″
-
Sentiment: Crushed Curry cardstock, die cut using the Stylish Shapes Dies
-
Embellishments: A few Cajun Craze & Gold Dots to finish the look
This design shows how a simple card sketch for beginners can easily be turned into an elegant fun fold with just a few cuts and layers!
Would you like the PDF file for this card?
Click Here to Download the Free PDF File
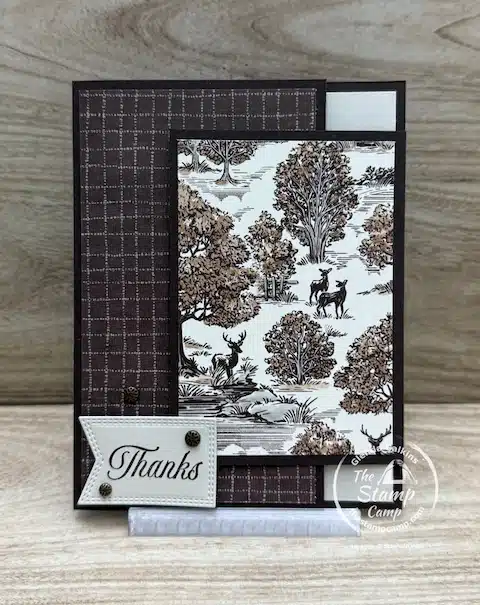
Card #3 – Autumn Toile Double Front Flap Card
Featuring: Autumn Toile Designer Series Paper, Amber Autumn Stamp Set, and Nested Essentials Dies
Finally, Card #3 brings another fun fold twist to this week’s simple card sketch templates! This time, I used the Autumn Toile Designer Series Paper paired with the Amber Autumn Stamp Set to create a cozy, seasonal design. The sentiment is die-cut using the Nested Essentials Dies, which add a clean, classic touch to the layout.
This card may look similar to the first two, but it has a few unique elements that make it stand out. It’s a double front flap card — an interactive design that opens in layers, revealing your beautifully coordinated papers and stamped images.
Measurements:
-
Card Base: Early Espresso – 5 1/2″ x 7 1/2″, scored at 4 1/4″
-
Front Panel DSP: Autumn Toile Designer Series Paper – 3″ x 5 1/4″
-
Flap Panel: Early Espresso – 3 1/2″ x 4 1/4″, scored at 3″
-
Adhere the 1/2″ scored section to the right-hand side of the card front.
-
Layer a piece of Basic Beige – 4″ x 5 1/4″ – over the top to conceal the flap hinge and create a finished look.
-
-
Sentiment: Stamped and die-cut using the Nested Essentials Dies, then popped up on the bottom left-hand corner of the card front. This placement allows the flap to tuck neatly under the sentiment to keep the card closed.
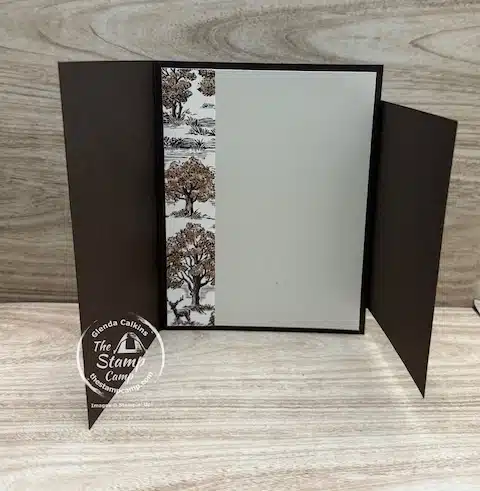
This design is another great example of how clean and simple card sketch layouts can be turned into creative fun fold cards with just a few simple adjustments. Even if you’re new to cardmaking, this is a wonderful simple card sketch for beginners that looks far more advanced than it is!
Here Is Your Shopping List for Today’s Simple Card Sketch Templates:


Price: $16.50


Click on any of the products that you wish to purchase and add them to your shopping cart. I truly appreciate any and all orders—your support helps me continue to share simple card sketch templates and creative inspiration each week.
Thanks so much for visiting my blog! Don’t forget to download the free PDF file and print today’s Card Sketch so you can recreate these clean and simple card sketch layouts in your own craft space.
Join me again next Wednesday for Card Sketch #26 and another week of simple card sketches for beginners and seasoned crafters alike!
October Customer Appreciation – Huge PDF file Featuring the Neutrals Color Family
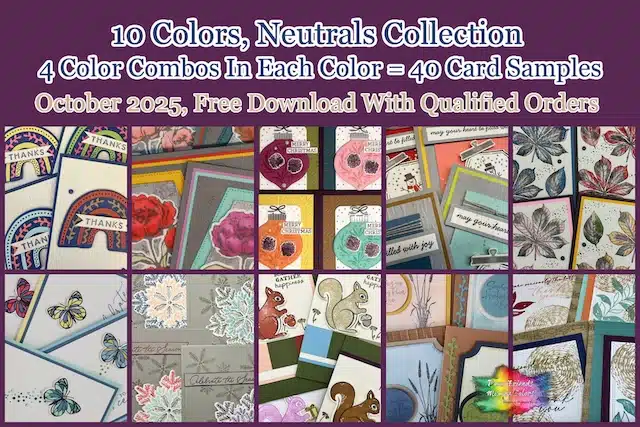 Orders of $50 or more (before tax and shipping) placed in my online store this month will qualify for an exclusive PDF download.
This month’s download includes:
-
Neutrals Color Combination Guide – Forty unique color combinations featuring the Neutrals Collection
-
Forty coordinating card ideas to inspire your crafting
-
Bonus PDF featuring creative ideas with the color Night of Navy
Please note: this Customer Appreciation PDF Download is not available for purchase—it’s my special gift of thanks to everyone who places a qualifying order with me.
This Month’s FREE PDF file featuring the Night of Navy Color Combinations:
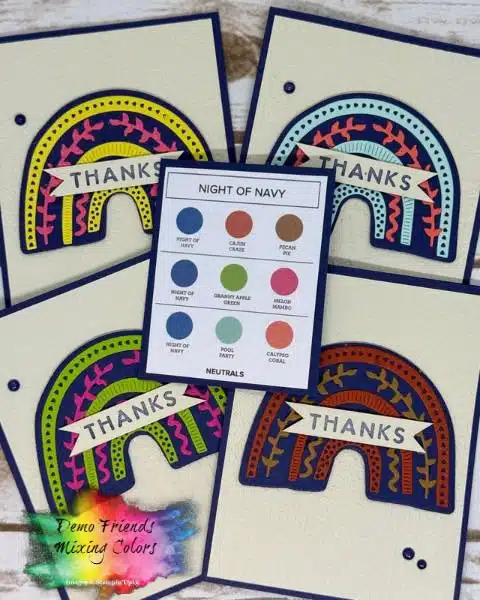
Click HERE to download the FREE Night of Navy PDF file.
Place your orders Here: https://stampl.ink/shop
2 thoughts on “Quick and Easy Cardmaking with Simple Card Sketch Templates”
For some reason, it won’t download today’s sketch to print. Love your sketches
Sorry about that Barb, it has been fixed, you should not have a problem now. Thanks for checking out the blog post and happy stamping!