
Welcome to Week #23 of my Simple Card Sketches for Beginners series! If you’ve been following along, you know each week I share a brand-new sketch designed to help spark your creativity and make stamping fun and easy. This week’s sketch is perfect for simple stamping for beginners—quick to put together, easy to customize, and a great foundation for building your handmade card collection.
Whether you are brand new to stamping or a seasoned crafter looking for inspiration, these easy card sketches from The Stamp Camp give you endless possibilities.
This Week’s Simple Simple Stamping For Beginners Card Sketch (#23)
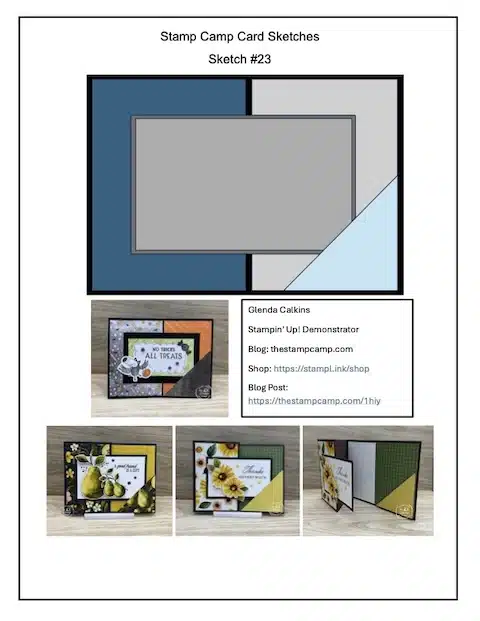
Today’s sketch is all about clean lines and simple layers. With just a card base, a strip of Designer Series Paper, and a focal element with your sentiment, you’ll have a beautiful card in minutes.
That’s the beauty of simple stamping cards—they let the paper and sentiment do all the work while still giving you a polished, professional look. This design is quick, beginner-friendly, and versatile enough to use over and over again with different colors and themes.
To download and print Sketch #23 Click HERE
To download and print Sketch #22 Click HERE
To download and print Sketch #21 Click HERE
To download and print Sketch #20 Click HERE
To download and print Sketches #11 – #20 Click HERE
To download and print Sketches #1 – #10 Click HERE.
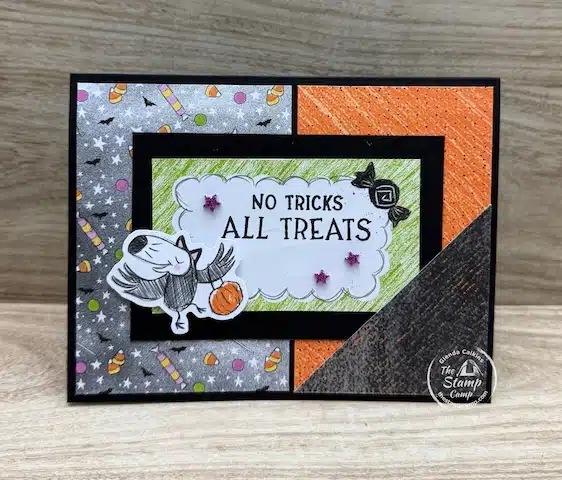
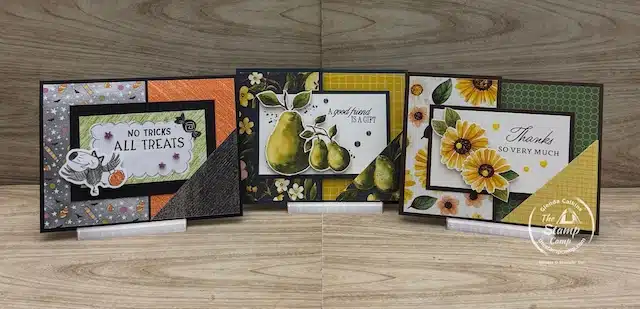
Card #1 – Simple Yet Looks Like a Fun Fold
Card #1 is as simple as the sketch itself! At first glance, it may look like a fun fold card, but it’s actually just one layer. The card base is 5 1/2″ x 8 1/2″ scored at 4 1/4″. By layering different pieces of Designer Series Paper on the front, it gives the illusion of a fun fold without the extra cutting.
For this sample, I used the Spooky Sweet Designer Series Paper. The sentiment and the little die-cut trick-or-treater come from the coordinating Spooky Halloween Stamp Set. The best part? This paper pack includes two full sheets of coordinating die cuts that you can punch out—making this card even easier to assemble!
Here are the paper measurements I used:
-
DSP layer #1: 2 3/4″ x 4″
-
DSP layer #2: 2 1/2″ x 4″
-
Triangle in the corner: 2 1/2″ x 2 1/2″, cut on the diagonal
-
Sentiment piece (DSP): 2″ x 3 1/2″
-
Sentiment mat (Basic Black cardstock): 2 5/8″ x 4″
This layout shows just how versatile simple stamping for beginners can be—you get a card that looks detailed and impressive without adding complicated folds or techniques.

On the inside of the card, I added a piece of Basic White cardstock (4″ x 5 1/4″) to give plenty of space for writing your message. To tie the design together, I attached a 3/4″ x 5 1/4″ strip of the coordinating Spooky Sweet Designer Series Paper along the edge. This simple touch brings the theme from the front of the card to the inside, giving it a finished and polished look.
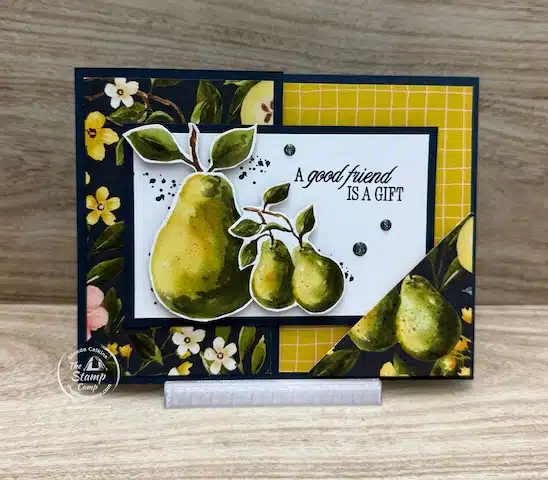
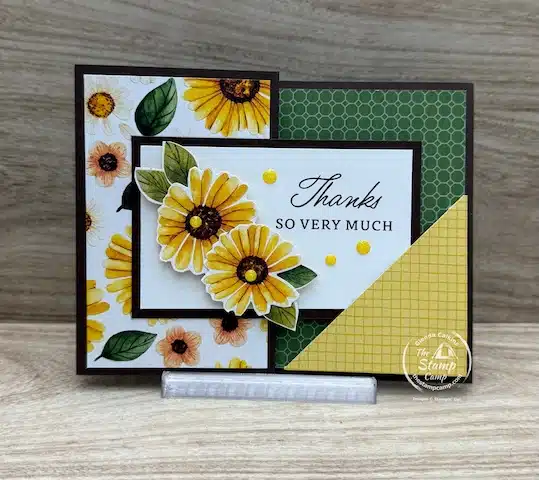
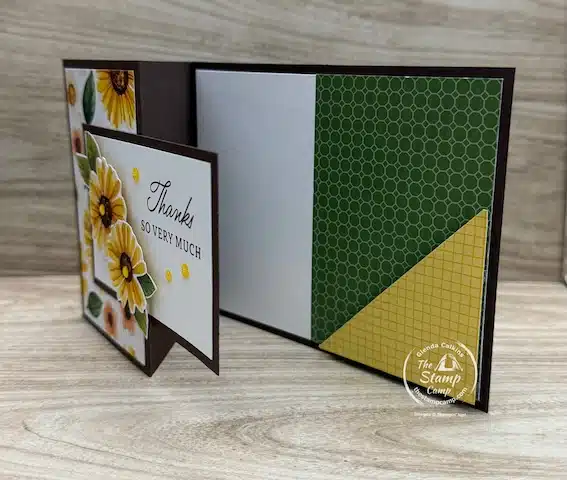
Card #2 may look similar to Card #1, but this time it really is a fun fold card! The card base is Secret Sea cardstock, 4 1/4″ x 8 1/4″. When cutting down your original 4 1/4″ x 11″ piece, the 2 3/4″ strip you cut off is turned and reused on the card front as the mat for the sentiment and pears—no waste here!
For this version, I used the Painterly Pears Designer Series Paper. The pears on the card front were hand-cut directly from the paper, and the sentiment comes from the coordinating Perfectly Pears Stamp Set.
Here are the paper measurements for this card:
-
DSP on the card front: 2 1/2″ x 4″
-
Inside layer (Basic White): 4″ x 5 1/4″
-
Inside DSP layer: 2 3/4″ x 4″
-
Diagonal piece: 2 1/4″ x 2 1/4″, cut on the diagonal
To create the closure, the small diagonal DSP piece is popped up with Foam Adhesive Strips. When you close the card, the corner of the sentiment panel slides neatly underneath, holding it shut. It’s like a clever corner pocket card—simple to make, but it adds a really fun interactive element!
In this photo, you can see how the side panel from the card front was cut off and then reused by attaching it horizontally. This creates the perfect mat for the sentiment and pear images, tying the whole design together while making great use of that extra piece of cardstock.
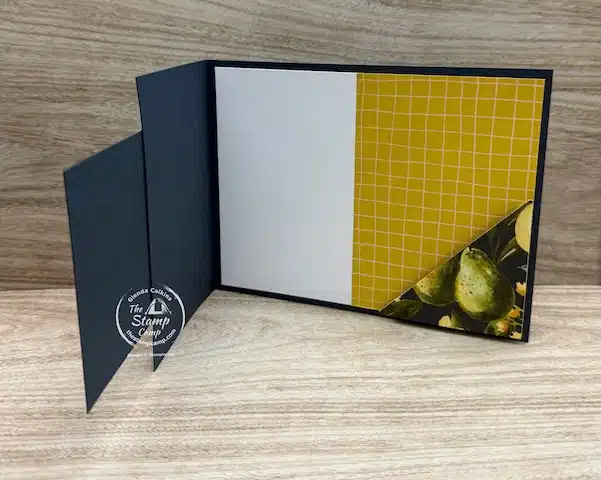
Card #3 – Z-Fold Corner Pocket Card
Card #3 is another fun fold card, but this time it’s stepped up with a Z-Fold base! At first glance, it looks similar to Card #2, but instead of a simple fold, this one opens with an interactive Z-Fold design.
The card base is Early Espresso cardstock, 4 1/4″ x 11″, scored at 2 3/4″ and 5 1/2″. You’ll also need an extra piece of Early Espresso measuring 4″ x 2 1/2″ to use as the mat for the front sentiment and flowers.
For this version, I used the Floral Impressions Designer Series Paper. The flowers on the card front were hand-cut from the DSP, and the sentiment comes from the coordinating Impressions Abloom Stamp Set.
Here are the measurements for this card:
-
DSP on the card front: 2 1/2″ x 4″
-
Inside Basic White layer: 4″ x 5 1/4″
-
Inside DSP layer: 2 3/4″ x 4″
-
Corner piece: 2 1/2″ x 2 1/2″ square, cut on the diagonal
Once again, the diagonal DSP piece is popped up to create a corner pocket closure. The front panel slides neatly underneath the corner, holding the Z-Fold shut while adding a clever, interactive detail.
This card is a wonderful example of how a simple sketch can evolve into a completely different style of fun fold card, while still keeping the cutting and assembly very beginner-friendly.
Wrapping Up Week #23
That’s it for Week #23 of Simple Card Sketches for Beginners! Whether you tried Card #1 for a clean, single-layer look, Card #2 for a fun fold corner pocket, or Card #3 with the Z-Fold twist, each design shows how easy it is to create beautiful simple stamping cards.
Using these easy card sketches from The Stamp Camp, you can make cards that look intricate but are perfect for simple stamping for beginners. From single-layer designs to interactive fun fold cards, these sketches provide inspiration and confidence to explore your own creativity.
Give these sketches a try, mix and match your favorite Designer Series Paper, and watch how quickly you can build a collection of handmade cards that your friends and family will love!
Shopping List for These Simple Stamping for Beginners Card Sketches:


Click on any of the supplies you wish to purchase and add them to your shopping cart. Thanks SO much for any and all orders I appreciate it so very much!
If you enjoy simple stamping for beginners card sketches, make sure to come back next week Wednesday!
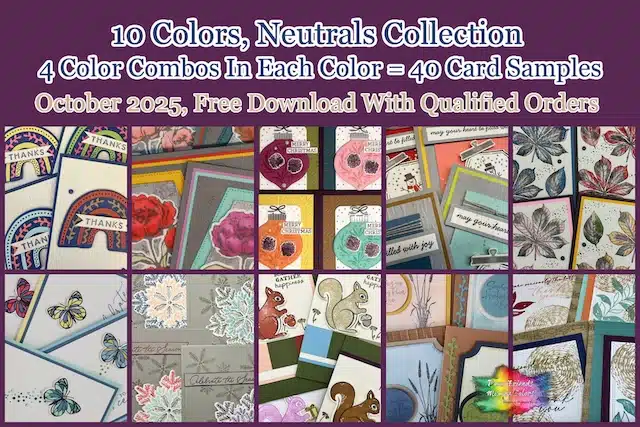
October Customer Appreciation – Huge PDF file Featuring the Neutrals Color Family
 Orders of $50 or more (before tax and shipping) placed in my online store this month will qualify for an exclusive PDF download.
This month’s download includes:
-
Neutrals Color Combination Guide – Forty unique color combinations featuring the Neutrals Collection
-
Forty coordinating card ideas to inspire your crafting
-
Bonus PDF featuring creative ideas with the color Night of Navy
Please note: this Customer Appreciation PDF Download is not available for purchase—it’s my special gift of thanks to everyone who places a qualifying order with me.
Place your orders Here: https://stampl.ink/shop