
Creative stamping ideas for beginners can be surprisingly simple when you know where to start. When I meet a new customer who’s unsure how to begin, I always recommend starting with a basic card sketch or two. These easy layouts are a great way to jump-start creativity and build confidence. Once they’re comfortable, I show them how that same sketch can be transformed into a fun fold card—taking their crafting to the next level with just a few changes.
Each sketch opens the door to easy stamping techniques that are perfect for beginners, making the creative process enjoyable and approachable. Join me every Wednesday for a brand-new sketch designed to expand your creativity or spark your new stamping journey.
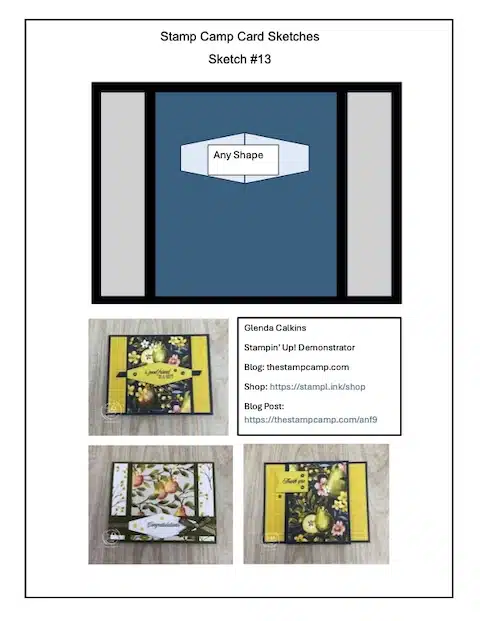
It’s Week #13 in my Card Sketch Series, so let’s dive into today’s creative inspiration!
To download and print today’s creative stamping ideas for beginners Click HERE
To download and print Sketch #12 click HERE.
To download and print card sketch 11 click HERE.
If you would like to print my first 10 clean and simple card sketch layouts click HERE.
This week’s sketch is all about simplicity with style—a layout that’s perfect for beginners but versatile enough for seasoned stampers to stretch their creativity. Whether you’re reaching for your favorite patterned paper or trying out a new stamp set, this sketch gives you the perfect starting point.
As always, I’ll walk you through a basic version of the card and then show you how to take it a step further by turning it into a fun fold! You’ll see how easy it is to use the same layout in multiple ways, making your crafting time even more productive and enjoyable.
So grab your paper, stamps, and ink, and let’s get creating!
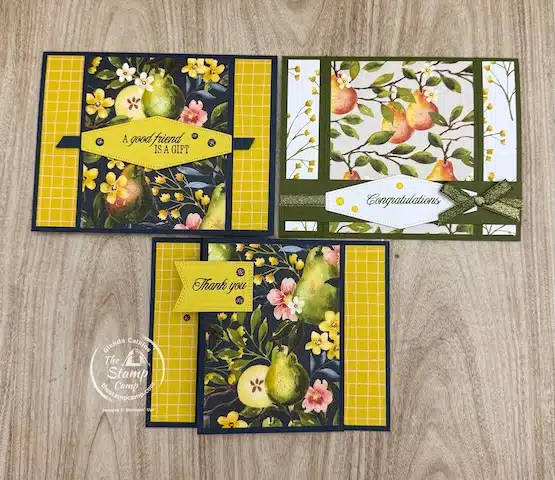
For today’s card samples, I’m featuring the new Online Exclusive Painterly Pears Designer Series Paper—and let me tell you, it’s stunning! The soft watercolor textures and vibrant pear-themed prints make this paper a joy to create with.
I paired the paper with sentiments from the coordinating Perfectly Pears Bundle, which includes gorgeous stamps and dies that bring your cards to life. To finish off each design, I added a touch of sparkle using the Low Profile Sparkle Dots—a subtle yet dazzling embellishment that perfectly complements the suite.
All of these products are part of the Painterly Pears Suite, which is currently on the Low Inventory List. So if this paper pack and its coordinating products are on your wish list, now is the time to order—before they sell out!
And here’s the cherry on top:
Today —Friday, July 25, 2025—enjoy FREE Shipping on all orders of $75 or more!
I don’t include measurements on my card sketches—and that’s on purpose! I want you to feel free to explore, adjust, and truly make the sketch your own. Think of the sketch as a creative starting point—a foundation to build on, not a rulebook to follow. Whether you change the orientation, shift the layers, or play with different shapes and sizes, it’s all part of the fun!
That said, I do share the exact measurements for the card samples I’m showing in today’s post. You’re welcome to jot them down on your printed sketch or skip the measurements entirely and just go where your creativity leads.
Here are the details for today’s card:
-
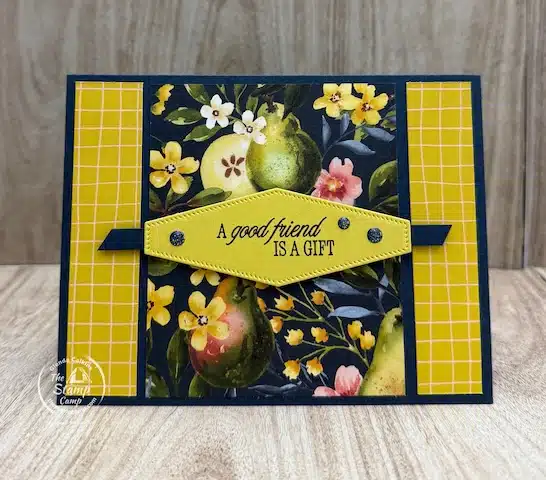
Card base: Secret Sea cardstock, 5 1/2″ x 8 1/2″, scored at 4 1/4″
-
Painterly Pears DSP pieces: (2) strips at 7/8″ x 4″ and (1) panel at 3 1/4″ x 4″
-
Sentiment: Choose any shape you like and place it anywhere on the card front—there are no rules here!
This second card may look like the sketch and the first card at first glance—but there’s a fun surprise! It’s actually a fun fold card known as a bridge card, and it features two openings for an interactive twist.
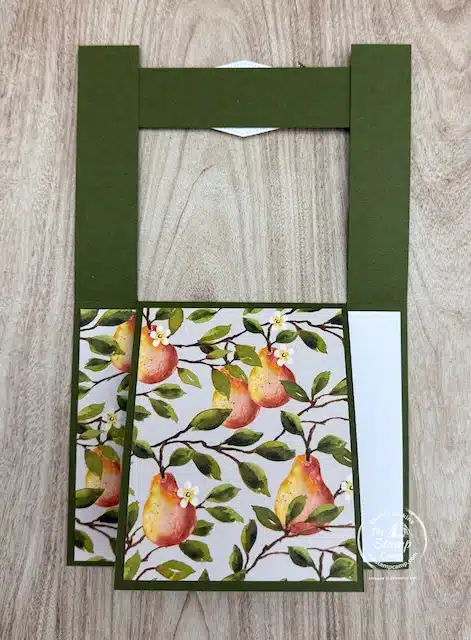
The unique part of this design is the “bridge” panel that runs across the bottom of the front. It connects the two side panels, giving the card dimension and stability while still allowing it to fold flat for mailing. It’s a creative way to take the original sketch and transform it into something a little more elevated—literally and figuratively!
Even though it follows the same general layout as the first card, this version shows how easy it is to stretch your sketches into fun fold formats for a whole new look.
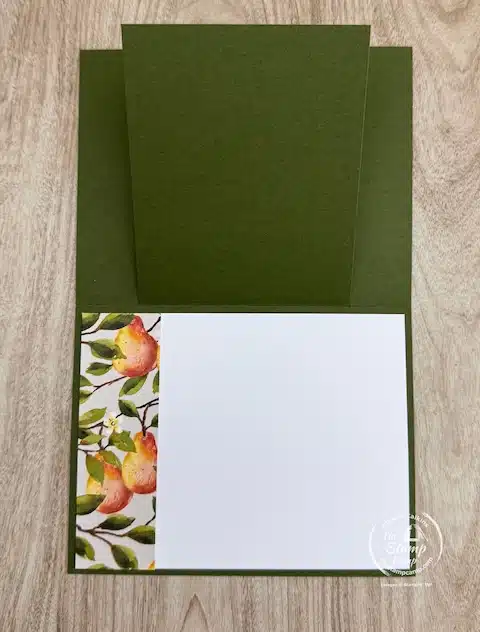
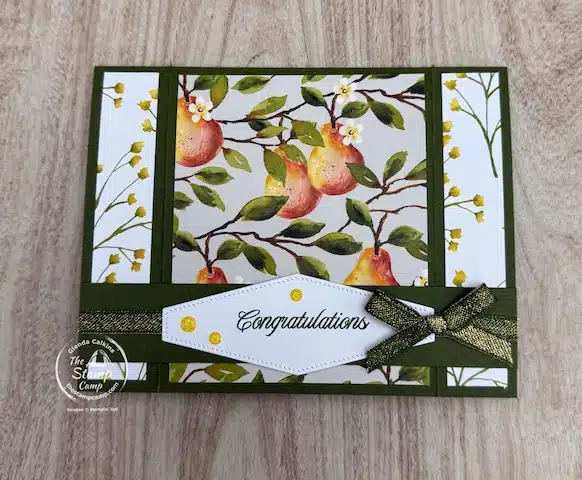
Once you open this card all the way, you’ll be greeted by the gorgeous Painterly Pears Designer Series Paper on the inside—along with ample space to write a heartfelt message or stamp a sentiment for your recipient. For my sample, I used the “Congratulations” sentiment from the Perfectly Pears Bundle, which makes this a lovely choice for a wedding or anniversary card.
Although it follows the same sketch inspiration, the measurements are just a bit different to accommodate the bridge fold design.
Measurements:
-
Card Base: Mossy Meadow – 5 1/2″ x 8 1/2″, scored at 4 1/4″
-
After scoring, rotate the card base so the 5 1/2″ side is at the top of your trimmer or scoring board. Line the left edge up at the 1″ mark, then cut down from the top edge to the 4 1/4″ score line. Repeat this from the opposite side to create your two flaps.
-
Painterly Pears DSP:
-
(2) pieces at 3/4″ x 4″ for the side flaps
-
(1) piece at 3 1/4″ x 4″ for the center panel
-
-
Bridge Panel: 1″ x 5 1/2″
-
Inside Basic White Panel: 4″ x 5 1/4″
To finish the look, I added the Mossy Meadow & Gold Ribbon from the Painterly Pears Suite, adding just the right touch of shimmer and elegance. This extra bit of sparkle really takes the card to the next level!

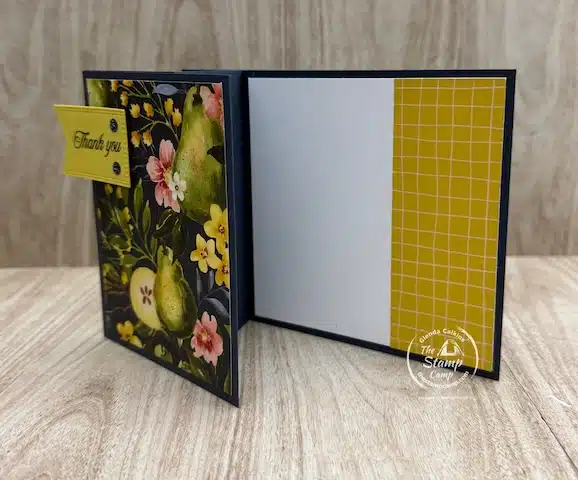
This final card might look just like the first one at a glance—but look again! While I used the same Designer Series Paper prints as the original card, the layout and fold are completely different. This card is actually a Book Binding Z-Fold—a fun and interactive design that gives your card extra movement and dimension.
The sentiment piece is also slightly different in size and placement, which helps give this card its own personality, even though it shares the same beautiful Painterly Pears DSP.
Measurements & Instructions:
-
Card Base: Secret Sea cardstock – 4 1/4″ x 11″, scored at 2 1/8″, 4 1/4″, and 5 1/2″
-
Fold the card in half at the 5 1/2″ score line.
-
Seal the card front closed between the 4 1/4″ and 5 1/2″ score lines to create your book binding.
-
Now take the 2 1/8″ score line and fold it back toward the left, creating the Z-fold effect.
-
-
Additional Layers:
-
Secret Sea panel: 3 1/4″ x 4 1/4″ (this attaches to the Z-Fold on your card front)
-
Painterly Pears DSP:
-
1″ x 4″
-
1 1/2″ x 4″
-
3″ x 4″
-
-
Basic White inside panel: 4″ x 4″
-
This clever fold is a great example of how you can use the same sketch and DSP but create something with an entirely different interactive feel.
Stamping is more than just a hobby—it’s therapeutic. Whether you’re feeling stressed, overwhelmed, or just need a little pick-me-up, creating a handmade card can lift your spirits. And the best part? It does the same for the person who receives it. What are you waiting for? Get creating and share the joy—this hobby is truly a twofer!
Creative Stamping Ideas for Beginners Begins With Supplies, So Here Is Your Supply List:


Don’t miss out on this chance to stock up on your favorites while saving on FREE shipping. Let’s get crafting!

If you are a beginner stamper do you find card sketches to be creative stamping ideas for beginners? Let me know.
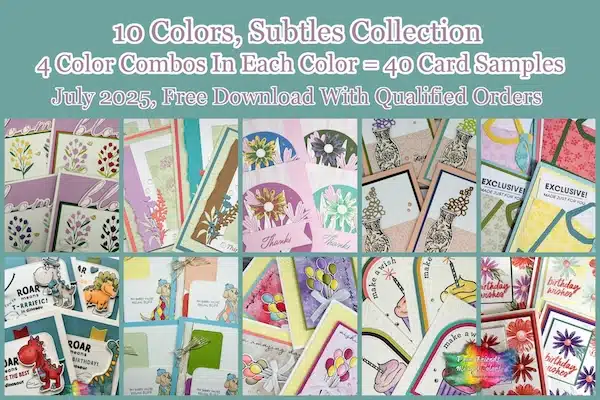
July Customer Appreciation – Huge PDF file
 Orders of $50.00 or more (before tax and shipping) placed on my online store will qualify for this month’s download.
This month’s PDF download includes the Subtles Collection Color Combination: Forty Color Combinations and Forty Cards in the download.
Plus, a Bonus PDF file featuring the Bubble Bath color.
To receive all the details click HERE.
My customer appreciation (PDF Download) is unavailable for purchase and only available with qualified orders. It is a token of appreciation to all who place orders with me.
Place your orders Here: https://stampl.ink/shop