
Welcome to The Stamp Camp, your go-to place for card sketch inspiration for handmade cards!
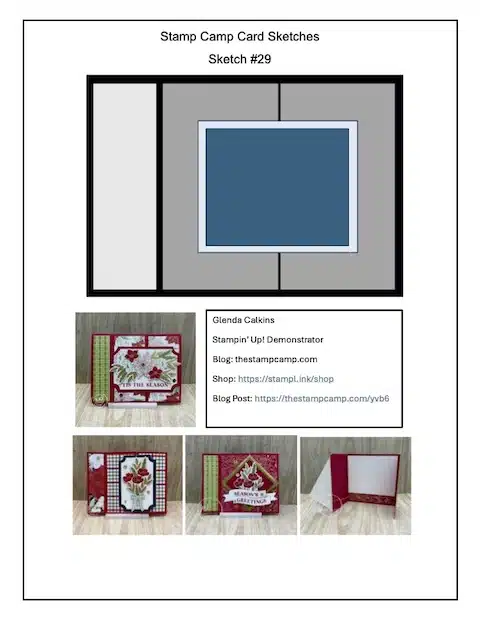
Today, I’m sharing Card Sketch #29, and this one is a real winner if you love using up your Designer Series Papers.
This week’s card sketch is simple, stylish, and so versatile—you can create it for any occasion. Just switch up your printed papers, and you’re already halfway to creating a beautiful handmade card in no time! Whether you’re crafting a birthday card, a thank-you note, or a holiday greeting, this design works perfectly.
One of the things I love about card sketches is how they take the guesswork out of design. You can follow the layout as-is for a quick and easy card, or dress it up with extra layers, embellishments, or stamped images for more detail.
So grab your favorite Designer Series Paper, your cardstock, and a few embellishments—and let Card Sketch #29 from The Stamp Camp inspire your next handmade card!
Stay tuned, because each week I’ll be bringing you a new card sketch inspiration to keep your creative mojo flowing.
To download and print Sketch #29 Click HERE
To download and print Sketch #28 Click HERE
To download and print Sketch #27 Click HERE
To download and print Sketch #26 Click HERE
To download and print Sketch #25 Click HERE
To download and print Sketch #24 Click HERE
To download and print Sketch #23 Click HERE
To download and print Sketch #22 Click HERE
To download and print Sketch #21 Click HERE
To download and print Sketch #20 Click HERE
To download and print Sketches #11 – #20 Click HERE
To download and print Sketches #1 – #10 Click HERE.
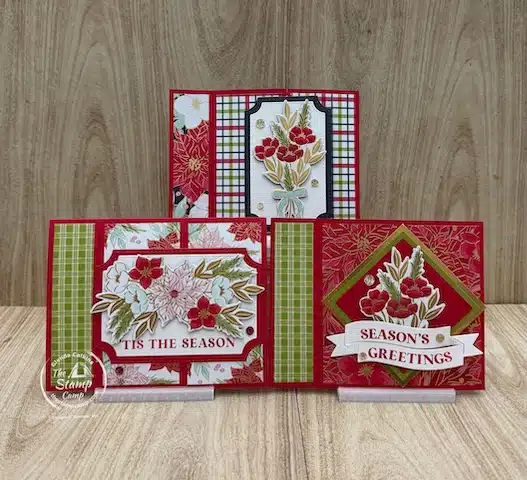
Now that you’ve seen today’s Easy Card Sketch Inspiration for Handmade Cards, let’s take a closer look at each of the beautiful designs and details:
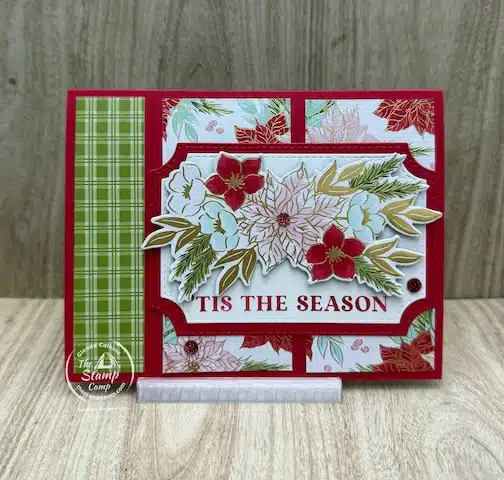
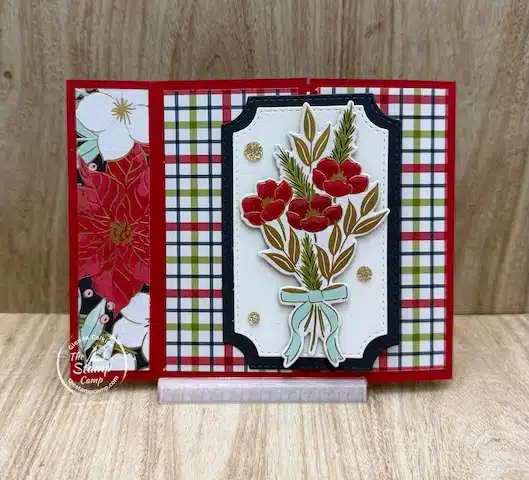
Card #1 follows the sketch perfectly! It’s not a fun fold card or an interactive card—just a classic design that looks like it could be a fun fold. I love when a card sketch gives you that little surprise factor while still being quick and easy to create.
All of today’s cards showcase the Traditions of Christmas Specialty Designer Series Paper, which is featured in this month’s Stamp Camp at Home Card Club Kit. The elegant patterns and festive colors in this paper pack make it ideal for holiday handmade cards.
If you’d like more information about my Card Club Kit, please visit the blog post HERE for all the details.
Let’s take a look at some of the measurements for Card #1 so you can recreate it at home:
-
Card Base: Real Red – 5 1/2″ x 8 1/2″, scored at 4 1/4″
-
Designer Series Paper: Traditions of Christmas Specialty DSP
-
(1) piece – 1″ x 4″
-
(2) pieces – 1 7/8″ x 4″
-
For the focal point, I used the Branching Out Dies to create the Real Red and Basic White mat layers. The sentiment was stamped in Real Red ink using the coordinating Traditional Labels stamp set. I then used the Christmas Greenery Bundle dies to cut the floral bouquet right from the paper pack—such an easy way to add beautiful detail!
To finish it off, I added a few of those gorgeous Real Red sparkly sequins for the perfect touch of holiday shimmer.
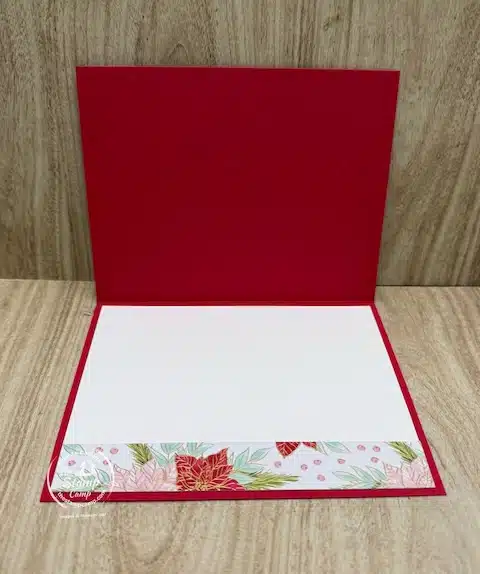
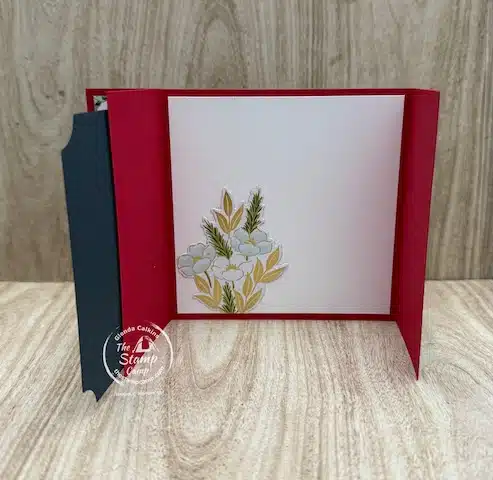
For the inside of the card, I added a piece of Basic White cardstock measuring 4″ x 5 1/4″. To tie the design together, I adhered a coordinating strip of the Traditions of Christmas Specialty Designer Series Paper across the bottom edge, cut to 3/4″ x 5 1/4″.
This simple touch brings the look of the Designer Series Paper from the card front into the inside, giving your handmade card a polished and professional finish. It’s those little details that make a big difference!
Card #2 – Book Binding Gatefold Card
Card #2 is called a Book Binding Gatefold Card, and it’s such a fun and easy fun fold card to create! It’s just a bit different from your typical card, but still quick enough to make in multiples—perfect for holiday handmade cards.
For this design, I switched things up by turning the Branching Out Dies vertically instead of horizontally. This simple change completely transforms the look of the card front while still following the card sketch inspiration from The Stamp Camp.
Here are the measurements so you can recreate it:
-
Card Base: Real Red – 4 1/4″ x 11″, scored at 2 1/8″, 3 3/8″, and 8 7/8″
-
Secure the section between the 2 1/8″ and 3 3/8″ score lines closed to create the book binding effect
-
Designer Series Paper: Traditions of Christmas Specialty DSP
-
(1) piece – 1″ x 4″
-
(2) pieces – 1 7/8″ x 4″
-
For the focal point, I used the Branching Out Dies again with Secret Sea and Basic White cardstock for the layered mats. The floral bouquet was die cut directly from the Traditions of Christmas Specialty Designer Series Paper, giving it a beautiful, cohesive look without extra stamping.
To finish it off, I added a few elegant Gold Sequins for that perfect festive sparkle.
For the inside of this card, I used a piece of Basic White cardstock measuring 4″ x 4″. Along the bottom edge, I adhered a floral bouquet that I die cut from the Traditions of Christmas Specialty Designer Series Paper.
This is a great way to use up those smaller printed pieces that fall off the edges or sides of your DSP sheets. Don’t toss those 2 1/2″ or 1 3/4″ printed pieces—use them to decorate the insides of your handmade cards! It’s an easy way to add a coordinated finishing touch while making the most of your beautiful paper.
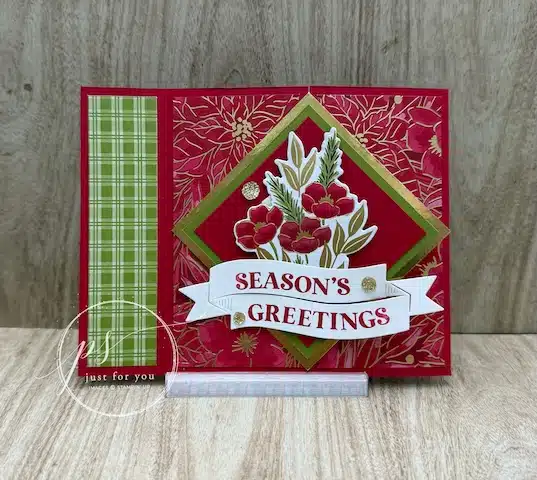
Card #3 – Diamond Focal Point Twist
Card #3 follows the exact same measurements as Card #2, but this time I switched up the focal point on the card front for a fresh new look. Instead of using the Branching Out Dies, I created a layered focal point using squares that I rotated to form a diamond shape.
Only the left-hand side of the diamond stack is adhered to the card front, allowing the gatefold design to open smoothly. This layout gives the illusion of a more complex design while still being quick and easy to create—another great example of card sketch inspiration for handmade cards from The Stamp Camp!
Here are the measurements so you can recreate this design:
-
Card Base: Real Red – 4 1/4″ x 11″, scored at 2 1/8″, 3 3/8″, and 8 7/8″
-
Designer Series Paper: Traditions of Christmas Specialty DSP
-
(1) piece – 1″ x 4″
-
(2) pieces – 1 7/8″ x 4″
-
-
Squares:
-
Gold Foil – 2 7/8″ x 2 7/8″
-
Old Olive – 2 5/8″ x 2 5/8″
-
Real Red – 2 3/8″ x 2 3/8″
-
The sentiment and banner die are both from the coordinating Traditional Labels Bundle. For the floral element, I used one of those smaller bouquet prints that gets cut off from the bottom edge of the Designer Series Paper. It worked perfectly here because the sentiment banner covers the lower edge, so you’d never know it’s only a partial image!
This design is another fun and festive way to make the most of your Traditions of Christmas Specialty Designer Series Paper and to stretch your creativity with simple yet striking layouts.
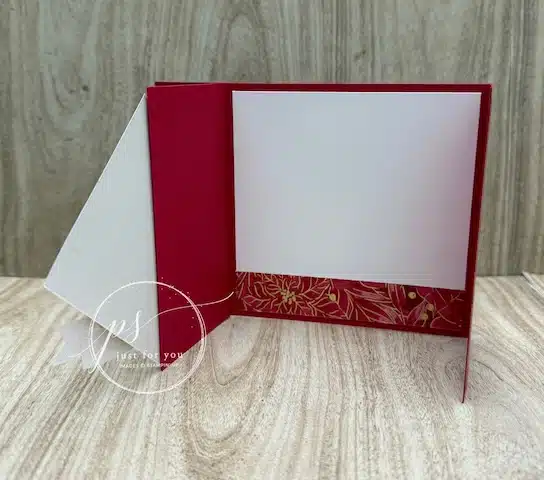
For the inside of this card, I added a piece of Basic White cardstock measuring 4″ x 4″. To coordinate with the card front, I adhered a strip of the Traditions of Christmas Specialty Designer Series Paper across the bottom edge, cut to 3/4″ x 4″.
I’ve also created a PDF file for this fun fold version of my card sketch that you can download and print HERE. Be sure to keep it in your Card Sketch Notebook for future reference!
If this is your first time visiting The Stamp Camp and seeing my card sketches, I highly recommend starting a Card Sketch Notebook. Just grab a 3-ring binder and some page protectors, print out the card sketches, and slip them inside. It’s a great way to keep all your card sketch inspiration for handmade cards in one place—ready to spark creativity whenever you sit down to craft!
The Best News!
The best news is that this gorgeous Traditions of Christmas Specialty Designer Series Paper is back in stock—so now’s the perfect time to order your pack (or packs!) before it sells out again.
Shopping List:
Here is your shopping list for these projects so you can recreate all three card sketch designs at home. Simply click on any of the products below to add them to your shopping cart.


Price: $16.50


Click on any of the supplies you wish to purchase and add them to your shopping cart, Thank You! Thank You! For Your order!
Thank you so much for stopping by The Stamp Camp today! I hope these card sketches inspire you to create beautiful handmade cards for every occasion. Don’t forget to download your Card Sketch #29 PDF and add it to your Card Sketch Notebook for future inspiration.
November Customer Appreciation Gift!
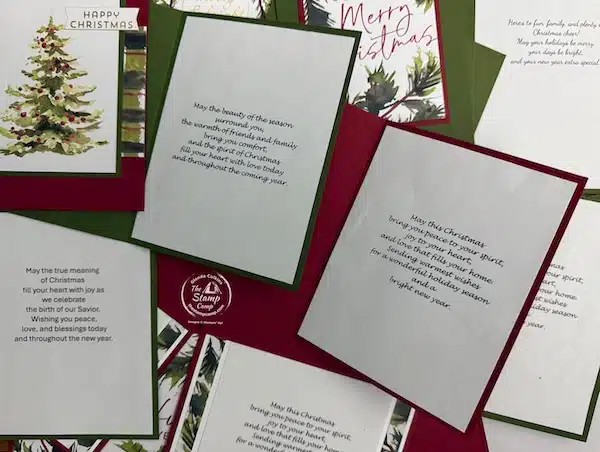
Do you ever struggle with what to write inside your Christmas cards—or maybe you don’t have the perfect inside sentiment stamp? Well, I’ve got you covered!
When you place a minimum $30 (before shipping and tax) online Stampin’ Up! order with me this month, you’ll receive an exclusive PDF file featuring 6 different Christmas card sentiment inserts.
Each sentiment is provided in both horizontal and vertical formats, with 4 of the same sentiment per sheet—ready to print, cut, and use!
How to Use:
-
Print the sentiment of your choice.
-
Cut the sheet in half in both directions.
-
Adhere the insert to the inside of your card.
I typically cut my inserts to 4″ x 5-1/4″, but if you’d like to mat your sentiment on another color of cardstock, trim your sentiment insert to 3-3/4″ x 5″ instead.
Make your Christmas cards extra special this year with beautiful, heartfelt sentiments—ready to go and easy to use!
Place your orders Here: https://stampl.ink/shop