
Welcome to Card Sketch #36, where you’ll always find quick and easy card sketch ideas right here at The Stamp Camp! Whether you’re a longtime reader or this is your very first visit, I’m so glad you’re here.
If you’re new to my blog, no worries at all — you’ll find all of my simple card sketch templates listed below. You can click on the sketches you still need or print them all. I highly recommend grabbing a 3-ring binder and some page protectors so you can organize your sketches in one place. Once printed and stored, you’ll have the perfect inspiration book to keep on hand whenever you’re ready to create.
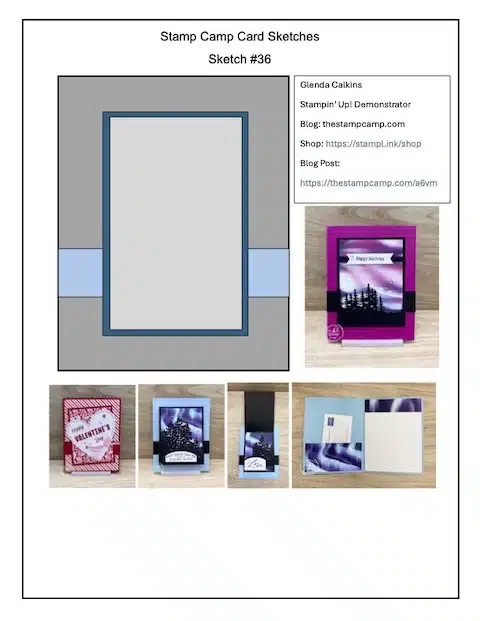
To download and print Sketch #36 Click HERE
To download and print Sketch #35 Click HERE
To download and print Sketch #34 Click HERE
To download and print Sketch #33 Click HERE
To download and print Sketch #32 Click HERE
To download and print Sketch #31 Click HERE
To download and print Sketches #21 – #30 Click HERE
To download and print Sketches #11 – #20 Click HERE
To download and print Sketches #1 – #10 Click HERE
One thing you’ll notice about my easy card sketch templates is that I do not include measurements directly on the sketches. This is intentional! I want you to make each sketch your own and adapt it to whatever supplies you have on hand. To make things easy, each sketch includes the blog post where it was originally featured. Simply click through to see the cards up close and get all the measurements you’ll need from that specific blog post.
These quick and easy card sketch ideas are designed to spark creativity, save time, and help you get more handmade cards made — without overthinking the design. They work beautifully with Designer Series Paper, scraps, and your favorite stamps and embellishments.
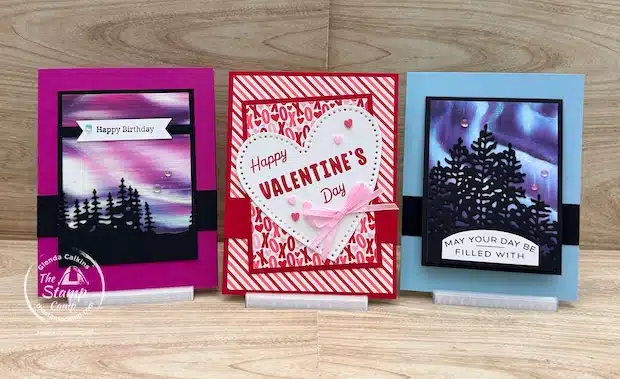
Now let’s take a look at today’s sketch #36 along with the card samples I created using this layout. I can’t wait for you to see how versatile this sketch can be!
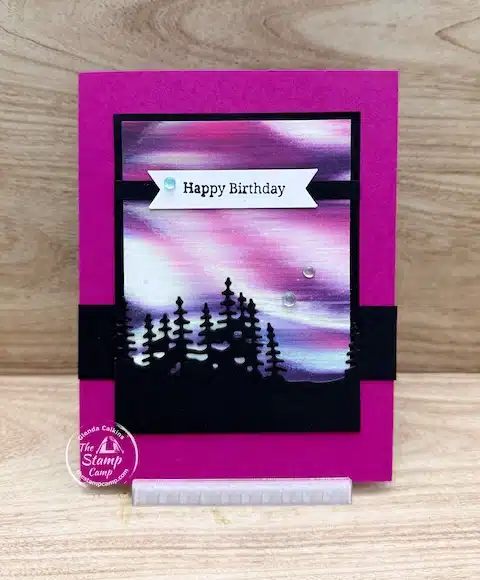
Card #1
Card #1 is created just as the sketch suggests, keeping the layout simple and true to the design. The card base is Berry Burst cardstock, cut to 5 1/2″ x 8 1/2″ and scored at 4 1/4″.
The Basic Black cardstock layers were cut to:
-
1″ x 4 1/4″
-
1/4″ x 3 1/4″
-
3 1/4″ x 4 1/4″
The Lights of Aurora 6″ x 6″ Designer Series Paper was cut to 3″ x 4″, adding a beautiful night-sky backdrop to the design.
For the focal point, I die cut the trees from Basic Black cardstock using the coordinating Light & Wonder Dies. The sentiment and banner were created with the Banner Sayings Bundle, keeping the greeting clean and perfectly sized for the sketch.
To finish off the night scene, I added a few Frosted Iridescent Dots for just the right amount of sparkle.
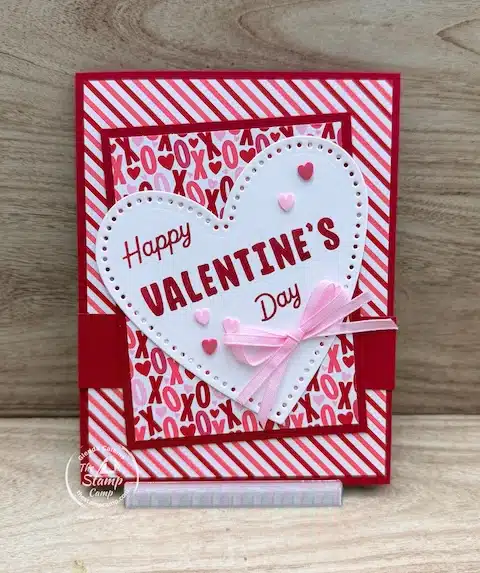
For Card #2, I switched things up by using the Made with Love Designer Series Paper along with the coordinating Endless Love Bundle. Even though this card uses the same sketch as Card #1, it has a completely different look and feel. That’s the beauty of quick and easy card sketch ideas—simply changing the Designer Series Paper and the occasion can make the layout look brand new.
The card base is Real Red cardstock, cut to 5 1/2″ x 8 1/2″ and scored at 4 1/4″. I layered a piece of Made with Love Designer Series Paper measuring 4″ x 5 1/4″ directly onto the card front.
The center panel measurements are the same as Card #1:
-
Real Red cardstock mat: 3 1/4″ x 4 1/4″
-
Designer Series Paper: 3″ x 4″
This time, instead of adhering the panel straight, I placed it on the card front at a slight angle to add extra visual interest.
For the focal point, I die cut the large heart using the Endless Love Bundle and stamped the Happy Valentine’s Day sentiment in Real Red ink. To soften the look and add texture, I finished the card with Bubble Bath ribbon and a few pieces from the Loose Valentine’s Assortment.
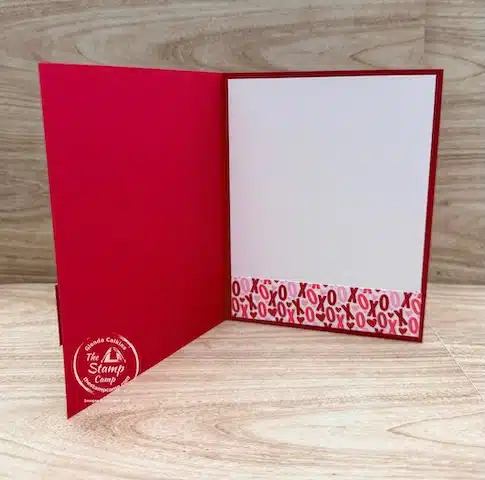
Card #1 & #2 – Inside
For the inside of both Card #1 and Card #2, I kept things simple and coordinated. I added a piece of Basic White cardstock measuring 4″ x 5 1/4″ to each card base.
To tie the inside to the front design, I added a strip of the coordinating Designer Series Paper across either the bottom or the top edge—whichever you prefer. This is an easy way to use up leftover paper and gives the inside a finished look without adding extra bulk.
I generally cut my Designer Series Paper strips to 3/4″ x 4″ or 1″ x 4″, depending on the look I’m going for and the pattern of the paper.
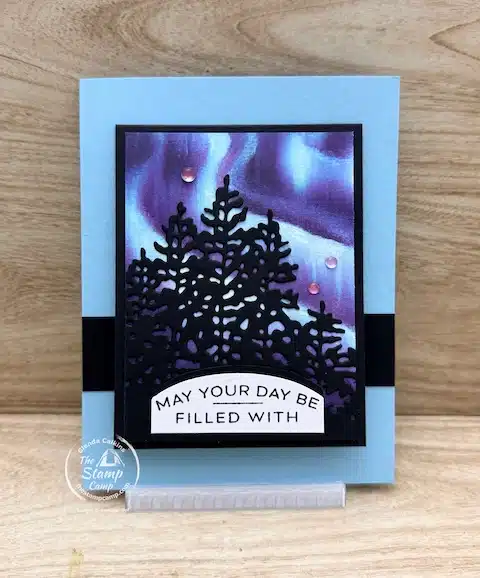
Card #3 looks very similar to Card #1 at first glance, but this one has a fun surprise—it’s a fun fold card! The overall measurements are basically the same as Card #1, with just a few small adjustments.
The card base is Balmy Blue cardstock, cut to 5 1/2″ x 8 1/2″ and scored at 4 1/4″. One of the Basic Black cardstock pieces is 1″ x 4 1/4″, just like before. However, what appears to be a center mat on the card front is actually a mini card.
The mini card measures 3 1/4″ x 8 1/2″, creating a fun interactive element while still keeping the design clean and simple. I used the Lights of Aurora Designer Series Paper again for the front panel, cut to 3″ x 4″, to keep it coordinated with Card #1.
For the focal point, I die cut the tree image from Basic Black cardstock using the coordinating Light & Wonder Dies. The sentiment comes from the Light & Wonder Bundle and was punched out using the Sign Design Punch. I also die cut a piece of Basic Black cardstock to create a mat behind the sentiment for extra contrast.
To finish off the card, I added a few Frosted Iridescent Dots, which are absolutely perfect for enhancing the aurora night scene.
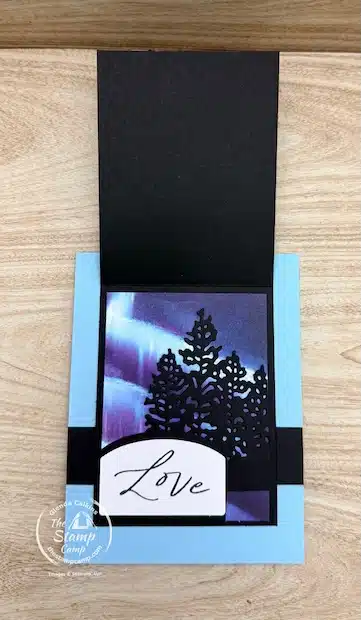
When you flip up the mini card on the card front, it reveals another beautiful aurora night scene, similar to the front design, along with an additional sentiment.
The Lights of Aurora Designer Series Paper on the inside of the mini card is cut to the same size as the front, 3″ x 4″, keeping the look cohesive. The sentiment piece was created the same way as the front as well, making this fun fold card easy to assemble while still feeling special.
This interactive element is a great example of how easy card sketch templates can be turned into something a little more unique with just one simple change—perfect for when you want to add a “wow” factor without extra work.
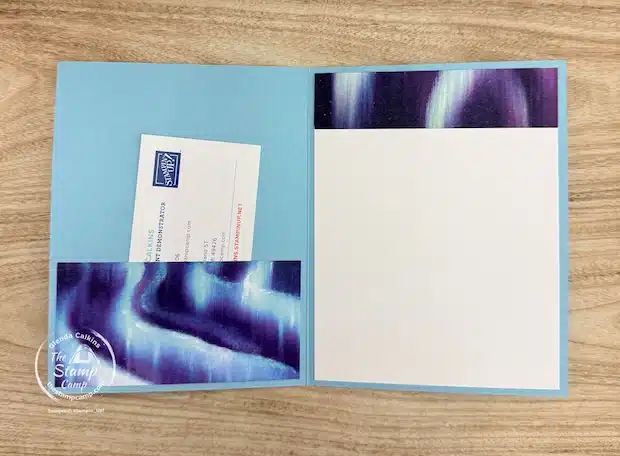
When you open the card all the way, the inside holds a special surprise as well. This fun fold card also doubles as a card and gift card holder all in one.
On the inside, I added a piece of Basic White cardstock measuring 4″ x 5 1/4″, then finished it with a strip of the Lights of Aurora Designer Series Paper cut to 1″ x 4″ across the top.
On the backside of the card front, I added another piece of Lights of Aurora Designer Series Paper measuring 2″ x 4″. By adhering only the sides and bottom, it creates a pocket—perfect for holding a gift card, check, or cash.
Grab the supplies from below and create these quick and easy card sketch ideas with me here at The Stamp Camp:


Grab any of the supplies you need and add them to your shopping cart—thank you SO much for your orders with me! I truly appreciate your support.
Why Order This Month?
Here are a couple of great reasons to grab your supplies and take advantage of some fun specials:
-
January 6 – February 2, 2026
With every $50.00 order placed (before shipping and tax), you’ll earn a $5.00 coupon emailed directly to you from Stampin’ Up!.
These coupons can be redeemed February 3 – 28, 2026. -
January 6 – January 30, 2026
With a $75.00 order placed (before shipping and tax), you can choose one Product of the Month item for just $5.00!
This month’s choices are the Fabulous Sayings Stamp Set or last month’s True Blue Florals Designer Series Paper. -
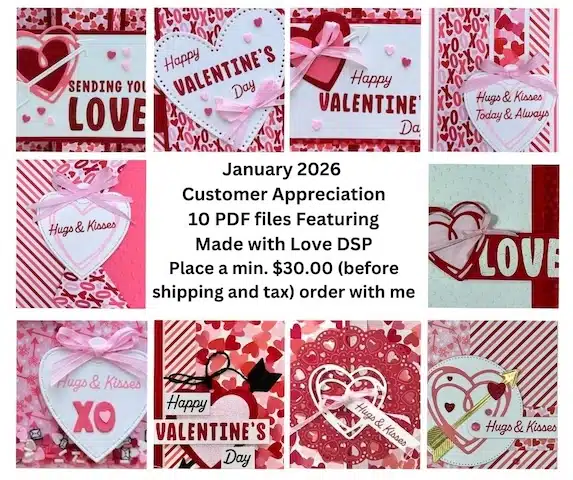
As a special thank you this month, with a minimum $30.00 order (before shipping and tax), you’ll receive the unlock code to access a special album on my blog featuring the Made with Love Suite of Products.
This exclusive album includes 10+ PDF files that you can download and print, all designed to help you get the most out of this beautiful suite. It’s my way of saying thank you for shopping with me and giving you extra inspiration for your quick and easy card sketch ideas!
The Stamp Camp Customer Appreciation for January 2026:
Place a min. $30.00 online order (before shipping and tax) with me and I’ll send you an unlock code to the Made with Love album in the photo gallery on my blog.
- In the album you’ll find 8 PDF files featuring the Made with Love Suite Collection.
- The download project sheet and one sheet wonder pattern for two Fabulous Fun Fold One Sheet Wonder Cards
- The Video link to the One Sheet Wonder class
- Additional PDF files for the remainder of the month
Place your orders Here: https://stampl.ink/shop