
Today’s quick and easy card sketch ideas are one of those designs that you can use again and again—just tweak it a little each time for a completely fresh look!
The beauty of simple card sketch templates is that they’re so adaptable. You can adjust the sizes of your panels depending on the look you want for your card front. Maybe you prefer three panels, like in today’s sample, or perhaps you’d like to experiment with four narrower panels instead. Make them thinner, thicker, or even mix in different patterned papers—the choice is yours!
This particular easy card sketch template is just a starting point. It’s perfect when you want to make a quick card but still end up with something that looks polished and thoughtfully designed. A few simple adjustments can transform the same sketch into multiple layouts for birthdays, thank-yous, holidays, or any occasion.
At The Stamp Camp, I love sharing ideas that help you save time while sparking creativity. Today’s sketch shows how much variety you can get from one basic layout. Whether you’re a beginner looking for a confidence boost or an experienced stamper wanting to simplify your process, these quick and easy card sketch ideas are sure to inspire your next crafting session!
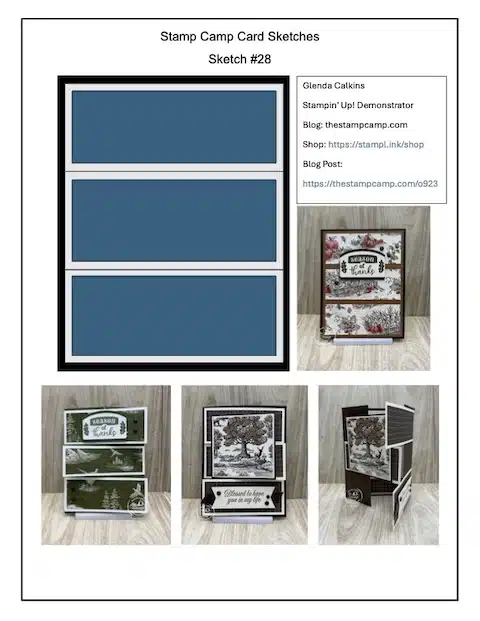
To download and print Sketch #28 Click HERE
To download and print Sketch #27 Click HERE
To download and print Sketch #26 Click HERE
To download and print Sketch #25 Click HERE
To download and print Sketch #24 Click HERE
To download and print Sketch #23 Click HERE
To download and print Sketch #22 Click HERE
To download and print Sketch #21 Click HERE
To download and print Sketch #20 Click HERE
To download and print Sketches #11 – #20 Click HERE
To download and print Sketches #1 – #10 Click HERE.
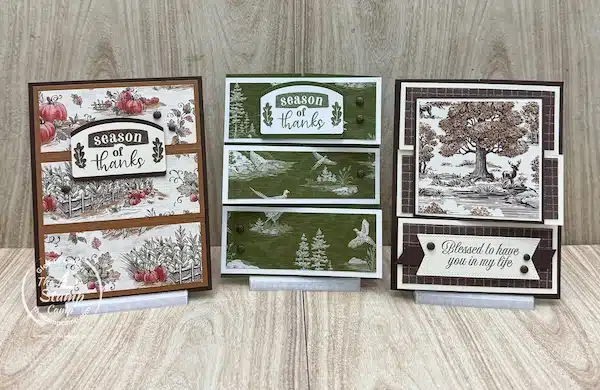
Now that you’ve seen today’s quick and easy card sketch idea, let’s take a closer look at the different ways you can use it.
Each card below was created using the same simple card sketch template, but with just a few tweaks here and there. You’ll see how changing the panel sizes, paper patterns, or focal images can completely transform the design.
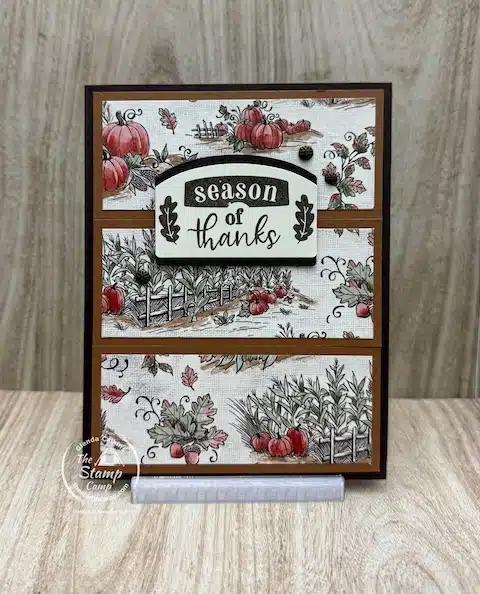
Card #1 – Classic Three-Panel Design
Card #1 follows today’s quick and easy card sketch idea exactly — a clean, simple layout with three panels across the card front. It’s a traditional fold, no fancy openings, just a timeless design that works beautifully for any occasion.
Card Base: Early Espresso cardstock, 5 1/2″ x 8 1/2″, scored at 4 1/4″.
Layer 1: Pecan Pie cardstock, 4″ x 5 1/4″.
Panels: Three strips of Autumn Toile Designer Series Paper, each measuring 1 1/2″ x 3 3/4″.
The sentiment on the front comes from the Sign Design Bundle. I stamped it on Very Vanilla cardstock and punched it out with the coordinating Sign Design Punch. To create a lovely framed look, I punched another piece from Early Espresso cardstock, cut it in half horizontally, and attached each half to the top and bottom of the sentiment piece. This gives a perfect Early Espresso border accent that really ties the design together.
For the inside, I added a simple finishing touch — a strip of Autumn Toile Designer Series Paper across the bottom edge of a Very Vanilla cardstock insert. It’s an easy way to coordinate the inside of your card with the front design.
This easy card sketch template is the perfect starting point — quick to make, easy to duplicate, and ideal for showcasing your favorite patterned papers!
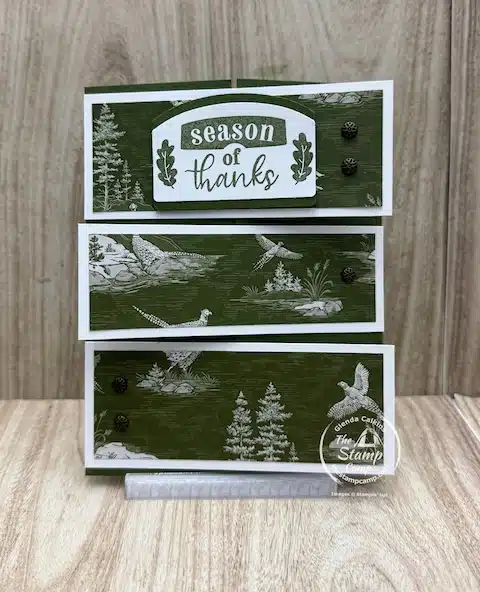
Card #2 – Three-Panel Fun Fold
If you’re looking to step up today’s quick and easy card sketch idea, this three-panel fun fold is a great next level! It uses the same simple card sketch template as Card #1, but with a creative twist in the way the panels open.
For this design, the top and bottom panels are only adhered to the left-hand side of the card front, while the center panel is adhered to the right-hand side. This creates a fun interlocking effect when the card is closed — a little surprise element that’s still simple to assemble!
Card Base: Mossy Meadow cardstock, 5 1/2″ x 8 1/2″, scored at 2 1/8″ from each side.
Top and Bottom Panels: Basic White cardstock, 1 3/4″ x 4 1/4″.
Center Panel: Basic White cardstock, 1 1/2″ x 4 1/4″.
Designer Series Paper (Autumn Toile):
-
Top and bottom strips – 1 1/2″ x 4″
-
Center strip – 1 1/4″ x 4″
The sentiment once again features the Sign Design Bundle, stamped this time in Mossy Meadow ink to coordinate perfectly with the card base.
To finish things off, I added a few Pressed Flower Motifs for a touch of texture and elegance. These accents bring the whole card together beautifully and highlight the versatility of this easy card sketch template — it’s amazing how a small fold change can give you a completely different look!
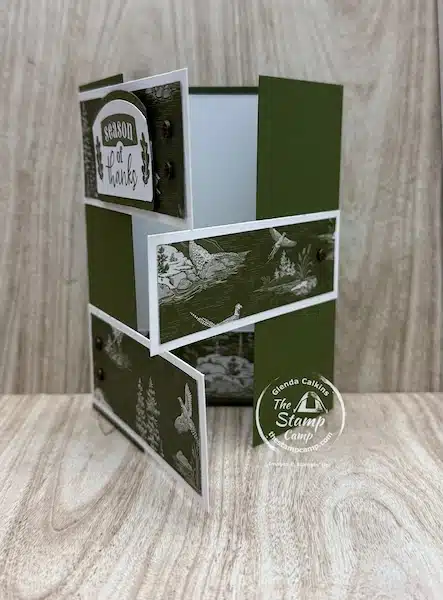
For the inside, I added a simple Basic White cardstock insert with a narrow strip of Autumn Toile Designer Series Paper along the bottom edge. It’s a clean finish that complements the front design and lets the fun crisscross fold shine!
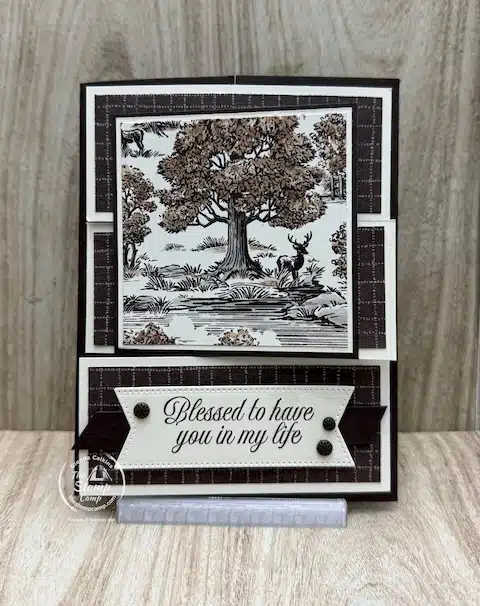
Card #3 – Elevated Focal Point Fun Fold
For Card #3, we’re taking today’s quick and easy card sketch idea and giving it a little upgrade! This version elevates the overall look of the card front by adding a bold focal point, while still keeping the design simple and achievable with the same easy card sketch template.
Card Base: Early Espresso cardstock, 5 1/2″ x 8 1/2″, scored at 2 1/8″ from both sides.
Panels:
-
Very Vanilla panels – 1 3/4″ x 4″ (three pieces)
-
Autumn Toile Designer Series Paper – 1 1/2″ x 3 3/4″ (three pieces)
For this fun fold, the top and bottom panels are adhered from the right-hand side of the card front, while the center panel is adhered from the left-hand side. This gives the card a completely different opening from Card #2 and adds extra visual interest to the layout.
The focal point on this card is also cut from the Autumn Toile Designer Series Paper.
-
DSP focal square – 2 7/8″ x 2 7/8″
-
Very Vanilla mat – 3″ x 3″
-
Early Espresso mat – 3 1/8″ x 3 1/8″
This layered square is adhered only to the center panel, allowing the top panel to slide neatly behind it when opening and closing the card — a clever detail that makes this design interactive and elegant.
The sentiment across the bottom panel is from the Amber Autumn Stamp Set and was die-cut using the Stylish Shapes Dies. I added a narrow strip of Early Espresso cardstock behind it for contrast and popped it up with dimensionals. A few Pressed Flower Motifs accent the sentiment, adding just the right touch of texture and charm.
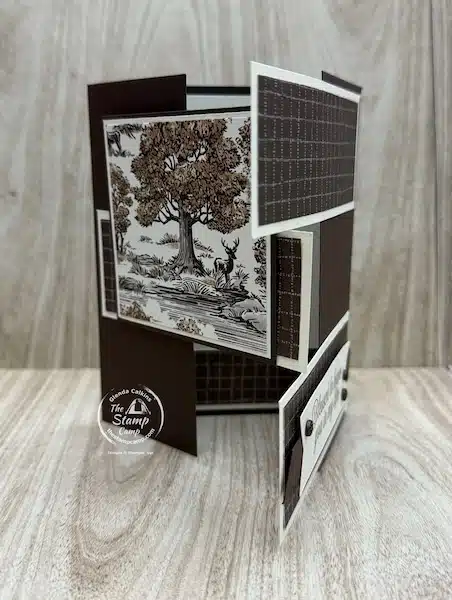
This photo shows how those panels intersect on the card front, giving you a peek at both the fun fold and the coordinated inside. For the inside, I added a piece of Very Vanilla cardstock (4″ x 5 1/4″) with a strip of Autumn Toile Designer Series Paper across the bottom edge for a polished finishing touch.
This card shows how easy it is to elevate your simple card sketch templates — with just a larger focal point and a few thoughtful details, you can create a design that feels completely fresh and sophisticated!
Shop the Supplies and Try These Quick and Easy Card Sketch Ideas!
Ready to create these beautiful cards yourself? Shop for the products you need from the list below, then follow along with my easy card sketches to recreate today’s designs — or put your own creative twist on them!


November Customer Appreciation Gift!
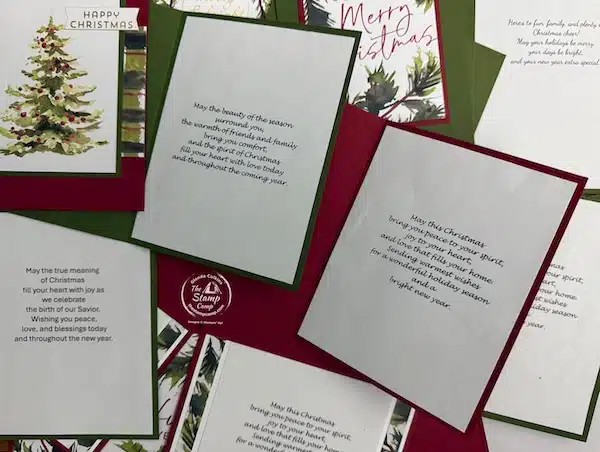
Do you ever struggle with what to write inside your Christmas cards—or maybe you don’t have the perfect inside sentiment stamp? Well, I’ve got you covered!
When you place a minimum $30 (before shipping and tax) online Stampin’ Up! order with me this month, you’ll receive an exclusive PDF file featuring 6 different Christmas card sentiment inserts.
Each sentiment is provided in both horizontal and vertical formats, with 4 of the same sentiment per sheet—ready to print, cut, and use!
How to Use:
-
Print the sentiment of your choice.
-
Cut the sheet in half in both directions.
-
Adhere the insert to the inside of your card.
I typically cut my inserts to 4″ x 5-1/4″, but if you’d like to mat your sentiment on another color of cardstock, trim your sentiment insert to 3-3/4″ x 5″ instead.
Make your Christmas cards extra special this year with beautiful, heartfelt sentiments—ready to go and easy to use!
Place your orders Here: https://stampl.ink/shop