
Did you join me last night for my Quick and Easy Card Tutorials with One Sheet Wonder Layouts? If you missed it, no worries! I have the video down below in this blog post so you can watch the replay and craft along when you have time.
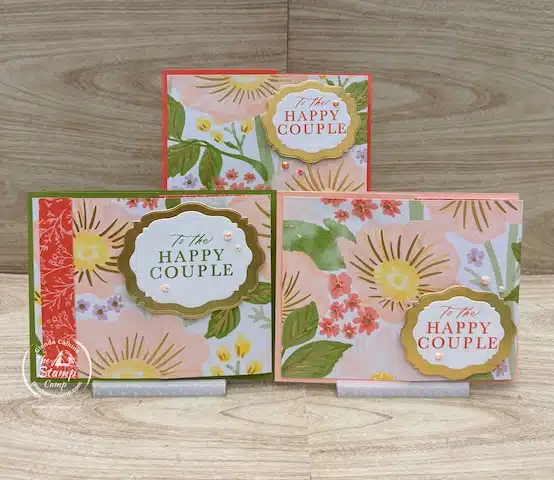
This month in my Stamp Camp at Home Card Club Kit I’m featuring the Lovely & Beautiful Specialty Designer Series Paper, and last night I created three fun fold cards using just one of the gorgeous sheets from the pack. This is one of my favorite ways to create several coordinated cards while keeping the process simple and stress-free.
If you love creative one sheet card ideas, this is a great technique to try. With a simple One Sheet Wonder layout, you can cut a single sheet of designer paper and turn those pieces into multiple card designs. It’s a fantastic way to stretch your patterned paper and create beautiful cards without a lot of extra supplies.
Each of the cards I created features the coordinating bundles from the suite: the Beautifully Celebrated Bundle and the Simply Beautiful Bundle. These bundles work perfectly with the paper and make it easy to add elegant stamped images and sentiments to finish off your cards.
This entire suite of products is really centered around love, weddings, and anniversaries, and with wedding season right around the corner it’s a perfect time to create cards for those special occasions. But don’t feel like you have to stick with those themes. By simply changing the sentiment, these designs can easily become Mother’s Day cards, birthday cards, or even thank you cards.
If you don’t need wedding cards right now, just reach for other sentiments in your stamp collection.
Each card I created last night was cut the exact same way, which is what makes this project perfect for quick and easy card tutorials. Once your designer paper is cut using the One Sheet Wonder layout, the rest of the cards come together quickly.
The only differences between the cards were the color of the card bases and how I used the leftover strip of designer series paper on each design. This is a great way to get even more from your paper while still creating cards that look completely different.
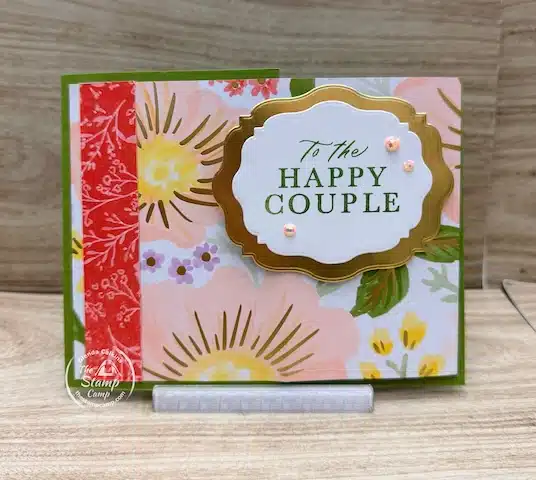
For Card #1, I added the leftover strip of designer series paper directly to the card front. This simple addition adds another layer of pattern and helps tie the whole design together.
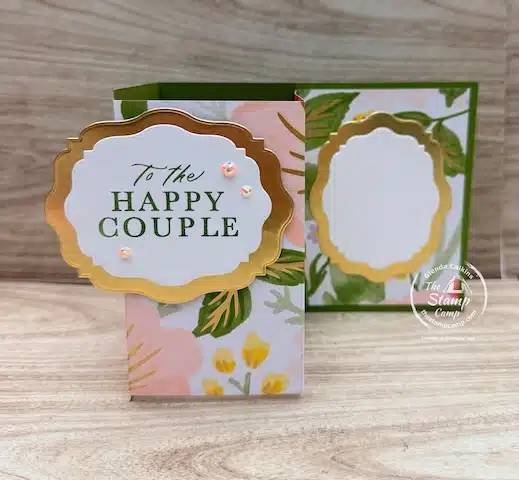
I also used the coordinating framelits from the bundle on both the card front and the inside of the card. Adding a die-cut element to the front creates a beautiful focal point, while repeating that detail on the inside gives the card a finished and polished look when the recipient opens it.

For Card #2, I used Calypso Coral for the card base which really brings out the warm tones in the Lovely & Beautiful Specialty Designer Series Paper. Changing the card base color is an easy way to give each card a slightly different look while still using the same One Sheet Wonder layout.
On this card I chose to use the smaller coordinating framelits on the card front. These smaller die cuts create a nice focal point without covering too much of the beautiful patterned paper.
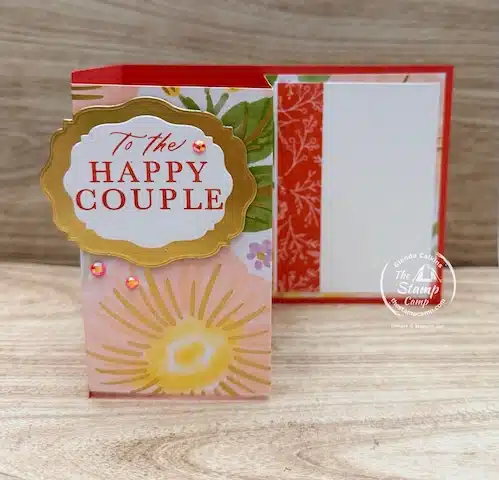
For the leftover strip of designer series paper, I did something a little different on this card. Instead of placing it on the front, I adhered it to an additional piece of Basic White cardstock and then added that layer to the inside of the card. This adds a nice decorative space for writing or stamping your inside message.
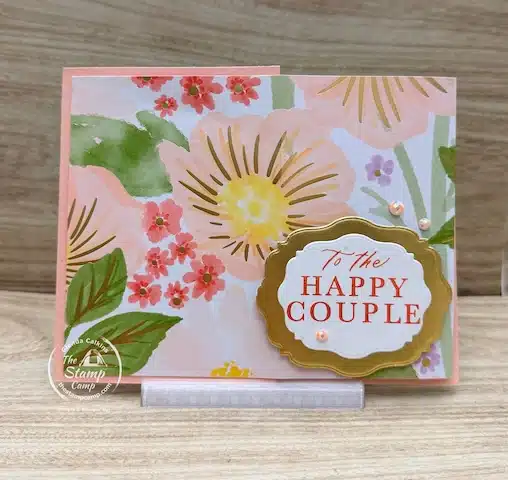
For Card #3, I used Petal Pink for the card base, which gives the card a soft, romantic feel. I also moved the sentiment on the front to the bottom right-hand corner so that it wouldn’t cover up any of those gorgeous floral patterns in the designer paper. This small adjustment lets the beauty of the paper take center stage while still showcasing the sentiment.
On each of the cards, I added the coordinating Pearlized Faceted Circles to give just the right amount of subtle bling. These little accents add elegance without overwhelming the design, making them perfect for wedding, anniversary, or special occasion cards.
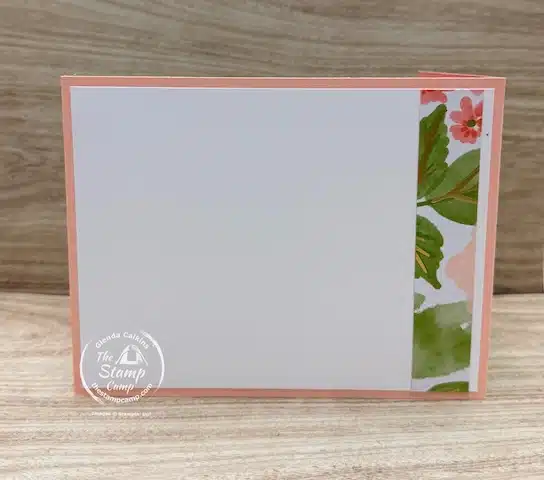
For this card, I decided to leave the inside plain, so when the card is sitting on display, the focus stays on the beautiful patterned paper. To make sure there’s still a space for a message, I took the leftover strip, adhered it to a piece of Basic White cardstock, and attached it to the backside of the card. This way, you still have a spot to stamp or write a note without taking away from the card’s visual appeal.
Here’s The Supply List for Today’s Quick and Easy Card Tutorials:


Price: $16.50


Click on any of the supplies you will need and add them to your shopping cart. Thanks SO much for your order, it is greatly appreciated!
This approach really shows how quick and easy card tutorials with One Sheet Wonder layouts can produce elegant, versatile cards while letting the paper do most of the work. By simply adjusting card base colors, sentiment placement, and leftover strips, you can create multiple unique designs from just one sheet of designer paper.
Here’s the Video:
The Stamp Camp Customer Appreciation for March 2026:
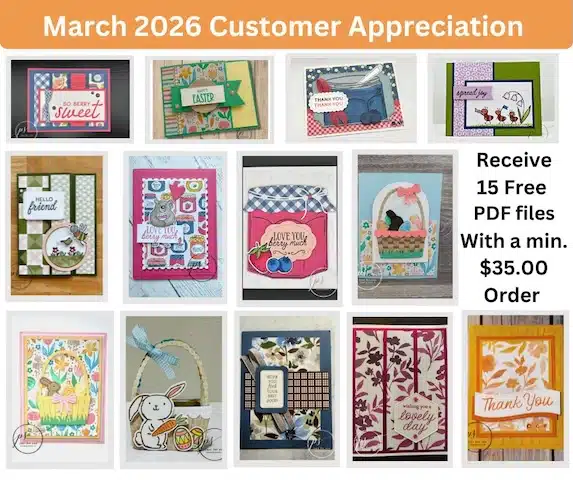
I love spoiling my customers, and March is no exception!
Place a minimum $35.00 order (before shipping and tax) with me during the month of March 2026, and you’ll receive the exclusive password to my March Customer Appreciation Album.
Inside the album, you’ll find:
- At least 15 PDF tutorials
- Projects featuring some of the NEW Online Exclusive Products releasing March 3, 2026
- Beautiful Easter Joy PDF tutorials perfect for your upcoming Easter celebrations
- A darling 3D Easter Basket project — perfect as a sweet little treat holder for your Easter table
These downloadable PDFs are packed with inspiration, measurements, and step-by-step instructions to help you create even more beautiful cards and projects beyond your Stamp Camp kit.
It’s my way of saying thank you for choosing me as your demonstrator and supporting my small business.
Ready to earn your access? Simply place your qualifying order in March and I’ll send you the private album password!
Place your orders Here: https://stampl.ink/shop