
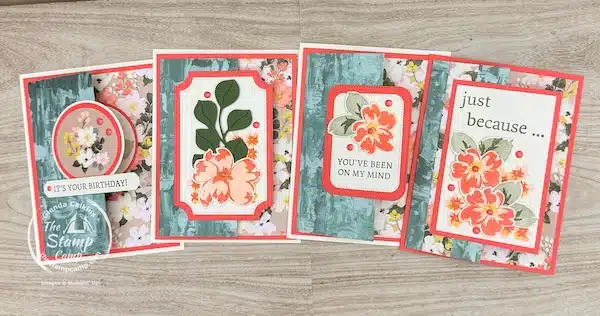
If you’re looking for simple one sheet card designs with Designer Series Paper, you’re going to love last night’s One Sheet Wonder Cards class. Using just one 12″ x 12″ sheet of Designer Series Paper, I demonstrated how to create four fun fold cards—easy layouts with lots of wow factor and very little waste.
If you missed the live class, no worries at all! You can catch the replay in the video down below in this blog post. I walk you step-by-step through each cut, fold, and assembly so you can confidently recreate these fun fold card designs at home.
For this class, I featured the Brushed With Beauty Designer Series Paper which is featured in my Stamp Camp at Home Card Club Kit for the month of January, and let me tell you—this pack is absolutely stunning! With its beautiful floral prints and artistic designs, I truly don’t think it’s possible to create a card with this paper that isn’t gorgeous. It’s the perfect choice for one sheet wonder cards and makes cardmaking both easy and inspiring.
If you loved last night’s One Sheet Wonder class, there are three different ways you can receive the downloadable project sheet and one sheet wonder pattern featuring the Brushed With Beauty Designer Series Paper:
Option #1
Subscribe to my Stamp Camp at Home Card Club Kit
This month’s kit includes the Brushed With Beauty Designer Series Paper along with everything you need to create 8 beautiful cards at home.
Be sure to check out the blog post with all the details and the link to subscribe: HERE
Option #2
Join My One Sheet Wonder Club
For $24.95/month, you’ll receive access to an exclusive album in my Photo Gallery with all my Thursday night One Sheet Wonder Classes:
-
All card/project photos
-
Downloadable One Sheet Wonder project sheets & One Sheet Wonder Patterns
-
Video tutorials from my Thursday night classes
This is a PayPal subscription, perfect for those who love weekly creative inspiration.
Click HERE to Subscribe to the One Sheet Wonder Club for $24.95 a month.
Option #3
Purchase the Download Only
If you only want the specific download from a Thursday night class, you can grab just that project sheet!
Fill out my Contact Me Form HERE with your:
-
Name
-
Email address
-
Add the message:
*Note that you would like the download project sheet from the January 15 One Sheet Wonder class featuring the Brushed With Beauty Designer Series Paper creating 4 fun fold cards.
No matter which option you choose, you’ll be able to recreate these one sheet wonder cards and enjoy just how versatile and beautiful this paper truly is. Happy stamping—and thank you so much for crafting with me!
Ready to Create These Simple One Sheet Card Designs?
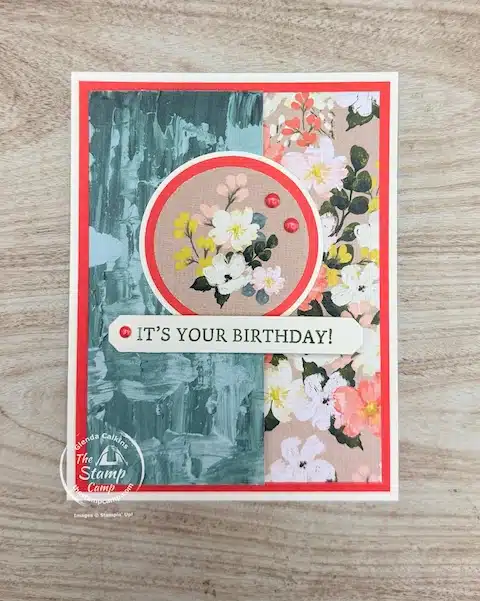
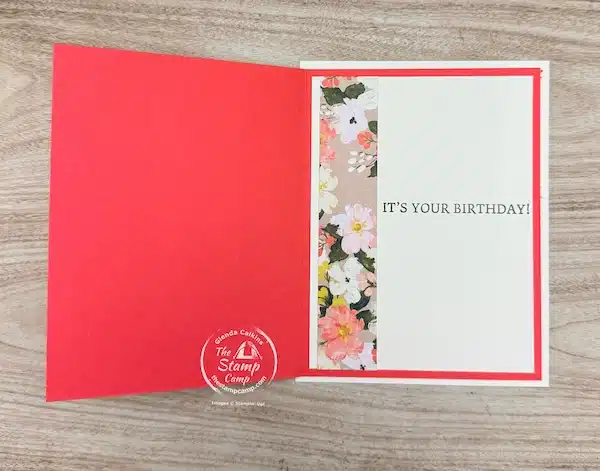
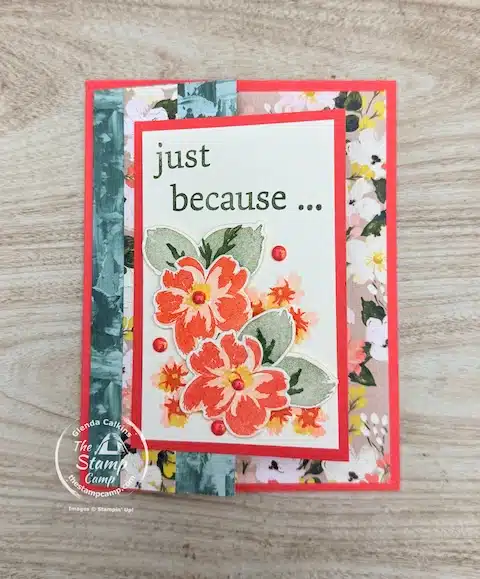
Card #1 is truly the most basic of all four cards I created, making it perfect if you love simple card designs. The Brushed with Beauty Designer Series Paper is the star of this card—so much so that the Designer Series Paper is the card.
The designer paper is adhered to two cardstock mats—Calypso Coral and Very Vanilla. These layers give the illusion of a traditional card base that opens normally, but the only opening on this card is the front flap of the Designer Series Paper, creating a subtle yet clever fun fold card.
For the center focal point, I used three different-sized circle punches to create a layered look. If you don’t have circle punches, the Stylish Shapes Dies work just as beautifully and give you the same effect.
The sentiment, “It’s Your Birthday,” comes from the coordinating Words of Beauty Bundle, tying in perfectly with the Brushed with Beauty Designer Series Paper and keeping this One Sheet Wonder card clean, simple, and elegant.
When you open the front flap of the card, you’ll find another layered circle focal point featuring a sentiment along with a stamped flower from the coordinating Petals of Beauty Bundle. This extra detail adds interest to the inside while still keeping the card design simple and easy to recreate.
I also added one of the leftover Designer Series Paper strips to the backside of the front flap. This is a great way to use every piece from your One Sheet Wonder cut—plus, this strip is very versatile. You can adhere it to the backside of the flap, the front of the card, or even the inside of the card. No matter where you place it, it adds a beautiful finishing touch.
The inside sentiment is from the Banner Sayings Bundle, which is the perfect size for the inside circle and works wonderfully with these simple one sheet wonder fun fold card designs.
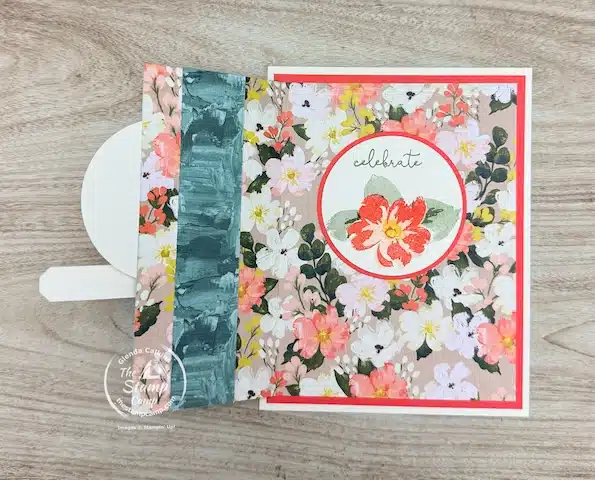
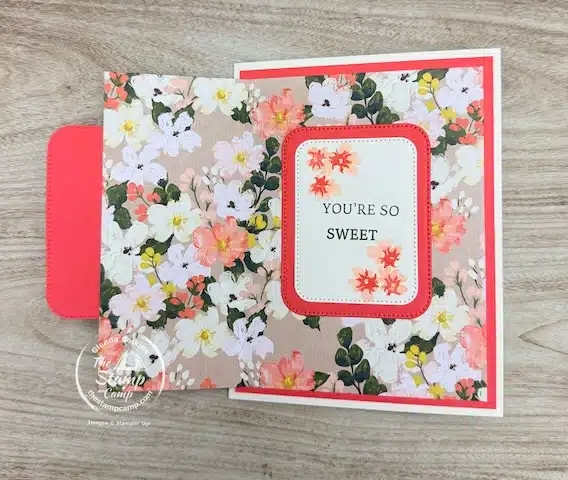
Card #2 was created using the same One Sheet Wonder concept as Card #1, but with a fun twist. This time, the Calypso Coral layer is not just a mat—it’s an actual card base that opens.
This gives the card two front openings. First, you open the Designer Series Paper front flap, just like Card #1. Then, you open the Calypso Coral card layer to reveal the main inside of the card, which is matted onto a piece of Very Vanilla cardstock. This layered opening adds interest while still keeping the design simple and easy to create.
For the front focal point, I used the Branching Out Dies. The Very Vanilla die cut was stamped with flowers from the Petals of Beauty Bundle using Petal Pink, Calypso Coral, and Mossy Meadow inks. To finish the look, the Mossy Meadow leaf image was created using one of the coordinating dies from the bundle.
This design is a great example of how Designer Series Paper and a few thoughtful layers can turn a simple one sheet card design into an eye-catching fun fold card.

Another fun feature of Card #2 is that it doubles as a gift card holder, making this One Sheet Wonder card both beautiful and practical. When you open the Designer Series Paper front flap, you’ll find the perfect spot to tuck in a gift card.
To create this pocket, adhesive was applied only along the side and bottom edges of the Branching Out die cut. This leaves the top open and forms a pocket on the backside of the flap that can hold a gift card, check, or cash—an easy technique that adds so much value to the card without extra layers.
I also die cut a few of the smaller Branching Out dies, stamped them, and added a sentiment. These pieces were attached to the opening of the inside card, adding a sweet decorative detail and helping draw the eye to the opening of this fun fold card design.
This clever pocket detail makes Card #2 a standout example of how simple one sheet wonder card designs can be taken up a notch with just a small design change.
This time, I used the extra Designer Series Paper strip on the inside of the card and stamped the “It’s Your Birthday” sentiment, adding a finishing touch that ties the entire design together beautifully.
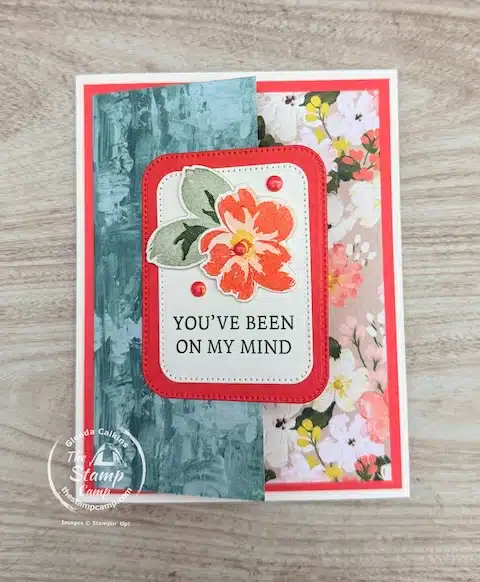
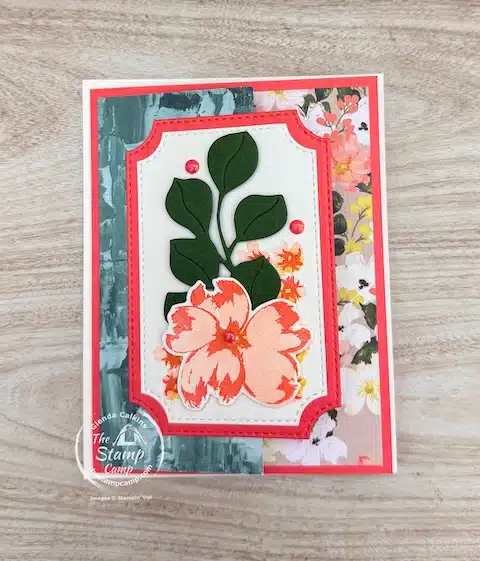
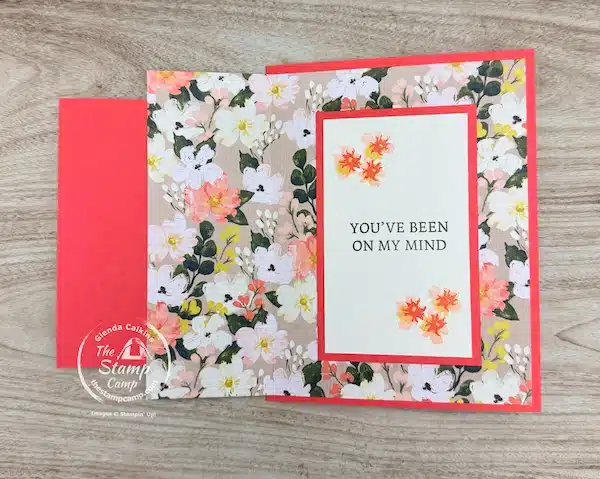
Card #3 was created using the same layout as Card #1, but with a slight change in the layers. This time, the Very Vanilla cardstock is the actual card base that opens, while the Calypso Coral serves as a mat layered on top of the card, with the Designer Series Paper adhered on top of that.
This design is still a double front fun fold card, but unlike Card #2, it is not a gift card holder. The layered fronts give it plenty of visual interest while keeping the construction simple and beginner friendly.
For the focal point on the Designer Series Paper front flap, I used the Nested Essentials Dies for the mat pieces and stamped the sentiment using the Words of Beauty Bundle. The flower image was stamped on a scrap piece of Very Vanilla cardstock and then die cut using the coordinating dies from the Petals of Beauty Bundle, allowing it to pop off the card front.
All of the cards were accented with the beautiful Calypso Coral Petals of Beauty embellishments, which add just the right amount of sparkle and tie everything together perfectly.
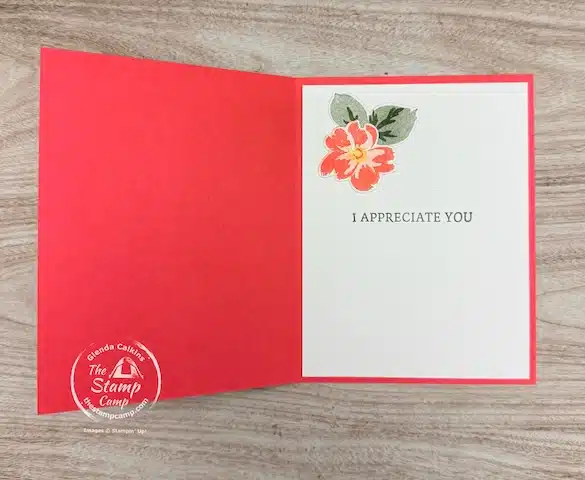
When you flip open the front flap on this card, you’ll find another set of Nested Essentials die cuts featuring a sweet sentiment along with a few of those pretty stamped flowers, adding a lovely surprise to the inside of this fun fold card.
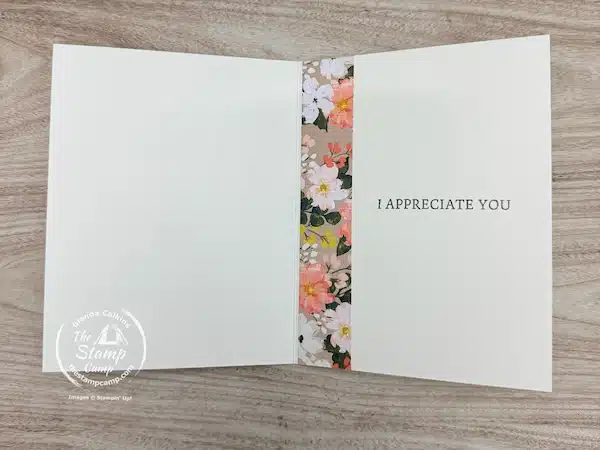
For the inside of the card, I added one of the Designer Series Paper strips and stamped an additional sentiment using Mossy Meadow ink, tying the inside perfectly to the front design.
Card #4 follows the same general layout as the first three cards, with just a few small changes. This time, the Designer Series Paper was cut and scored slightly differently. I omitted the Calypso Coral mat, using the full Designer Series Paper as the main card front. The card still features a double front flap, it’s just a bit simpler with one less layer.
For the focal point, I didn’t use any die cuts. I know some of you don’t have a die-cutting machine, so I wanted to show how you can achieve a similar layered look with just cardstock. I cut a rectangle of Calypso Coral and matted it with a slightly smaller Very Vanilla rectangle. On this, I stamped a few of the small flowers and the sentiment from the coordinating bundles.
To add dimension, I stamped a couple of medium-sized flowers and leaves on a scrap piece of Very Vanilla cardstock and die cut them using the coordinating dies. These were then popped up onto the focal point on the card front, giving it a layered and professional look.
Finally, I used one of the leftover Designer Series Paper strips on the front flap, adding a cohesive finishing touch while making the most of every piece of paper.
For the inside, I used the same size mat pieces behind the front flap and added additional stamped flowers and a sentiment, creating a cohesive look that ties the front and inside of the card together beautifully.
When you fully open the card, you’ll find the inside sentiment along with another stamped and die-cut flower and leaves, which I adhered flat to the inside. By gluing them directly to the card, there’s no added bulk, keeping the inside smooth and easy to write on.
Below you’ll find the shopping list for all the supplies used to create these Four Simple One Sheet Card Designs:


Click on any of the supplies you need and add them to your shopping cart. Thanks so much for your order(s) I so appreciation your support!
A quick note: the Banner Sayings Bundle is currently sold out, but you can simply add your email address when it appears in the Stampin’ Up! store, and they’ll notify you as soon as it’s back in stock.
Gather your supplies, grab your favorite inks and tools, and let’s start creating!
Here is the Video on Last Night’s Simple One Sheet Card Designs:
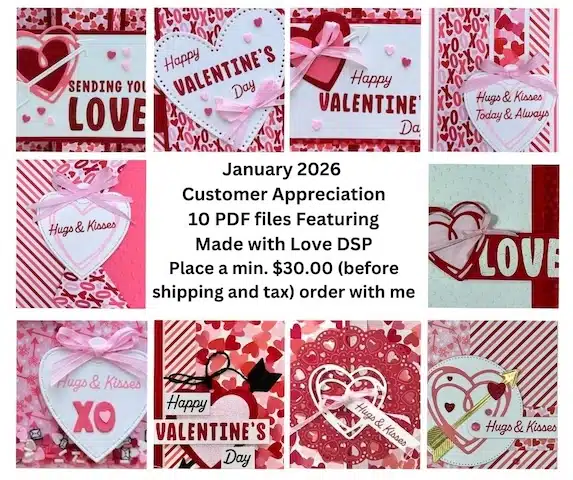
The Stamp Camp Customer Appreciation for January 2026:
Place a min. $30.00 online order (before shipping and tax) with me and I’ll send you an unlock code to the Made with Love album in the photo gallery on my blog.
- In the album you’ll find 8 PDF files featuring the Made with Love Suite Collection.
- The download project sheet and one sheet wonder pattern for two Fabulous Fun Fold One Sheet Wonder Cards
- The Video link to the One Sheet Wonder class
- Additional PDF files for the remainder of the month – 3 MORE PDF FILES JUST ADDED TODAY!
Place your orders Here: https://stampl.ink/shop