
Last night was One Sheet Wonder Thursday Night, and if you tuned in, you saw me create two adorable gift card holders from one 12″ x 12″ sheet of the Traditions of Christmas Specialty Designer Series Paper.
This project also gave you a little sneak peek into my November Stamp Camp at Home Card Club Kit! The Traditions of Christmas paper is absolutely gorgeous — it’s rich, festive, and perfect for the upcoming holiday season.
Now, I do want to give you a quick update — this beautiful paper pack is currently sold out, but expected back in the Stampin’ Up! warehouse the week of November 17th
Current Club Members: No worries! I’ve already set aside enough supplies for all your November kits.
Not a Member Yet? If you’d like to get the Traditions of Christmas Club Kit, click [HERE] and scroll down to the Subscribe button to join my November Card Club before it’s sold out!
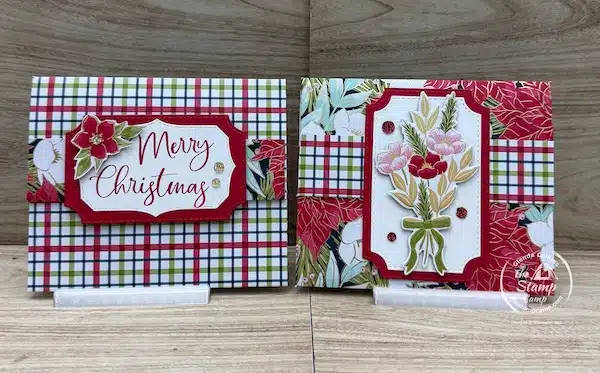
Now that you know where the idea came from, let’s take a closer look at these cute Christmas gift card holders! Both designs were created from just one sheet of the Traditions of Christmas Specialty Designer Series Paper — making this a true One Sheet Wonder project.
Each holder features the same basic layout but with a few simple tweaks that give them their own unique look. Whether you’re gifting coffee cards, restaurant cards, or even a little cash, these festive holders are a quick and stylish way to wrap your gift in holiday cheer.
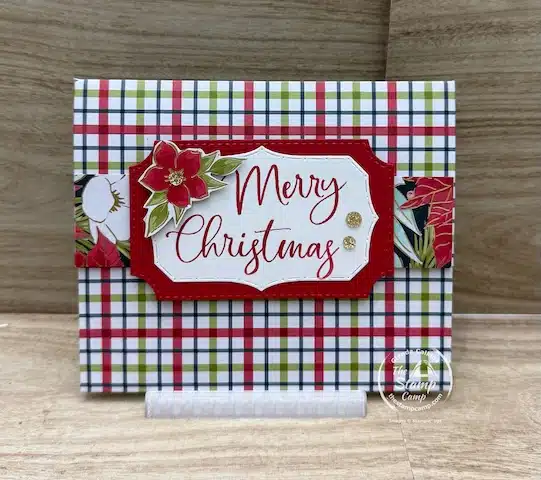
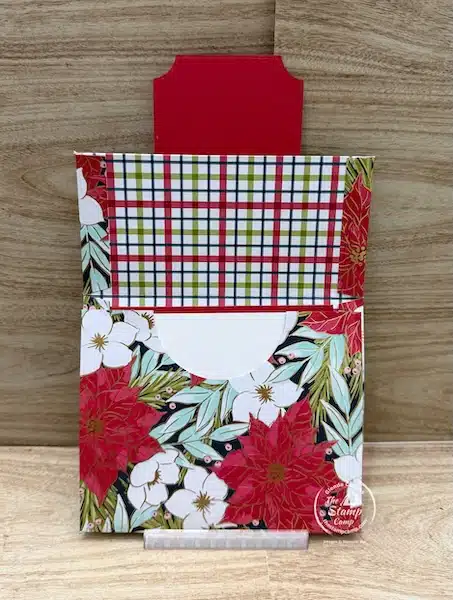
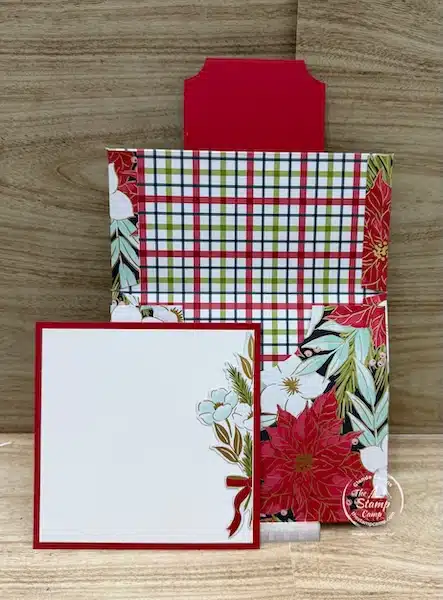
Gift Card Holder #1 – Classic Plaid with a Touch of Elegance
Both of these gift card holders were created from the same 12″ x 12″ sheet of Traditions of Christmas Specialty Designer Series Paper. I simply flipped the paper for the second version so you can see both sides of this gorgeous double-sided print — and decide which side you’d like to showcase on your own gift card holder!
For this first design, I chose to feature the plaid side on the front, while the inside reveals the beautiful poinsettia floral print. The overall look is a bit more neutral and classic, perfect for anyone on your Christmas list.
To finish it off, I added a simple sentiment on the front using the Branching Out Dies and the Traditional Labels Dies, with the sentiment itself from the Traditional Labels Bundle. For a bit of extra dimension, I hand-cut a flower from the same paper pack and popped it up in the corner of the sentiment piece. A few Traditional Sparkling Sequins were the perfect final touch to bring just the right amount of shimmer!
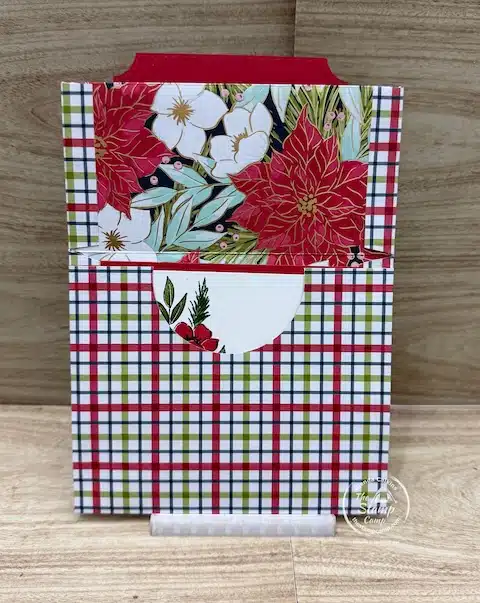
When you open the gift card holder, you’ll find a little pocket on the inside — just the right size to tuck in a sweet mini notecard. You can also slip in a gift card, check, or a bit of cash, making this a thoughtful and practical handmade gift.
To decorate the little notecard inside, I stamped the floral bouquet image from the Christmas Greenery Bundle, which is part of the Traditions of Christmas suite.
For my color palette, I used Memento Black, Real Red, Old Olive, and Garden Green inks — a classic combination that complements the designer paper perfectly.
If you’d like to create a floral image that more closely matches the look of the printed paper, try this variation: stamp the outline in Memento Black, then stamp the leaves using VersaMark ink and heat emboss with Gold Embossing Powder for an elegant shine. For the flowers, experiment with Pretty in Pink, Real Red, and Pool Party to capture that soft, festive color blend from the paper.

Gift Card Holder #2 – Elegant Poinsettia Perfection
For the second gift card holder, I chose to showcase the poinsettia floral print on the front, allowing just a hint of the plaid pattern to peek through on the inside. This combination gives a beautiful balance of festive color and classic elegance.
This time, I used two different sizes of the Branching Out Dies to create my layered focal point. Instead of adding a sentiment to the front, I featured a floral bouquet die-cut from the Traditions of Christmas paper pack. The result is soft, elegant, and timeless — a design that could easily work for more than just the holidays.
In fact, with its floral details and rich gold accents, this version would make a beautiful gift card holder for a wedding, anniversary, or any special occasion where you want to give a handmade touch of luxury.
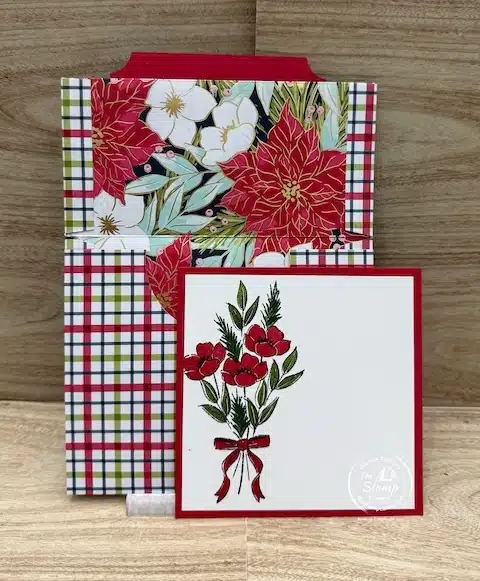
Again, the inside features a pocket with a coordinating notecard — perfect for stamping or writing a personal message. There’s also plenty of space to tuck in your gift card, check, or a bit of cash, making it both beautiful and functional.
It’s such a simple design, yet it feels so special when opened — a lovely way to give a gift that’s as meaningful as it is pretty.
This time, to decorate the notecard on the inside, I kept it simple by using a floral image cut directly from the edge of the Traditions of Christmas Specialty Designer Series Paper. I used the coordinating die to cut out the floral design from the side of the printed sheet and then attached it along the side of the notecard.
It’s the perfect way to use up those narrow edge pieces of your designer series paper — no waste, just beautiful results! Little touches like this really tie the project together and make your handmade gift card holders look polished and professional.
Here Is Your Shopping List for This Step-by-Step Gift Card Holder Tutorial:
Click on any of the products below to order the supplies you’ll need to create these One Sheet Wonder gift card holders. I truly appreciate every order — your support means so much and helps me continue sharing free tutorials like this one!


Price: $16.50


If You Missed the Class Last Night…
No worries! You can watch the replay below and follow along with my step-by-step gift card holder tutorial to create your own One Sheet Wonder Gift Card Holders. It’s the perfect way to craft at your own pace and catch all the little tips and details along the way!
In Closing
Don’t forget — today is the last day to take advantage of this sweet Stampin’ Up! join deal!
Choose $125.00 in products of your choice and pay only $35.00 — shipping is free!
OR
Choose $189.00 in products of your choice and pay only $99.00 — also with free shipping!
It’s truly the best deal around and a wonderful way to stock up on your favorite crafting supplies while joining an amazing creative community.
Click HERE to Get This Great Deal!
And before you go — did you enjoy this step-by-step gift card holder tutorial? I’d love to hear what you think! Leave me a comment below and let me know which version was your favorite — the plaid or the poinsettia!
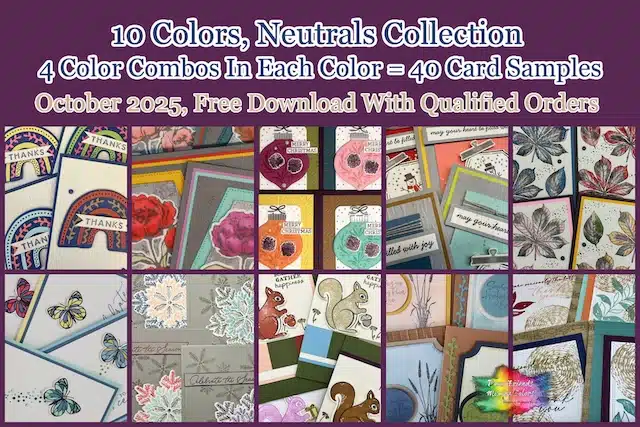
October Customer Appreciation – Huge PDF file Featuring the Neutrals Color Family
 Orders of $50 or more (before tax and shipping) placed in my online store this month will qualify for an exclusive PDF download.
This month’s download includes:
-
Neutrals Color Combination Guide – Forty unique color combinations featuring the Neutrals Collection
-
Forty coordinating card ideas to inspire your crafting
-
Bonus PDF featuring creative ideas with the color Night of Navy
Please note: this Customer Appreciation PDF Download is not available for purchase—it’s my special gift of thanks to everyone who places a qualifying order with me.
This Month’s FREE PDF file featuring the Night of Navy Color Combinations:
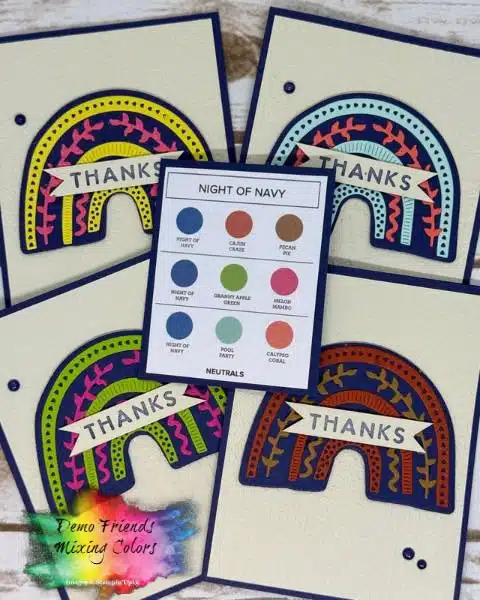
Click HERE to download the FREE Night of Navy PDF file.
Join me every Thursday night for another One Sheet Wonder Project, it might just be another step-by-step gift card holder tutorial.
Place your orders Here: https://stampl.ink/shop
3 thoughts on “Step-by-Step Gift Card Holder Tutorial: A One Sheet Wonder Idea You’ll Love”
Love these gift card holders. Going to make some for my craft fairs . Thanks for the ideas ? ? ???
Love these gift card holders. Going to make some for my craft fairs . Thanks for the ideas ? ? ???
Perfect! I’m sure they will be a hit! I love gift card holders.