
Did you catch last night’s One Sheet Wonder cards featuring the Joyful Specialty designer series paper with the Christmas Classics Bundle and the Joy of Noel bundle? If you missed it no worries, you will find the video below in this article.
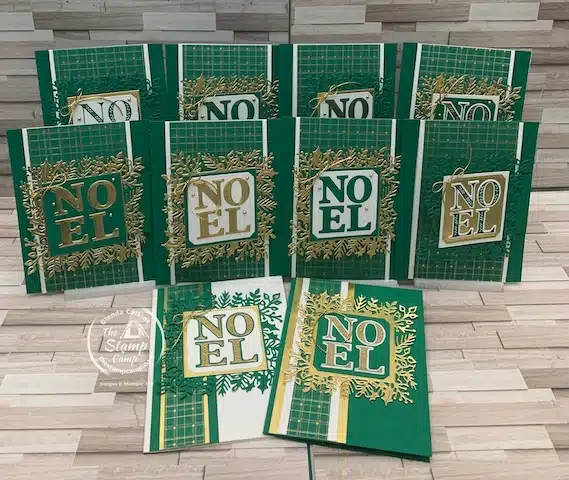
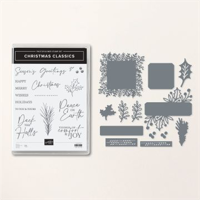
Last night’s cards were 8 fun fold cards and 2 regular cards created with the left-over strips of paper. The last two strips were pretty simple and sort of the same as last week’s final two cards except I just showed how you can beef up your strips by adding additional layers of cardstock. I love the intricate dies from the Christmas Classics bundle as all you need to add is a sentiment to the center of the die and you have quite a beautiful focal point on your cards.
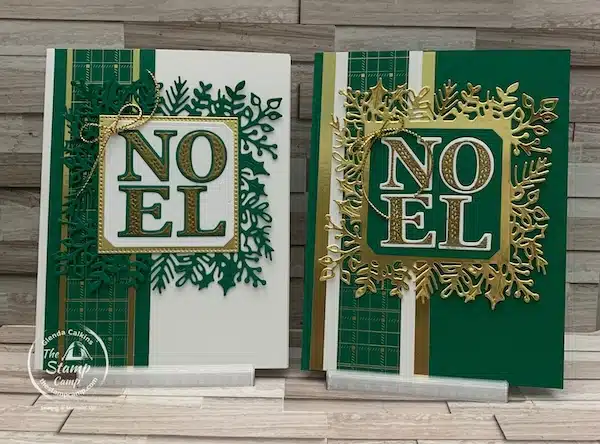
The first 8 cards are all the same layout, the same fun fold cards all I did was changed up the sentiment pieces and die cuts on the outside and the inside. I also changed up the color combinations. It is fun to see all the different combinations that I can come up with, I’m sure there are a lot more, but these were the ones I came up with for last night’s cards.
Let’s take a look at these 8 Fun Fold Cards using just One Sheet of the Joyful Specialty Designer Series Paper:
I always like to start out basic and then work my way up to the final extravaganza card, hahahaha. So, to begin all the card bases are Shaded Spruce 4 1/4″ X 5 1/2″ and the card is Thick Basic White 3 1/4″ X 11″ scored at 5 1/2″. The little “arm” mechanism is 2″ X 5″ scored at 2 1/2″.
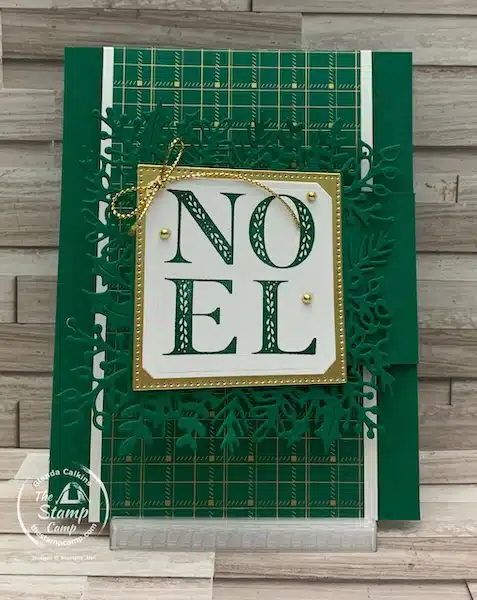
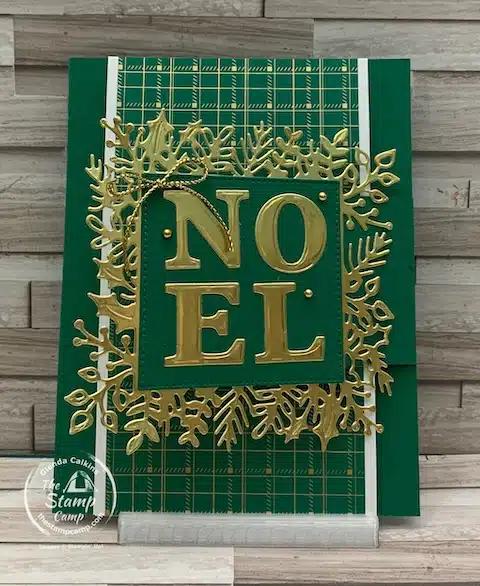
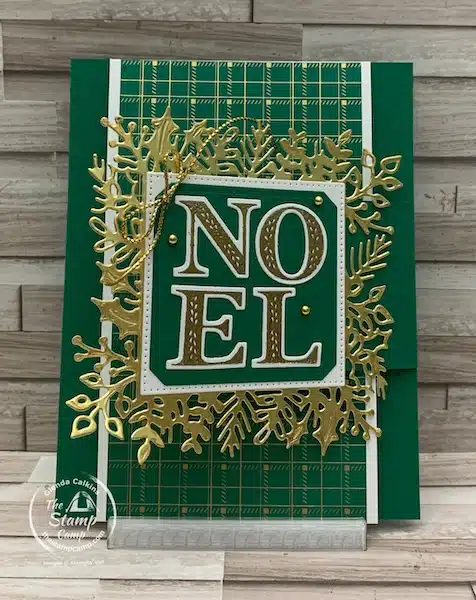
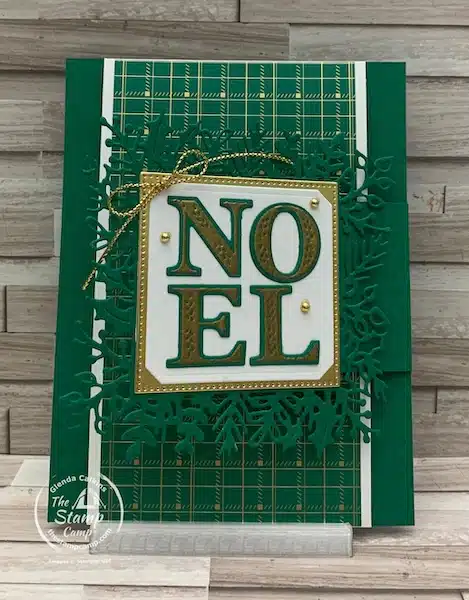
For this first card I just simply stamped the Noel from the Joy of Noel bundle using Shaded Spruce ink onto a piece of basic white cardstock and then die cut it out with the framelit die from the Christmas Classics bundle. I then matted it onto a gold foil square die cut using the stylish shapes dies. For the inside I just added a strip of gold foil to bring the gold foil to the inside as well.
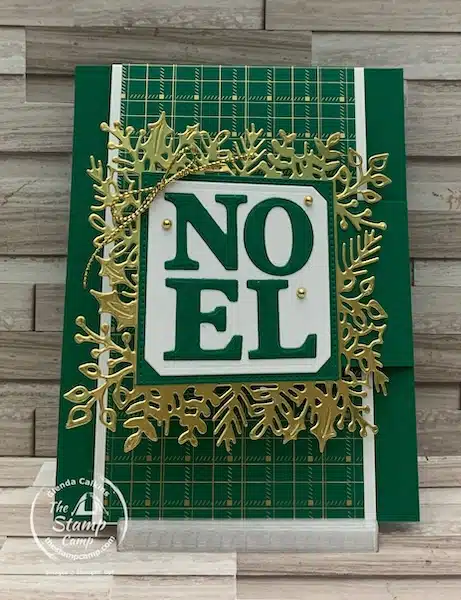
For card #2 I stepped it up just a bit by stamping the Noel onto a piece of Basic White and then die cutting out the letters using the Noel die from the Joy of Noel bundle. This was then attached to the Gold Foil die cut piece, then to the Basic White square and finally attached to the Shaded Spruce intricate die cut piece. NOTE: For all the Noel letters I used a piece of adhesive sheet behind them before die cutting; much easier to adhere your letters than by using liquid glue, and less messy too.
On the inside I stamped the holly leaves and colored them in with the Shaded Spruce Blend and added 3 gold foil berries over the top.
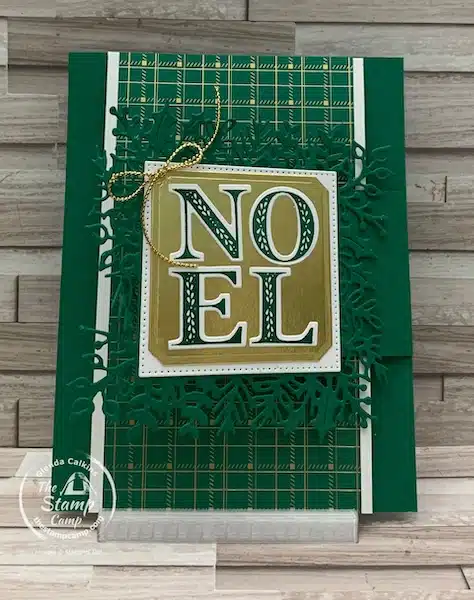
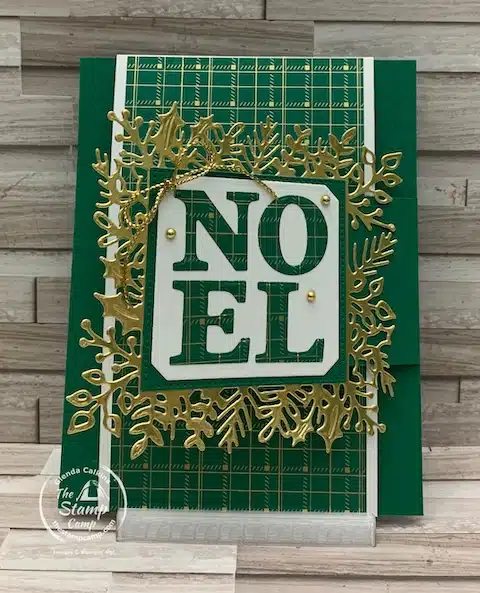
On card #3 I decided to switch things up a bit and went with the Gold Foil for my intricate die piece and decided to die cut the Noel out of Shaded Spruce cardstock; matted it onto a Basic White die cut and then onto a Shaded Spruce square die cut.
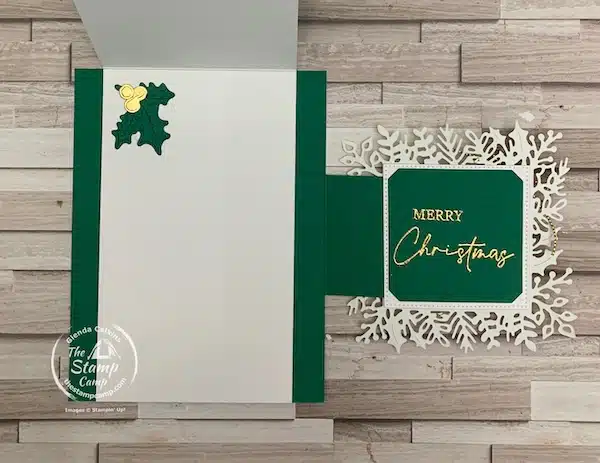
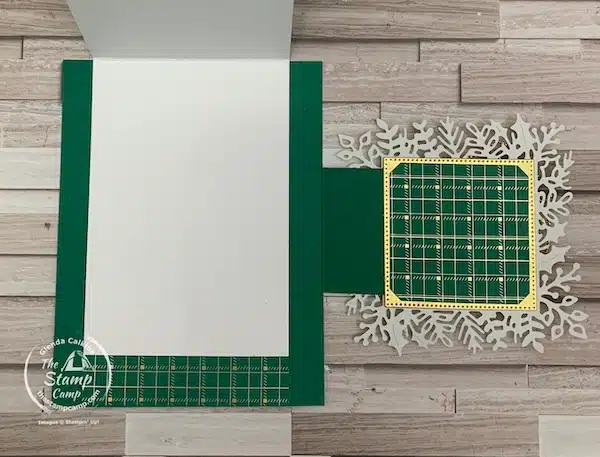
For the inside, I added a Heat Embossed piece to the backside of the “arm” and then on the inside of the card portion I added a stamped and die cut Holly Leaves and Gold Berries.
Card #4 was all about the Gold and Shaded Spruce. I die cut the Noel letters from Gold Foil and adhered them to the Shaded Spruce square die cut and for the inside I heat embossed a sentiment onto another Shaded Spruce die cut for the backside of the “arm” piece. The inside decorative piece is one of the dies from the bundle die cut out of Gold Foil and adhered to the inside of the card. I also added some gold foil berries.

Moving along to card #5 is a little bit of a spin off from card #4 as the letters were Gold Foil but I brought in some of the white. I attached the letters to the Basic White die cut piece and then adhered that to the Shaded Spruce Square. For the inside “arm” piece I added a heat embossed message onto a Basic White die cut, adhered it to a Shaded Spruce square and attached it to the backside of the “arm”. For the inside on this one I used two intricate leaves die cut from the Gold Foil, with some gold foil Berries.
Card #6 is taking it up just a notch by embossing the letters onto a piece of Basic White using gold embossing powder and then die cutting them out. These were then added to a piece of Shaded Spruce, which was then attached to a Basic White square before being attached to the Gold Foil intricate die.
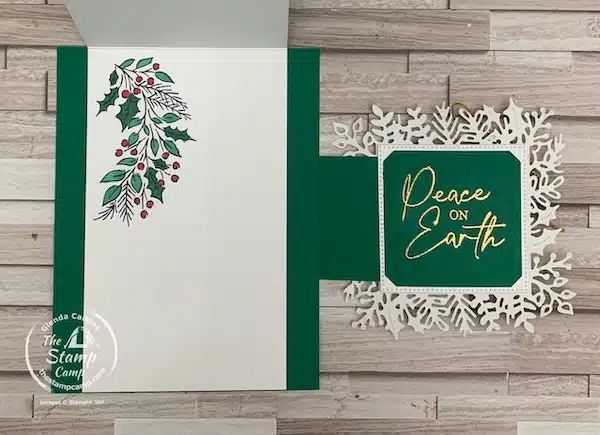
For the inside “arm” on this card I embossed a sentiment onto the Shaded Spruce die cut piece using gold embossing powder, it was then attached to a Basic White square before adding it to the arm. For the inside portion of the card, I stamped the sprig shown using Black Memento ink and then colored it in with the Shaded Spruce Blends and the Real Red Blend.
Card #7 was done pretty much the same way as card #6 except I heat embossed the letters onto Shaded Spruce cardstock, die cut them out and attach to a Basic White square and then adhered that to a Gold Foil square and finally attached it to a Shaded Spruce Intricate die piece. The inside “arm” piece sentiment was embossed on Basic White and then adhered to a Gold Foil square before attaching it to the backside of the arm piece.
On the inside portion of the card, I stamped the sprig onto a piece of Basic White cardstock and colored it in with the Shaded Spruce and Real Red Blends and then die cut it out using the coordinating die. I then attached it inside the card in a swag pattern. I did not show all the card insides as you can see them all in the video.
Finally fun fold card #8 was the grand finale. To create this card, I used some scraps of the same Joyful Specialty Designer Series Paper that I had left-over from other projects to die cut my sentiment letters from. The letters were attached to a Basic White die cut and then adhered to a Shaded Spruce square and finally attached to the Gold Foil intricate piece.
For the inside arm piece I attached a gold foil square and a piece of the same designer series paper left-over from other projects and attached it to the backside of the arm piece. A strip of the Joyful paper was adhered to the bottom on the inside of the card.
Final Two Paper Strips For These One Sheet Wonder Cards:
Like I said these were very similar to last week’s final two cards except I showed how you can beef up your paper strips to dress up the card fronts a bit more. With the intricate dies from the Christmas Classics bundle you really don’t have to do too much to make your cards pretty. Decide which color card base you want to go with and create from there.
If you really wanted to create a big pile of simple cards, you could easily cut the entire 12 X 12 sheet in strips of 1″ X 5 1/2″ and adhere those to the various sizes of coordinating colors; add the intricate die pieces with a sentiment and you will have yourself a pile of gorgeous cards to send out this holiday season.
Each one of these cards was accessorized with the Simply Elegant Gold Trim tied in a bow and the Festive Gold Pearls. The perfect finishing touch to all these cards wouldn’t you agree?
The Joyful Specialty Designer Series Paper was a part of my Stamp Camp at Home Card Club this month. Club members receive the pattern, video, and project download sheets as a perk for being in my club. If you would like to know more about my club, you can find all the details here.
Here is your shopping list for these fun One Sheet Wonder Cards:


Click on any of the supplies that you wish to purchase and add them to your shopping cart.
Remember to use the Host Code: QSQSSMMM
Do NOT use the host code if your order is over $150.00 you are your own host and receive the host benefits at checkout.
Here is the video on How To Create These Fun Fold Cards Plus Two Paper Strips Cards:
My Customer Appreciation for November:
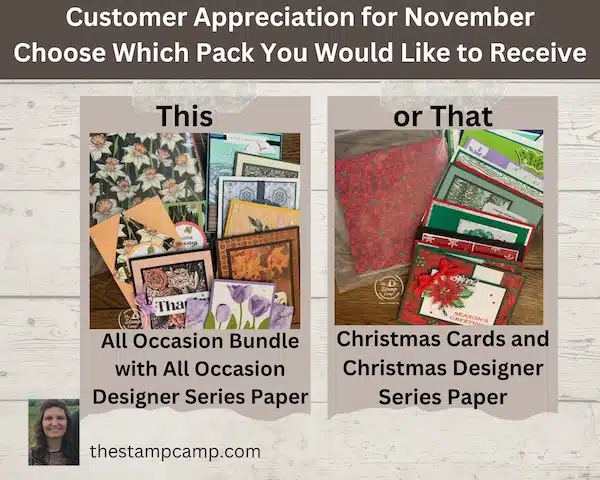
This month’s customer appreciation features handmade cards and a pack of designer series paper. You choose which pack you would like to receive all occasion or all Christmas cards. Which will you choose?
As you probably already know every Thursday night on my YouTube Channel “The Stamp Camp” I go live with a One Sheet Wonder class. Now sometimes it is just 1 card and other times it is piles of cards. Doing this every week sure builds up a supply of cards in no time at all; so, what to do with them is always a concern. I’ve donated piles of cards to local organizations, and I still have piles left. Not to mention my piles of designer series paper. I pretty much purchase all the different paper packs because I do love a good one sheet wonder but that also leaves me with piles of designer paper as well.
So with that being said, this month is a twofer. What is that? It means not only will you receive a package of 10 cards from me but also a 6 x 6 package of designer series paper. The Christmas Card bundle will have 12 cards in the pack as it is a slightly smaller pack of designer paper.
How do you get this package of Handmade Cards & Designer Series Paper Bundle?
All you need to do is place a min. $60.00 order with me and you must use the host code: QSQSSMMM
Remember you MUST use the Host Code unless your order is over $150.00, then do NOT use the host code and you will receive the host benefits, plus a package. (I’ll send you an email regarding shipping of the package).
Place your orders Here: https://stampl.ink/shop
Once you have placed your order with me, I will email you and ask which type of bundle you would like to receive All Occasion or All Christmas. NOTE: I am OUT OF CHRISTMAS designer series paper SO if you would like all Christmas Cards you will still get 12 cards and an All Occasion bundle. I will then send you a PayPal invoice for $5.00 to cover the cost of shipping. The 6 x 6 paper packs of All Occasion have approximately 1/2″ – 3/4″ thick of designer papers and the Christmas packs are approximately 1/2″ thick of designer papers, but I’ve also included 2 more cards in the pack.
Never miss a One Sheet Wonder Cards night again; subscribe to my YouTube Channel to get notified.
3 thoughts on “Ten Simply Stunning Fun Fold One Sheet Wonder Cards”
ABSOLUTELY GORGEOUS CARDS!!!! You’ve given me the best ideas for my cards for this year! Love the gold and green plaid.
Happy To Help! Thanks for commenting and happy Stamping!
Yay! Always happy to inspire someone. Happy Stamping!