

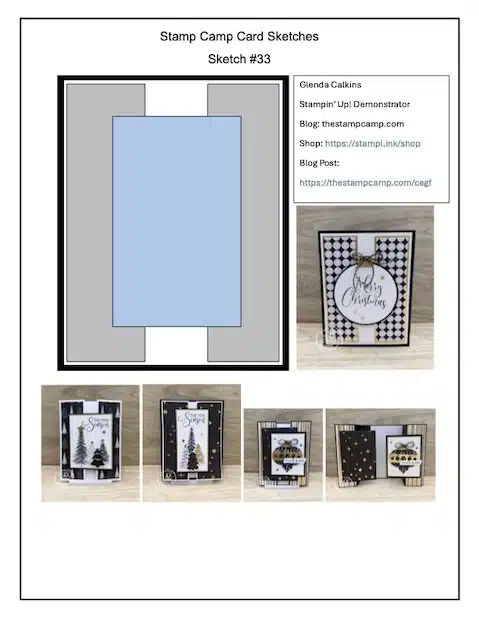
Welcome to another Card Sketch Wednesday here at The Stamp Camp! Each week I share a brand-new sketch along with multiple ways you can use it to create quick, beautiful, and versatile cards. Today we’re featuring Card Sketch #33, one of my favorite easy card sketch templates because you can keep it simple or step it up to create fun fold cards — perfect for any occasion.
What I love most about this sketch is how truly reusable it is. Change up your designer series papers and you’ll instantly achieve a whole new look and feel, all while using the exact same layout. It’s the perfect starting point whether you’re a beginner stamper or a seasoned crafter.
For today’s samples, I’m crafting with the Modern Christmas Suite. The Modern Christmas 12″ x 12″ Designer Series Paper is absolutely stunning with its black, white, and gold foil prints. The coordinating Ornamental Christmas Bundle pairs beautifully with the patterns in the paper, making designing effortless. To top it off, the Black, White & Gold Baker’s Twine adds the perfect accent — especially for hanging ornaments or adding a little festive detail.
Don’t Forget Your Printable Card Sketch!
Print it out, slip it inside a page protector, and add it to your 3-ring binder so you always have a handy cardmaking resource right in your craft room. Over time, you’ll build a whole library of sketches you can flip through anytime you need inspiration.
To download and print Sketch #33 Click HERE
To download and print Sketch #32 Click HERE
To download and print Sketch #31 Click HERE
To download and print Sketch #30 Click HERE
To download and print Sketches #21 – #30 Click HERE
To download and print Sketches #11 – #20 Click HERE
To download and print Sketches #1 – #10 Click HERE
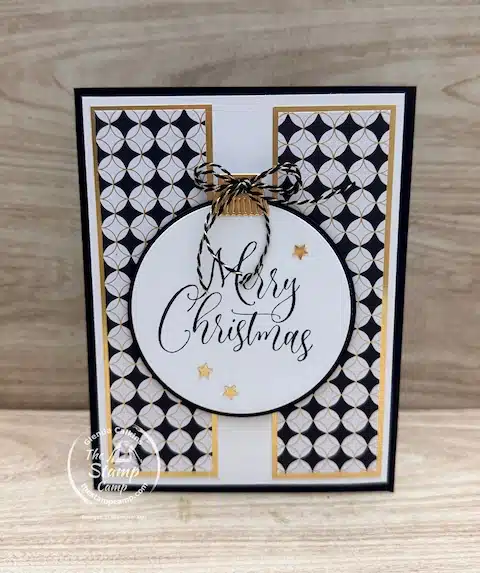
Card #1 – The Basic Sketch Made Beautiful
Card #1 is always the simplest version of the sketch and follows Card Sketch #33 exactly, making it perfect for beginners or anyone looking for a quick, elegant card.
I started with a Basic Black card base measuring 5 1/2″ x 8 1/2″, scored at 4 1/4″. On the card front, I added a Basic White layer cut to 4″ x 5 1/4″.
Next, I adhered two strips of the Modern Christmas Designer Series Paper, each measuring 1 3/8″ x 4 7/8″, and layered them onto Gold Foil strips cut to 1 1/2″ x 5″. These perfectly align with the sketch layout.
The only variation from the original sketch is the center focal point. Instead of a rectangle, I chose a circle die cut from the Ornamental Christmas Bundle and layered it onto the largest stitched circle from the Stylish Shapes Dies. I topped the ornament with a Gold Foil hanger, stamped Merry Christmas in Black Memento ink, and added a few Gold Shaker Stars for shimmer.
To finish it off, I tied a double bow using the Black & Gold Baker’s Twine and adhered it to the top of the ornament—simple yet stunning!
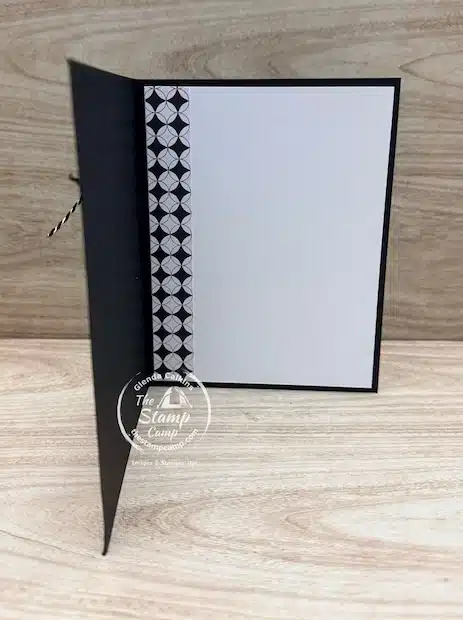
For the inside of the card, I added another piece of Basic White cardstock measuring 4″ x 5 1/4″. To tie the inside to the card front, I adhered a coordinating strip of the Modern Christmas Designer Series Paper cut to 3/4″ x 5 1/4″ along the side edge. It’s a simple touch that adds polish and brings the whole design together.
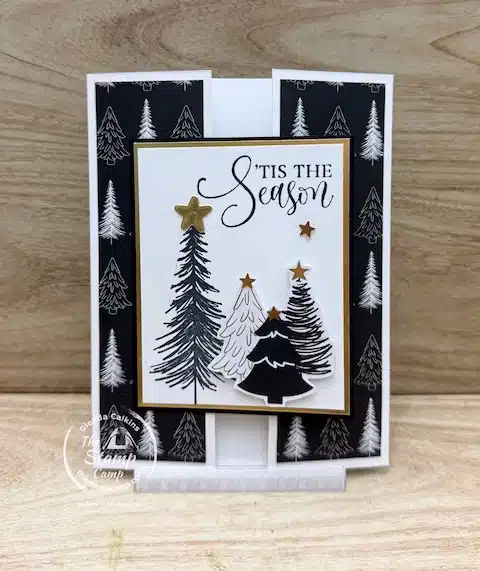
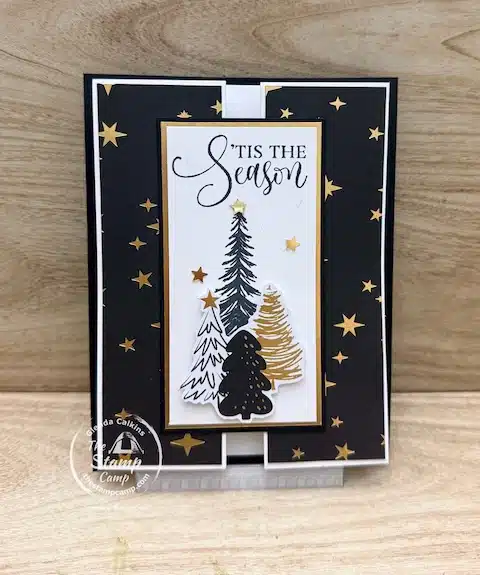
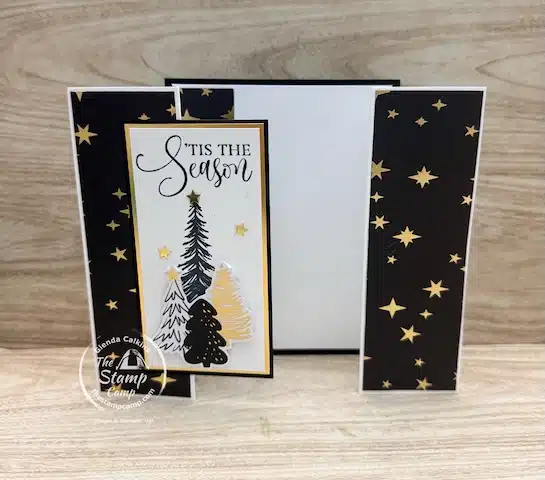
Card #2 – A Simple Gatefold Fun Fold
Card #2 steps things up with a clean and easy fun fold. The card base is Thick Basic White, cut to 5 1/2″ x 7 3/4″ and scored 1 3/4″ from both ends, creating a simple gatefold when folded inward.
On the two front flaps, I added panels of Modern Christmas Designer Series Paper measuring 1 1/2″ x 5 1/4″. These patterned panels frame the center focal piece beautifully when the card is closed.
Following the original sketch more closely this time, I layered a rectangle focal panel:
-
Basic Black: 3″ x 3 3/4″
-
Gold Foil: 2 7/8″ x 3 5/8″
-
Basic White: 2 3/4″ x 3 1/2″
On the white layer, I stamped the sentiment in Black Memento ink and added a tree image on the left. For the dimensional tree cluster on the right, I fussy cut one of the tree groupings directly from the Modern Christmas Designer Series Paper and popped it up with dimensionals. It adds just the right amount of texture and focus.
To finish the card, I sprinkled on a few gold star sequins, along with one slightly larger die-cut star from Gold Foil, giving the card a polished, festive sparkle.
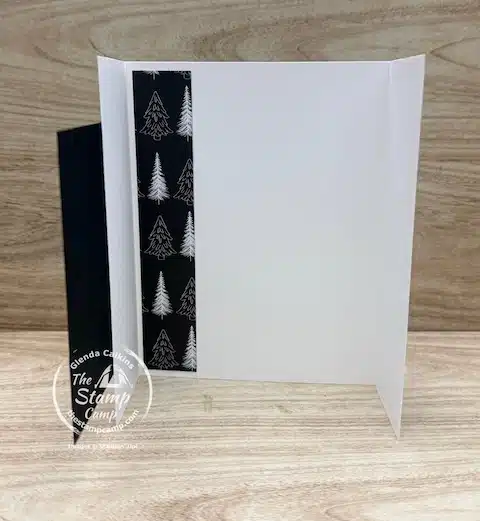
Since the card base is Basic White, I kept the inside clean and simple. I added a 3/4″ x 5 1/4″ strip of the coordinating Modern Christmas Designer Series Paper along the left-hand side. It brings the design from the front to the inside without overwhelming the space for your message.
Card #3 – A Stepped-Up Gatefold Variation
Card #3 is another fun take on a gatefold design, built from a single piece of Basic White cardstock measuring 5 1/4″ x 11″. Score this piece at 1 3/4″, 3 1/2″, 7 1/2″, and 9 1/4″.
To assemble the fold:
-
Fold the 3 1/2″ and 7 1/2″ score lines inward toward the center.
-
Fold the 1 3/4″ and 9 1/4″ score lines outward.
This creates a layered gatefold with movement and dimension.
Next, adhere two pieces of Modern Christmas Designer Series Paper, each cut to 1 5/8″ x 5 3/8″, onto the outside front flaps. Once the folding and panels are complete, attach this entire piece to a Basic Black card base measuring 4 1/4″ x 5 1/2″.
For the focal rectangle on the front, layer the following:
-
Basic Black: 2 1/4″ x 4 1/4″
-
Gold Foil: 2 1/8″ x 4 1/8″
-
Basic White: 2″ x 4″
On the white layer, I stamped the sentiment using Black Memento ink and added the larger tree image. Then I hand-cut one of the tree groupings from the Modern Christmas Designer Series Paper and popped it up with dimensionals for added texture and interest.
A few Gold Star Sequins finish the card beautifully with just the right touch of sparkle.
For the inside of the card, I kept the design simple by adding a coordinating strip of the Modern Christmas Designer Series Paper along the left-hand side. It ties the inside to the card front and adds just the right touch of festive color without overwhelming your writing space.
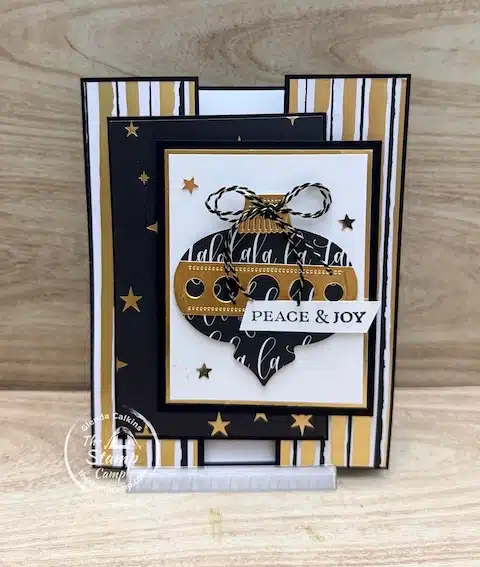
Card #4 – Double-Panel Gatefold Fun Fold
Card #4 is another gatefold-style fun fold, but this time with a twist—a double front panel that adds depth, movement, and a beautiful layered presentation.
The card base is Basic Black, cut to 5 1/2″ x 10 3/4″, and scored at 1 5/8″, 3 1/4″, 7 1/2″, and 9 1/8″. After folding on all score lines, you’ll see the structure form into a double-flap gatefold.
For the front flaps of the gatefold, adhere two panels of Modern Christmas Designer Series Paper cut to 1 1/2″ x 5 3/8″.
The two additional panels on the front are created from the leftover strip cut off when forming the card base. These pieces measure:
-
3″ x 4 1/2″ Basic Black
Larger panel: Add a Modern Christmas DSP piece cut to 2 7/8″ x 4 3/8″. -
3″ x 3 3/4″ Basic Black
Smaller top panel: Gold Foil layer measuring 2 3/4″ x 3 1/2″
Basic White piece: 2 5/8″ x 3 3/8″
-
For the ornament, I die-cut one of the Modern Christmas DSP prints and added a coordinating Gold Foil strip and ornament topper, both cut using the Ornamental Christmas Dies. The sentiment is stamped on a narrow strip of Basic White and adhered across the ornament.
To finish everything off, I added a double bow using the Black & Gold Baker’s Twine and sprinkled on a few Gold Star Sequins for that perfect festive sparkle.
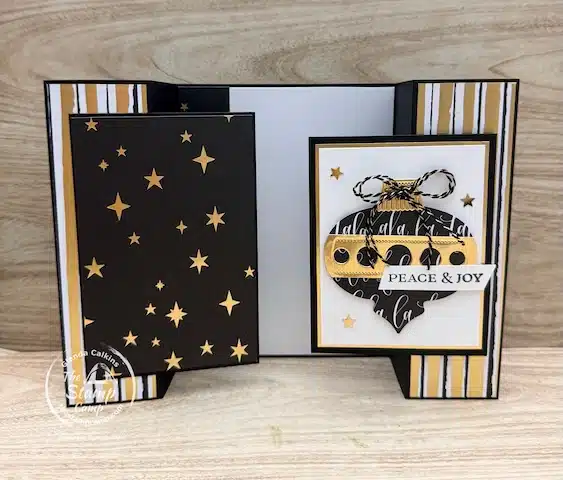
For the inside of the card, I added a piece of Basic White cardstock measuring 4″ x 5 1/4″. To tie it in with the card front, I adhered a coordinating strip of Modern Christmas Designer Series Paper, cut to 3/4″ x 5 1/4″, along the left-hand side. It adds a clean, festive touch without taking up writing space.
If you’d like to try these easy card sketch templates yourself, here’s a list of all the products I used for today’s cards.


Click on any of the supplies you wish to purchase and add them to your shopping cart.
Thank you so much for your order(s); your support is truly appreciated! Be sure to join me every Wednesday for another round of easy card sketch templates and all the creative possibilities you can make with them. Happy stamping!
FREE SHIPPING for 3 Days on ALL orders $75.00 or More (before shipping and tax)!

The Stamp Camp Customer Appreciation for December:
Place a min. $50.00 online order with me and I’ll send you a package of 12 handmade cards.
- Place your order December 8 – 31, 2025 and I’ll send you 12 All-Occasion cards.
Place your orders Here: https://stampl.ink/shop